
Understanding git
Git is a free and open source distributed version control system designed to handle everything from small to very large projects with speed and efficiency.
The basics
Git is a widely used version control system, with really powerful capabilities, but it can easily be confusing to use, if you don’t know what you’re doing.
Git works by creating snapshots of the current state of all files, every time you commit.
This also means that for larger projects you do not need to calculate mutliple diff’s on the same file over and over.
What this also means is that git does not rely on a remote server to do the calculations for you, since everything is stored in the .git directory.
This makes it possible to work offline as well, as opposed to some other VCS’s.
To initialize a repository
git init project-name
If this is your first ever using git, you first have to tell git who you are.
git config --global user.name "Tinggaard"
git config --global user.email [email protected]
Staging files
After making changes, add files or whole directories to the staging area, meaning their changes will be reflected in the next commit.
To add all Rust source files (.rs ending), inside the src/ directory, along with .gitignore run
git add src/*.rs .gitignore
Or if you are daring, add everything, by passing the -A/--all flag.
git add -A
To verify the current status of the staging area, before committing, status is used.
git status
The above command also shows if you have any local commits, that are not yet pushed to any remotes, or likewise if you are behind any remote.
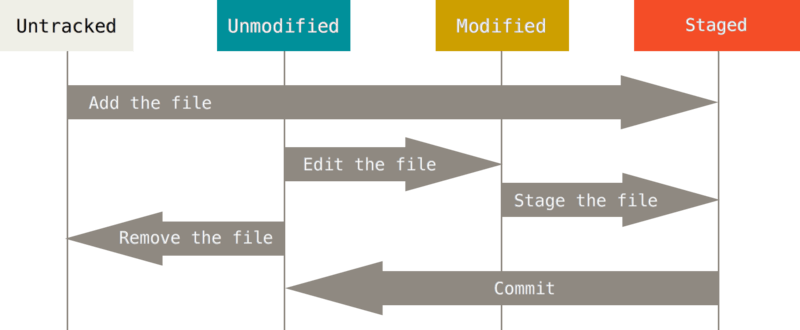
Note: If changes are made to a staged file, before committing, they will not be added to the commit, as the file has to be re-added. Otherwise the newest changes will not be added.
The git book also has a really great graphic, demonstrating the state of files.
Committing changes
Our changes are now ready to be committed, meaning their changes will be permanently (to some degree) saved.
Now we commit the staged changes, with the message “added .rs files and .gitignore”.
git commit -m "added .rs files and .gitignore"
A shorthand for almost all of the above, can be done, by adding the -a/--all flag to the commit command.
-a automatically stages any modified or deleted files, but does not add new files, which git does not know about.
git commit -am "message"
Working with remotes
Our changes are now committed locally, but if we want the changes to be reflected a on remote repository, we first have to tell git about it. GitHub and GitLab are among the most used platforms for this.
Say I created a new repository on my GitHub account, named “learning-git”, I can now add this as a remote to my local repo.
When doing this, I have to name my remote, origin is often used here.
git remote add origin https://github.com/tinggaard/learning-git
Or if your GitHub access is set up using an SSH key.
git remote add origin [email protected]:tinggaard/learning-git
Pushing and Pulling
To get the latest changes from origin locally, we use
git pull
The above command is actually a shorthand for the following two commands
git fetch # gets the remote's latest changes
git merge # applies the changes
Before pushing our local changes, we have to tell git which remote branch to use, using the -u/--set-upstream flag.
git push --set-upstream origin master
This only has to be done once.
From now on git knows which branch to use when pushing from our master, meaning we can simply use
git push
Cloning
Say you want to work on a repository that has already been created, a you’ll instead need to clone it, using the clone command.
git clone https://github.com/tinggaard/learing-git
The remote project will now be cloned into learning-git inside the current directory.
To choose another name for the local folder, simply append the name after the command.
git clone https://github.com/tinggaard/learning-git project
Note: The above commands also works with the SSH styling, as shown in the Working with remotes section.
Branches
Branching are very useful for implementing new features, without adding it directly to the master, before it has been tested and verified, so it won’t crash or interfere with the stable version.
Git automatically creates a branch for your first commit, this branch will be named master or main, if your repository was created on GitHub after to October 1. 2020.
You can change the name of the default branch on GitHub here
Before we dive into how to work with branches, let’s talk about what HEAD is.
For git to know what branch you are currently working on, it creates a pointer to said branch, using the HEAD, which can be thought of as a symlink.
This means that before creating another branch, your HEAD will point to master.
But once you create and switch to another branch, HEAD will now point to said branch.
Because all branches also point to a specific commit, it means that once you switch to another branch, git updates your working tree according to the commit the branch points to. And as each commit also has a parent commit (except for the initial commit), a full history of each branch can easily be viewed.
Creating and navigating braches
Say we want to create a new branch to implement a new feature, we’d first have to create the branch.
git branch feature
And then switch to it (change HEAD pointer).
git switch feature
There is also a shorter version, for doing both of these commands at once, using the -c option on the switch command.
git switch -c feature
To merge two braches, we first need to switch to the branch to apply the merge to, and then merge.
git switch master
git merge feature
To delete a branch, (if it has been merged, or you just don’t need it).
git branch -d feature
Workflow with branches
I’ll again be using some of the graphics from the git book, as they explain it really well.
In the following example, create a new branch (iss53), to work on issue #53.
After creating the branch, and committing some changes, our project looks like this.
git switch -c iss53 # HEAD still at C2 (iss53)
vim index.html # change files
git -am "Changed broken link #53" # HEAD now at C3 (iss53)
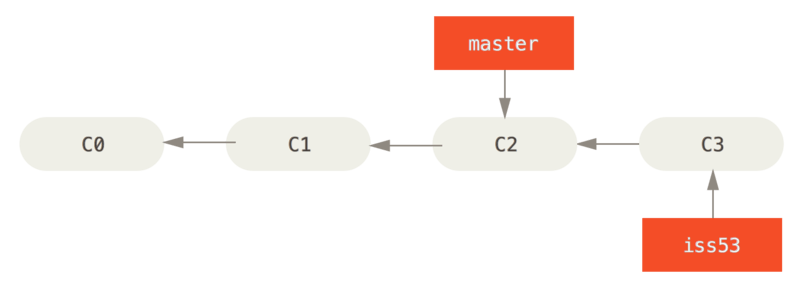
All the C’s represent commits.
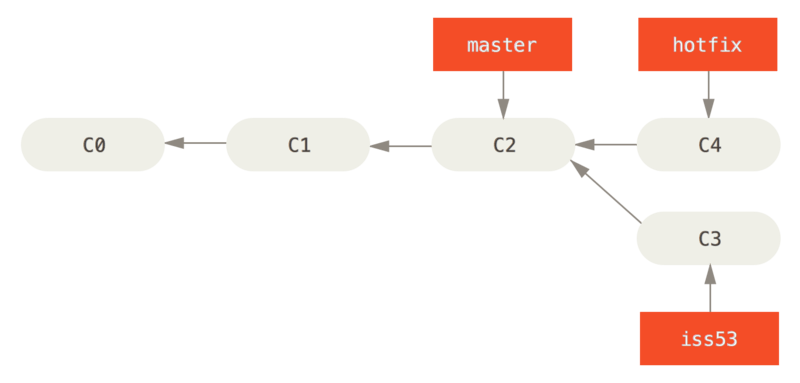
But now something happens, and you have to create a hotfix for your project, so you switch to the master, and create another new branch (hotfix), based on C2, and commit the changes.
git switch master # HEAD now at C2 (master)
git switch -c hotfix # HEAD still at C2 (hotfix)
vim index.html # change files
git commit -am "Hotfixed bug" # HEAD now at C4 (hotfix)
Our project now looks like this.
After the hotfix has been verified, we decide to apply it to the master, by merging the two branches.
git switch master # HEAD at C2 (master)
git merge hotfix # HEAD, master, and hotfix all at C4 (master)
Because C2 and C4 are directly related, git simply moves the pointer to master forward, to also point to C4.
This is called a “fast-forward”.
As we no longer have any use for the hotfix branch, we can delete it.
git branch -d hotfix
After this, we decide to go back to working on iss53, as more work still need to be done.
Another commit is made, and the issue is resolved.
git switch iss53 # HEAD at C3 (iss53)
vim index.html # change files
git commit -am "Apply formatting for new link #53" # HEAD now at C5 (iss53)
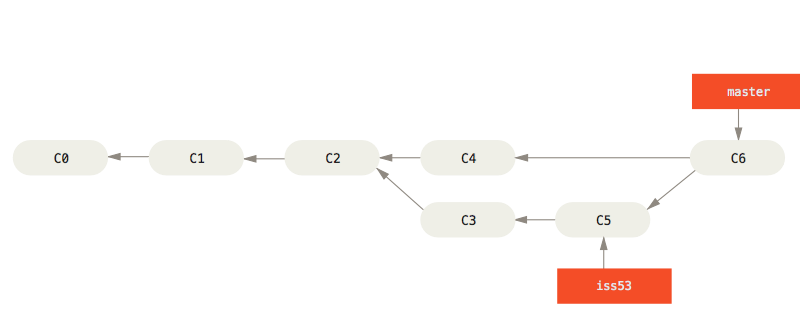
But this time, our merge is not nearly as clean, as our two branches (master and iss53), are not directly related.
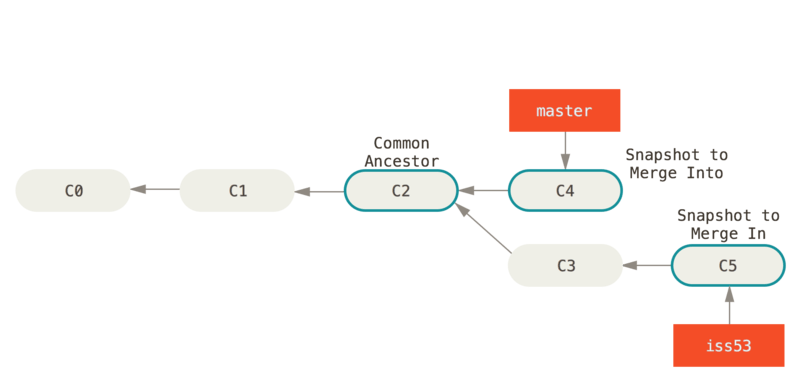
Git will have to do a “merge commit”, meaning it creates a new commit, referencing the merge. This is also special, because it has more than one parent (both C4 and C5).
git switch master # HEAD at C4 (master)
git merge iss53 # HEAD at C6 (master)
Git may complain if the two branches has merging conflicts, meaning they both change some of the same lines, and git does not know which version to keep.
If you have not changed your editor for git, it will most likely default to vim, which can be confusing if you haven’t used it before.
Luckily the default editor can be changed, using the command below (which sets it to VisualStudio Code - requires download)
git config --global core.editor "code --wait"
This states that the default editor (for the current user), should be code (VisualStudio Code), the --wait argument, passed so the command won’t return until the editor is closed.
Pull Requests
When working on a bigger project with a team, you would never just merge two branches and push it, but instead create a pull request (named “merge request” on GitLab). The name originates from the fact that you request the owner of the repository to pull your branch into their code.
The point of the pull request is to allow for a QA developer (Quality Assurance), to test the code and request further improvements, if needed or straight up reject it. The owner / QA can of course also accept it, and merge it.
By default git does not list remote branches, unless explicitly told to
git branch --all
It’s possible to switch to a remote branch using the <remote>/<branch> syntax.
git switch origin/development
Say we created a branch locally, which does not exist on the remote, we need to tell git to push the branch to the remote
git push origin local-branch
Likewise if you’ve deleted a branch locally (git branch -d local-branch), you also need to delete it explicitly on the remote
git push origin --delete local-branch
Undoing stuff
One of the most common things is committing and forgetting to add a file, or mess up the commit message.
To redo the latest commit, add any file you possible want to add to the commit, by using git add, and then commit again using the --amend option.
This overwrites the most recent commit, with the newly staged files included.
To keep the commit message from earlier, pass the --no-edit option as well.
--amend can also be used to edit the commit message, without adding new files.
git add forgotten_file
git commit --amend # -m "new message" or --no-edit
Unstaging
Say we changed multiple files, and only want to stage some of them, but accidentially added them all, so now we need to remove a file from the staging area, without undoing the changes made to the file itself.
For this we use git restore with the -S/--staged option.
git restore --staged file
Unmodifying
To reset a file entirely (to HEAD), we use almost the same command
git restore file
This can only be done for files that git already knows, like if it has been renamed or modified.
New files, cannot be deleted this way, but needs to be removed manually instead (rm file.ext), as git does not know about them.
To reset all files in the working tree to HEAD.
git restore .
Be careful! The above command will delete all unsaved work
Restoring old files
Files can also be restored from other commits/branches/tags, using the -s/--source option
git restore --source 4fed89a file # from commit checksum
git restore --source master~2 file # 2 commits beheind master
git restore --source HEAD~4 file # 4 commits beheind HEAD
git restore --source development file # development branch
git restore --source v1 file # v1 tag
This command can be combined with the -S/--staged option, to only restore the index (staging the file), instead of restoring it to the working tree.
Restoring to the working tree is the default, but can be enforced alongside the index, by using the -W/--worktree option.
# file visible, but not staged in `git status`
git restore --source master~2 staged file
# file not visible, but staged in `git status`
git restore --source master~2 --staged file
# file visible, and staged in `git status`
git restore --source master~2 --staged --worktree file
The ability to restore previous versions of files, is really great, but must be utilized with caution, as it can also damage any work done, if not used wisely.
Closing thoughts
I highly recommend reading (at least part of) the git book, as it gives a really great insight to how git works, and how to optimize your workflow.
Apart from that, man git <command> is really great for quickly looking up what the exact syntax is for that command you just forgot.
This was only a small insight to the powerhouse of git, it has much more to offer, but that is a topic for another day.